In the dynamic landscape of blockchain technology, creating and deploying custom tokens has become increasingly accessible. This guide will walk you through deploying and verifying a DogeCoin-inspired ERC20 token on the XDC Network using Hardhat. By following these steps, you'll gain practical insights into smart contract development and deployment on a real-world blockchain network.
Prerequisites:
Before diving into the deployment and verification process, ensure you have the following prerequisites in place:
Node.js and npm:
Install Node.js and npm (Node Package Manager) on your machine to execute commands and manage dependencies.Hardhat Installed:
Install Hardhat globally on your system using npm to leverage its powerful features for smart contract development and deployment.
Follow the steps to Compile, Deploy and verify your smart contract:
Step 1: Creating a Directory
Create a directory for your blockchain development project using the following command:
mkdir my-hardhat-project
Replace "my-hardhat-project" with the desired name for your project directory.
Step 2: Navigating into the Directory
Once the directory is created, navigate into it using the cd command:
cd my-hardhat-project
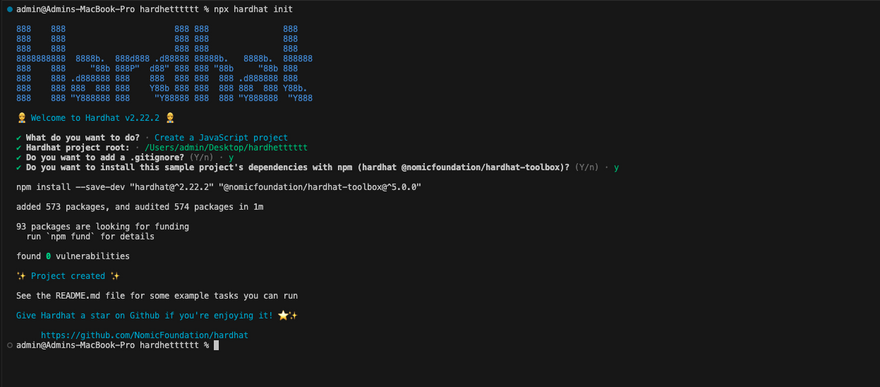
Step 3: Initializing Hardhat
Initialize Hardhat within your project directory by running the following command:
npx hardhat init
Choose the option to create a JavaScript project when prompted.
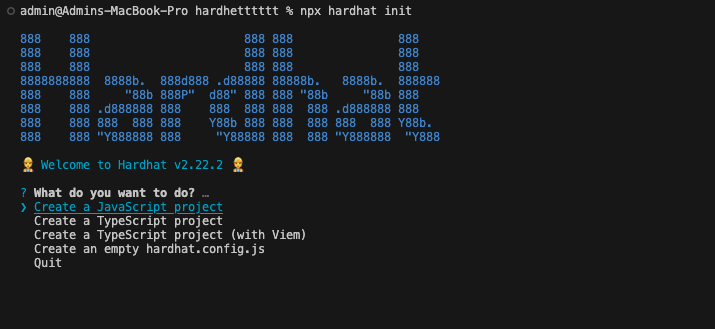
The initialized project has the following structure:
contracts/
ignition/modules/
test/
hardhat.config.js
These are the default paths for a Hardhat project.
contracts/ is where the source files for your contracts should be.
ignition/modules/ is where the Ignition modules that handle contract deployments should be.
test/ is where your tests should go.
Step 4: Create .env File
create a .env file and set the following environment variables:
PRIVATE_KEY=your_private_key
XDC_TESTNET_URL=https://apothem.xdcrpc.com
Replace PRIVATE_KEY with your private key.
Step 5: DogeCoin Contract Code
Rename the file contracts/lock.js to contracts/DogeCoin.sol and add the following code:
// SPDX-License-Identifier: MIT
pragma solidity ^0.8.0;

import "@openzeppelin/contracts/token/ERC20/ERC20.sol";

contract DogeCoin is ERC20 {
    constructor(uint256 initialSupply) ERC20("DogeCoin", "DOGE") {
        _mint(msg.sender, initialSupply);
    }
}
Step 6: Adding XDC Network Configuration
In your hardhat.config.js file, add the following configuration:
require('dotenv').config(); //all the key value pairs are being made available due to this lib
require('@nomiclabs/hardhat-ethers');
require("@nomiclabs/hardhat-etherscan");


module.exports = {
solidity: "0.8.20",
  networks: {
    apothem: {
      url: process.env.XDC_TESTNET_URL,
      accounts: [process.env.PRIVATE_KEY]
    }
  },
  etherscan: {
    apiKey: {
      apothem: "abc",
      devnet: "abc",
      xdc: "abc",
    },
    customChains: [
      {
        network: "apothem",
        chainId: 51,
        urls: {
          apiURL: "https://abapi.blocksscan.io/api",
          browserURL: "https://apothembeta.blocksscan.io/",
        },
      },
      {
        network: "devnet",
        chainId: 551,
        urls: {
          apiURL: "https://devnetapi.blocksscan.io/api",
          browserURL: "https://devnet.blocksscan.io/",
        },
      },
      {
        network: "xdc",
        chainId: 50,
        urls: {
          apiURL: "https://bapi.blocksscan.io/api",
          browserURL: "https://beta.blocksscan.io/",
        },
      },
    ],
  },
};
Step 7: Installing Dependencies
Install the necessary dependencies by running the following commands:
npm install dotenv
npm install --save-dev @nomiclabs/hardhat-ethers --force
npm install --save-dev @nomiclabs/hardhat-etherscan --force
npm install --force @openzeppelin/contracts
npm install --save-dev ethers@^5.7.2
Step 8: DogeCoin Deploy Script
Create a deploy script test/deploy.js and add the following code:
const { ethers } = require("hardhat");

async function main() {
  const DogeCoin = await ethers.getContractFactory("DogeCoin");
  const dogeCoin = await DogeCoin.deploy(1000000); // Initial supply: 1,000,000 tokens

  await dogeCoin.deployed();

  console.log("DogeCoin deployed to:", dogeCoin.address);
  console.log("DogeCoin deployed to HASH:", dogeCoin.deployTransaction.hash);
}

main().then(() => process.exit(0)).catch(error => {
  console.error(error);
  process.exit(1);
});
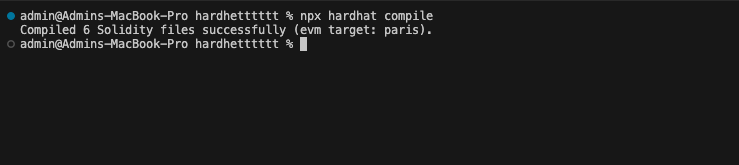
Step 9: Compiling Smart Contracts
Compile your smart contracts for deployment and testing using the following command:
npx hardhat compile
Once command run successfully, you’ll see output similar to the following:
After the initial compilation, Hardhat will try to do the least amount of work possible the next time you compile. For example, if you didn't change any files since the last compilation, nothing will be compiled:

To force a compilation you can use the --force argument, or run npx hardhat clean to clear the cache and delete the artifacts.
Step 9: Deploying Smart Contracts
Deploy your compiled smart contract by running the deploy script:
npx hardhat run test/deploy.js --network apothem
After running the command, you should receive output similar to the following:
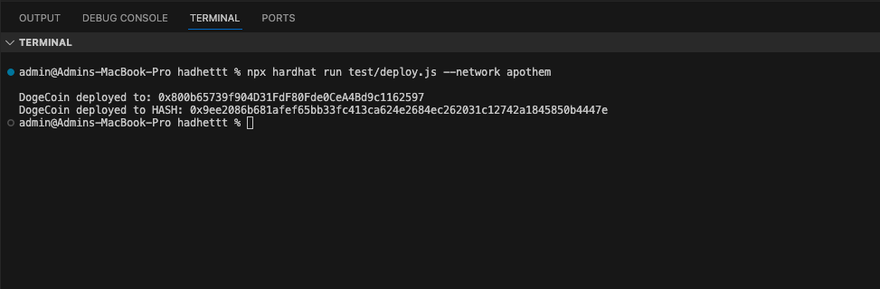
After deploying the contract, you will receive a transaction hash. To verify the contract deployment, you can check the BlocksScan explorer using this transaction hash.
Step 10: Verifying Smart Contracts
Verify your deployed smart contract by following these steps:
- Open and review the deploy.js file located inside the test folder.
- Identify the parameter passed to the constructor of the DogeCoin contract during deployment.
- Include this parameter in the verification command:
npx hardhat verify --network apothem DEPLOYED_CONTRACT_ADDRESS 1000000
Replace DEPLOYED_CONTRACT_ADDRESS with your contract address.


Congratulations! By successfully deploying your smart contracts on the XDC Network using Hardhat, you've achieved a significant milestone in your blockchain development journey. This article has provided you with the necessary skills to navigate Hardhat's robust toolset and harness the capabilities of the XDC Network efficiently. As you continue to explore decentralized applications (DApps) and smart contract development, remember to remain curious, continuously learn, and embrace the endless possibilities that this groundbreaking technology presents. If you have any questions or need assistance, don't hesitate to leave a comment below or connect with us on social media by tagging XDC Network. Happy coding!
Follow us to know more updates:


Discussion (0)