In the fast-evolving world of blockchain technology, crafting and deploying personalized tokens has never been easier. This guide will take you on a journey through deploying and authenticating a Pepe token, inspired by the popular meme, on the XDC Network using Hardhat. By following these steps, you'll delve into the realm of smart contract development and deployment on a real-world blockchain platform.
Prerequisites:
Before initiating the deployment and validation process, ensure that you have the following prerequisites in place:
Node.js and npm:
Install Node.js and npm (Node Package Manager) on your machine to execute commands and manage dependencies efficiently.Hardhat Installed:
Globally install Hardhat on your system using npm to leverage its robust features for smart contract development and deployment.
Follow these steps to compile, deploy, and verify your smart contract:
Step 1: Creating a Project Directory
Start by creating a directory for your blockchain project using the following command:
mkdir my-pepe-project
Replace my-pepe-project with your desired project directory name.
Step 2: Navigating into the Directory
Once the directory is created, navigate into it using the cd command:
cd my-pepe-project
Step 3: Initializing Hardhat
Initialize Hardhat within your project directory by running the following command:
npx hardhat init
Choose to create a JavaScript project when prompted.
C:\Users\admin\Desktop\hardhat>npx hardhat init
Need to install the following packages:
hardhat@2.22.2
Ok to proceed? (y)
888    888                      888 888               888
888    888                      888 888               888
888    888                      888 888               888
8888888888  8888b.  888d888 .d88888 88888b.   8888b.  888888
888    888     "88b 888P"  d88" 888 888 "88b     "88b 888
888    888 .d888888 888    888  888 888  888 .d888888 888
888    888 888  888 888    Y88b 888 888  888 888  888 Y88b.
888    888 "Y888888 888     "Y88888 888  888 "Y888888  "Y888

Welcome to Hardhat v2.22.2

√ What do you want to do? · Create a JavaScript project
√ Hardhat project root: · C:\Users\admin\Desktop\hardhat
√ Do you want to add a .gitignore? (Y/n) · y
√ Help us improve Hardhat with anonymous crash reports & basic usage data? (Y/n) · y
√ Do you want to install this sample project's dependencies with npm (hardhat @nomicfoundation/hardhat-toolbox)? (Y/n) · y
The initialized project has the following structure:
contracts/
ignition/modules/
test/
hardhat.config.js
These are the default paths for a Hardhat project.
- contracts/ is where the source files for your contracts should be.
- ignition/modules/ is where the Ignition modules that handle contract deployments should be.
- test/ is where your tests should go.
Step 4: Creating a .env File
Generate a .env file and define the following environment variables:
PRIVATE_KEY=your_private_key
XDC_TESTNET_URL=https://apothem.xdcrpc.com
Replace your_private_key with your private key.
Step 5: Pepe Token Contract Code
Rename the file contracts/lock.js to contracts/PepeToken.sol and insert the provided code.
// SPDX-License-Identifier: MIT
pragma solidity ^0.8.0;

import "@openzeppelin/contracts/token/ERC20/ERC20.sol";

contract PepeToken is ERC20 {
    constructor(uint256 initialSupply) ERC20("PepeToken", "PEPE") {
        _mint(msg.sender, initialSupply);
    }
}
Step 6: Adding XDC Network Configuration
In your hardhat.config.js file, append the provided configuration.
require('dotenv').config();
require('@nomiclabs/hardhat-ethers');
require("@nomicfoundation/hardhat-verify");

module.exports = {
    solidity: "0.8.24",
    networks: {
        apothem: {
            url: process.env.XDC_TESTNET_URL,
            accounts: [process.env.PRIVATE_KEY]
        }
    },
    etherscan: {
        apiKey: {
            apothem: "abc",
            devnet: "abc",
            xdc: "abc",
        },
        customChains: [
            {
                network: "apothem",
                chainId: 51,
                urls: {
                    apiURL: "https://abapi.blocksscan.io/api",
                    browserURL: "https://apothembeta.blocksscan.io/",
                },
            }
        ],
    },
    sourcify: {
        enabled: false
    }
};
Step 7: Installing Dependencies
Install the required dependencies by running the provided commands.
npm install dotenv
npm install --save-dev @nomiclabs/hardhat-ethers --force
npm install --save-dev @nomicfoundation/hardhat-verify --force
npm install --force @openzeppelin/contracts
npm install --save-dev ethers@^5.7.2
Step 8: Pepe Token Deployment Script
Create a deployment script test/deploy.js and include the provided code.
const { ethers } = require("hardhat");

async function main() {
 const PepeToken = await ethers.getContractFactory("PepeToken");
 const pepeToken = await PepeToken.deploy(1000000); // Initial supply: 1,000,000 tokens

 await pepeToken.deployed();

 console.log("PepeToken deployed to:", pepeToken.address);
 console.log("PepeToken deployed to HASH:", pepeToken.deployTransaction.hash);
}

main().then(() => process.exit(0)).catch(error => {
 console.error(error);
 process.exit(1);
});
Step 9: Compiling Smart Contracts
Compile your smart contracts for deployment and testing using the following command:
npx hardhat compile
Upon successful execution, you'll witness an output similar to the one below:
PS C:\Users\admin\Desktop\hardhat> npx hardhat compile
Compiled 1 Solidity file successfully (evm target: paris).
Step 10: Deploying Smart Contracts
Deploy your compiled smart contract by executing the deployment script:
npx hardhat run test/deploy.js --network apothem
After it's done running successfully, you'll see output something like this:
PS C:\Users\admin\Desktop\hardhat> npx hardhat run test/deploy.js --network apothem
Compiled 6 Solidity files successfully (evm target: paris).
PepeToken deployed to: 0xB172ed448de08306d996E1C54cb38e08Fa94C79e
PepeToken deployed to HASH: 0x5e9655182018d7861b3b4ff4b1fb72d465d37ef558619a886f7a2c49e2112856
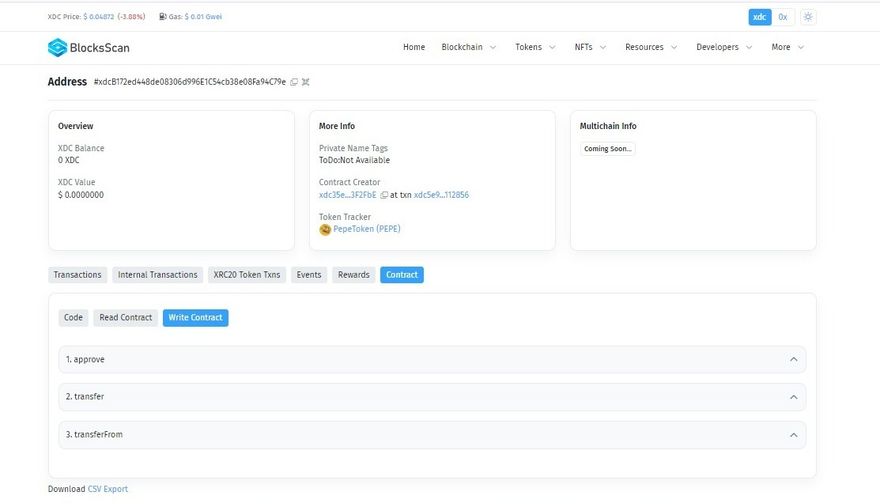
Upon deployment, you'll receive a transaction hash. To verify the contract deployment, scrutinize the BlocksScan explorer using this hash.
Step 11: Verifying Smart Contracts
Verify your deployed smart contract following the provided steps.
- Open and scrutinize the deploy.js file situated inside the test folder.
- Identify the parameter passed to the constructor of the PepeToken contract during deployment.
- Include this parameter in the verification command:
npx hardhat verify --network apothem DEPLOYED_CONTRACT_ADDRESS 1000000
Once the verification is successful, you'll receive an output similar to the one below:
PS C:\Users\admin\Desktop\hardhat> npx hardhat verify --network apothem 0xB172ed448de08306d996E1C54cb38e08Fa94C79e 1000000
Successfully submitted source code for contract
contracts/PepeToken.sol:PepeToken at 0xB172ed448de08306d996E1C54cb38e08Fa94C79e
for verification on the block explorer. Waiting for verification result...

Successfully verified contract PepeToken on the block explorer.
https://apothembeta.blocksscan.io/address/0xB172ed448de08306d996E1C54cb38e08Fa94C79e#code

Congratulations on successfully deploying your smart contracts on the XDC Network using Hardhat! This achievement marks a significant milestone in your blockchain journey. Armed with the skills to navigate Hardhat's robust toolset and harness the capabilities of the XDC Network efficiently, you're well-equipped to explore decentralized applications (DApps) and smart contract development further. Keep your curiosity alive, continue learning, and embrace the endless possibilities offered by this groundbreaking technology. For queries or assistance, feel free to leave a comment below or connect with us on social media by tagging XDC Network. Happy coding!
Follow us to know more updates:


Discussion (0)