WSL lets developers run a Linux environment directly on Windows, unmodified, without the overhead of a traditional virtual machine or dual boot setup. With WSL, Windows 10/11 users are able to run a Linux Virtual Machine without performance loss and the need for dual boot. See here for more detail about WSL.
What is XinFin — XDC Network?
The XinFin XDC Network is an open-source, carbon-neutral, enterprise-grade, EVM-compatible, Layer 1 blockchain that has been operationally successful since 2019. It obtains consensus via a specially delegated proof-of-stake (XDPoS) technique that allows for 2-second transaction times, near-zero gas expenses, over 2000 TPS, and interoperability with ISO 20022 financial messaging standards.
What is RPC?
RPC(Remote Procedure Call) nodes are a crucial component of the blockchain network, enabling users to communicate with the network in a secure and trustless way and developers to send transactions, perform smart contracts, and retrieve data on the blockchain. Without them, there would be a higher risk of attack and manipulation on the blockchain network.
Let’s, start the WSL Installation:
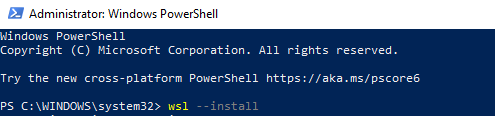
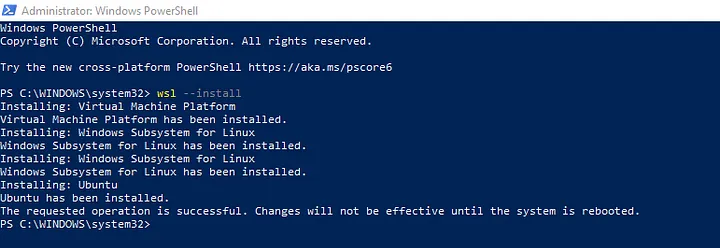
- Open PowerShell or Windows Command Prompt in administrator mode by right-clicking and selecting “Run as administrator”, enter the wsl — install command, then restart your machine.
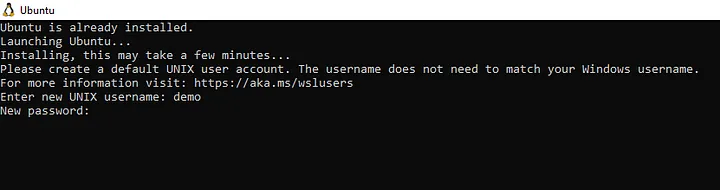
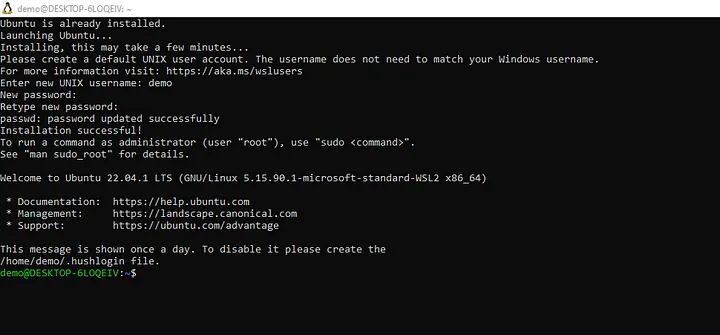
- Start WSL After the installation, type wsl on the Powershell or the Command prompt.
Note that the first time WSL is executed, you will be asked to create a new default username/password.
Installed successfully:
Install Ubuntu from Windows Store
Alternatively, after WSL is installed, search for Ubuntu in the Windows Store and install it as an app in the Start menu.
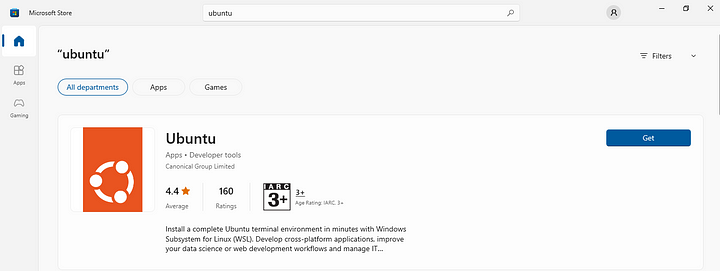
While installing, it will restart your system, so don’t worry about it. Now, it will ask to set the username and password.
Let’s start to Setup RPC:
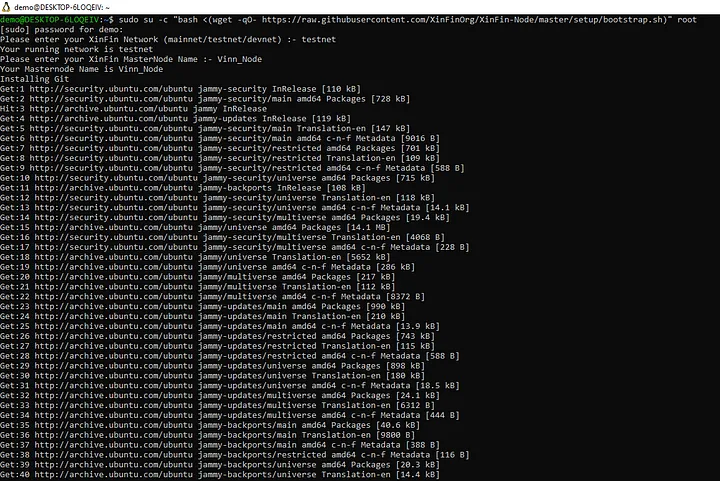
Step 1: Setting up the full node with the Bootstrap command on XinFin(XDC) Apothem Network, enter below command.
sudo su -c “bash <(wget -qO- https://raw.githubusercontent.com/XinFinOrg/XinFin-Node/master/setup/bootstrap.sh)" root
Example:
demo@DESKTOP-6LOQEIV:~$ sudo su -c "bash <(wget -qO- https://raw.githubusercontent.com/XinFinOrg/XinFin-Node/master/setup/bootstrap.sh)" root
[sudo] password for demo:
Please enter your XinFin Network (mainnet/testnet/devnet) :- testnet
Your running network is testnet
Please enter your XinFin MasterNode Name :- Vinn_Node
Your Masternode Name is Vinn_Node
Now, this will Install all the related files like Installing Git, Clone XinFin Node, Installing Docker, etc…
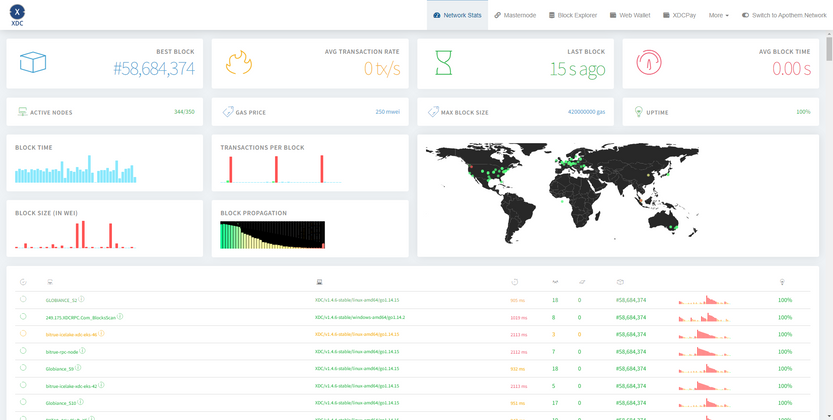
Once all the files installation Done, Your node will be appear on XinFin Network Stats(https://apothem.network/#stats).
You can check the Node status by entering below command:
sudo docker ps
Same way you can Setup RPC for mainnet.
For Mainnet:
demo@DESKTOP-6LOQEIV:~$ sudo su -c "bash <(wget -qO- https://raw.githubusercontent.com/XinFinOrg/XinFin-Node/master/setup/bootstrap.sh)" root
[sudo] password for demo:
Please enter your XinFin Network (mainnet/testnet/devnet) :- mainnet
Your running network is mainnet
Please enter your XinFin MasterNode Name :- Vinn_Node
Your Masternode Name is Vinn_Node
Once all the files installation Done, Your node will be appear on XinFin Network Stats
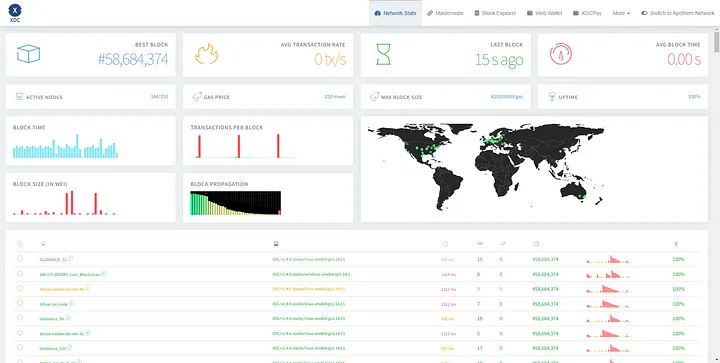
Follow the snapshot steps to get your full node to sync faster
- sudo docker-compose -f docker-compose.yml down
- wget https://download.xinfin.network/xdcchain.tar
- tar -xvzf xdcchain.tar
- rm -rf xdcchain/XDC
- mv XDC xdcchain/XDC
- sudo docker-compose -f docker-compose.yml up -d
After downloading the snapshot, monitor your node on the stats page. Once your node is fully synced, you can start using the dedicated RPC for your Dapp. Please note that the RPC port used is 8989, and for WebSocket, the port used is 8888.
To enable the 0x prefix RPC Endpoint, you can add the flag “ — enable-0x-prefix” to your “startnode.sh” script. This will allow the RPC Endpoint to recognize and process 0x-prefixed addresses.
Here are some Public RPCs, you can use it for your Dapps:
Mainnet:
Testnet/Apothem Network:
Alternatively, you can use below RPC’s which is highly recommended for Dapps.
However, using these public endpoints may come with some drawbacks, such as:
- Limited access: Public RPC endpoints may have rate limits, which can limit the number of requests that can be made within a certain time period.
- Security concerns: Public endpoints are accessible to anyone, which can increase the risk of attacks such as DDoS (Distributed Denial of Service).
- Privacy concerns: Public endpoints may not provide full privacy, as the data transmitted over the network can be monitored and tracked.
To address these concerns, it may be advisable for dapp developers to set up their own custom RPC endpoints. By setting up a custom RPC endpoint, developers can have more control over the network, improve security and privacy, and ensure reliable access to the blockchain.
To set up a custom RPC endpoint, a developer would need to have access to a node on the blockchain network. The exact process for setting up a custom RPC endpoint would depend on the specific blockchain network being used. However, in general, the process would involve configuring the node to listen on a specific port and enabling RPC access.
Once the custom RPC endpoint is set up, a developer can use it to interact with the blockchain in their dapp code. For example, in a dapp built on XDC, the web3.js library can be used to connect to a custom RPC endpoint. Here’s an example of how to use web3.js to connect to a custom RPC endpoint:
const Web3 = require('web3');

const rpcEndpoint = 'https://custom.rpc.endpoint.com'; // replace with your custom RPC endpoint URL
const web3 = new Web3(new Web3.providers.HttpProvider(rpcEndpoint));

// now you can use web3 to interact with the blockchain
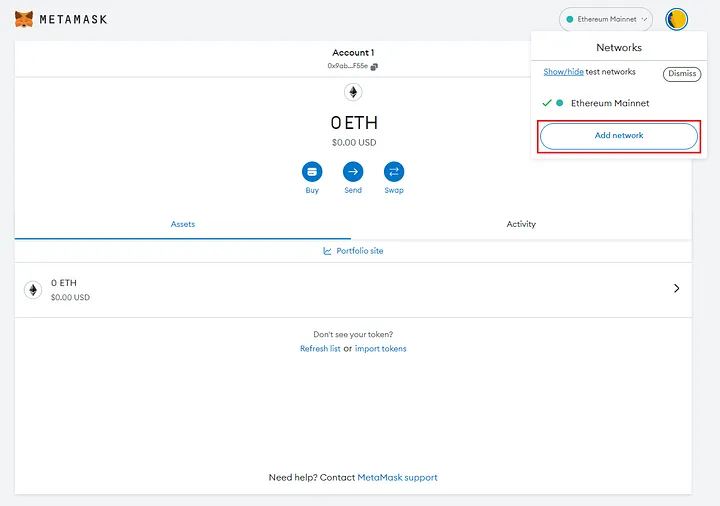
Also we can use RPC URL with Dapp like Metamask, Enkrypt by adding the XDC Network manually:
Access the Dapp/Metamask and click on the Network to add XDC Network manually with RPC endpoint.
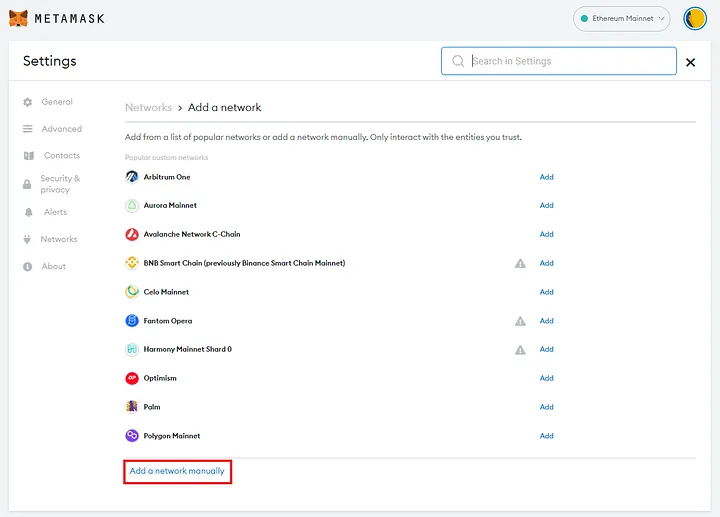
Click on the “Add a network manually”.
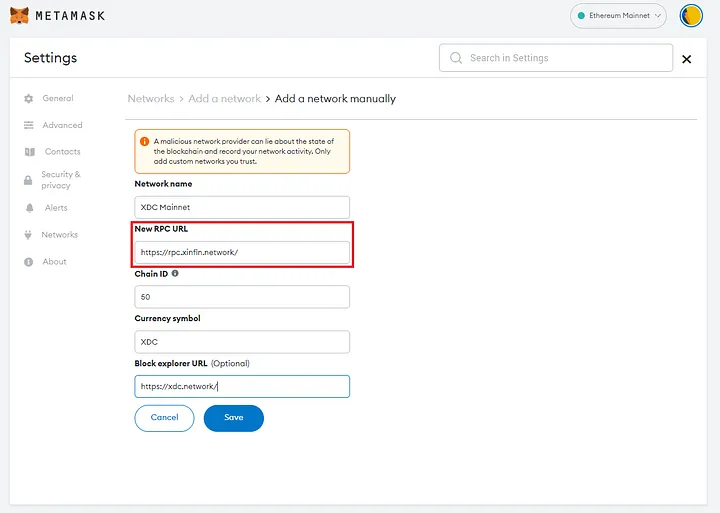
Enter the details with rpc endpoint url and click on Save button.
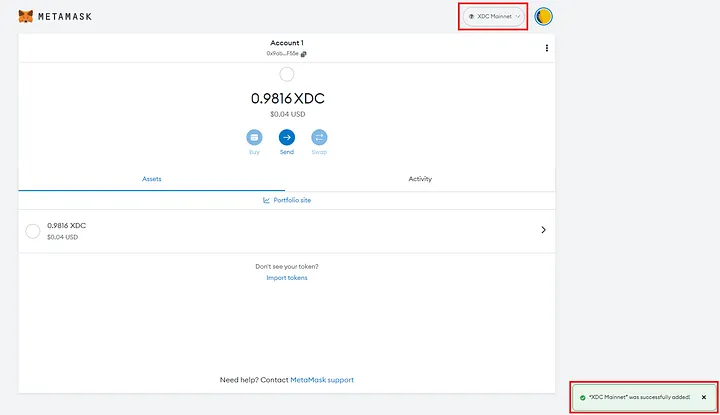
This is how we can use RPC to access the Network.
For any developer support, post your queries here at XDC.Dev
Important Links related to XDC Network


Discussion (1)