The XDC network is gaining popularity as a fast, scalable, and cost-effective blockchain platform. With its Apothem network, developers can build decentralized applications (dApps) that leverage the benefits of XDC’s ecosystem. In this article, we will guide you through the process of deploying an XRC721 contract on the XDC Apothem network using Truffle, a popular development framework. By the end of this tutorial, you will be able to create and deploy your own non-fungible tokens (NFTs) on XDC.
What is NFT?
NFT stands for Non-Fungible Token. It is a unique digital asset that represents ownership or proof of authenticity for a specific item or piece of content, such as collectibles, or virtual real estate, on a blockchain. Unlike cryptocurrencies like Bitcoin or Ethereum, NFTs are indivisible and cannot be exchanged on a one-to-one basis due to their unique properties. NFTs have gained popularity for their ability to establish verifiable ownership and provide new opportunities for creators and collectors in the digital realm.
Before we begin, ensure that you have the following prerequisites:
In order to create a Truffle project, we need NPM and Node on our local machine. You can download both for free.
$ node -v
$ npm -v
Wallet and Testnet XDC:
To successfully transfer contacts onto Apothem, it is essential to authorize transactions and cover the associated gas expenses. To accomplish this, it is imperative to possess a cryptocurrency wallet capable of accommodating the gas currency.
One of the highly acclaimed options for a self-custodial wallet in the current market is BlocksPay. Renowned for its popularity, BlocksPay is not only free but also offers a secure and user-friendly experience. Accessible as a browser extension, you can conveniently download BlocksPay to avail its benefits.
For users who are new to BlocksPay, the wallet setup process includes a series of guided steps to ensure a seamless experience. As you progress, Blockspay will offer the opportunity to enhance the security of your wallet. It is crucial to take advantage of this option and diligently save your wallet’s secret recovery phrase. This recovery phrase will play a significant role in subsequent steps, so its preservation is essential.
Once you unlock your wallet, you will see the dashboard screen. On the top center of your BlocksPay window, click on the Network dropdown and select the XDC Apothem network.

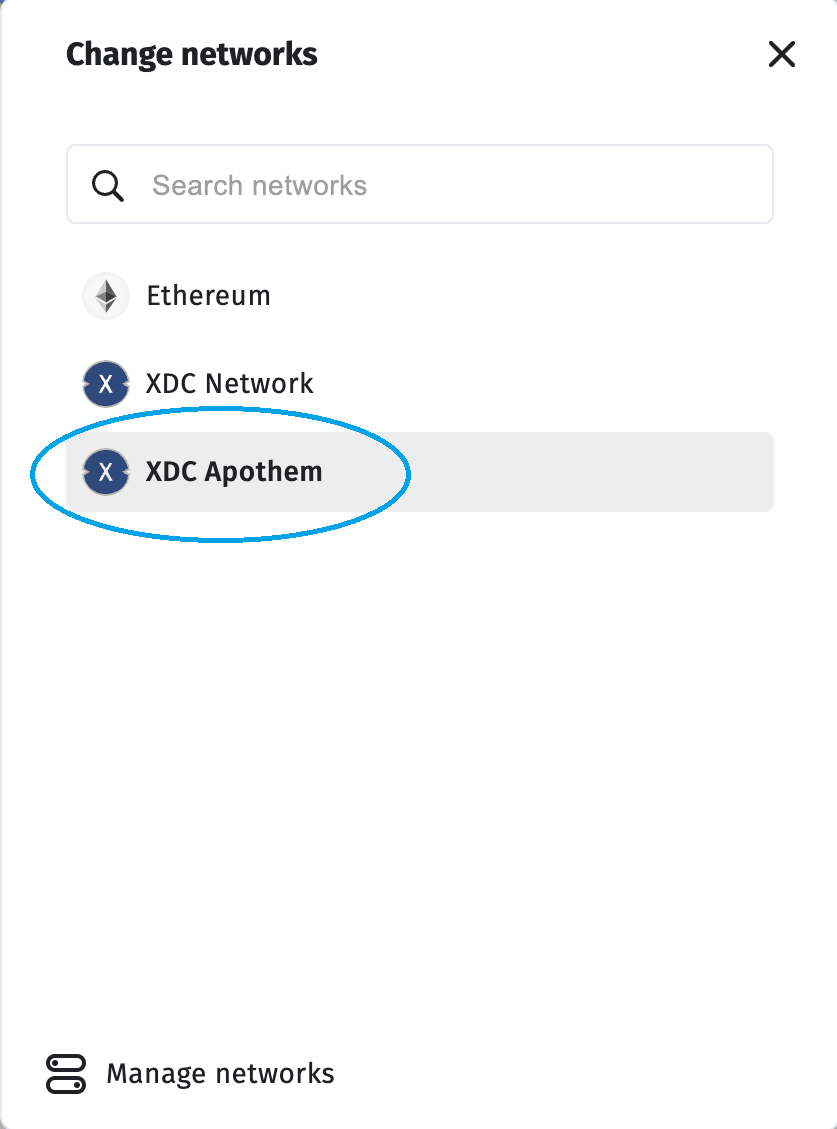
As you may have already guessed, BlocksPay comes automatically configured with the XDC Apothem testnet. We don’t have to do any additional configuration.
Upon your initial usage of Apothem, you will notice a balance of 0 XDCT. However, we can rectify this by obtaining a portion of free XDCT from the Faucet.
Step 1: Set up the project
Let’s start by setting up a new project directory for our XRC721 contract. Open your terminal and create a new directory for the project:
mkdir xdc-apothem-nft

cd xdc-apothem-nft
Once inside the project directory, initialize a new Truffle project with given command:
$ npm install -g truffle

$ truffle init

$ npm install dotenv

$ npm install @openzeppelin/contracts @truffle/hdwallet-provider dotenv
This will create the necessary project structure for us to work with.
Step 2: Configure Truffle for XDC Apothem network
To ensure our Truffle project can interact with the XDC Apothem Network, we need to configure it properly. Follow the steps below:
Create a new file in the project’s root directory named .env.
Add the following contents to the .env file:
MNEMONIC=” YOUR METAMASK WALLET RECOVERY PHRASE ”
Within the networks section, add the configuration for the
Apothem network. Here’s an example configuration:
javascript
module.exports = {
  networks: {
    development: {
      host: "127.0.0.1",
      port: 8545,
      network_id: "*"
    },
    apothem: {
      provider: () => new HDWalletProvider("<your-mnemonic>", "https://apothem.xdcrpc.com/"),
      network_id: 1666700000,
      gasPrice: 1000000000,
      gas: 8000000
    }
  },
};
Replace <your-mnemonic> with your wallet mnemonic or private key. The gasPrice and gas values can be adjusted according to your needs.
Step 3: Write the XRC721 contract
In this step, we will write the XRC721 contract that will define our NFTs. Create a new Solidity file called ApothemNft.sol in the contracts directory of your project.
XDC Network is EVM Compatible, So here in ApothemNft.sol, we are importing the necessary libraries and defining the ERC721 contract. Here’s a basic example:
// SPDX-License-Identifier: MIT

pragma solidity ^0.8.0;

import "@openzeppelin/contracts/token/ERC721/extensions/ERC721URIStorage.sol";
import "@openzeppelin/contracts/utils/Counters.sol";

contract ApothemNft is ERC721URIStorage {
    using Counters for Counters.Counter;
    Counters.Counter private _tokenIds;
    string private _metadataUrl;

    constructor() ERC721("Apothem NFT", "ANFT") {

        // Set metadata of the NFT
        _metadataUrl = "ipfs://QmUyZoK21qb8YknXGfDB34RTY8vMqPb6Bsj9U9iLEnyrZR";

        // Mint NFT
        _mintNFT();
    }

    function _mintNFT() private {
        _tokenIds.increment();

        uint256 newItemId = _tokenIds.current();
        _mint(msg.sender, newItemId);
        _setTokenURI(newItemId, _metadataUrl);
    }
}
In this example, we import the required ERC721 and Counters libraries from OpenZeppelin. The mintNFT function allows us to mint new NFTs and assign them to recipients with the provided token URI.
Step 4: Compile and migrate the contract
Now that we have our XRC721 contract ready, we can compile and migrate it to the XDC Apothem network.
In your terminal, run the following command to compile the contract:
truffle compile
If the compilation is successful, you’ll see output similar to the following:
PS C:\Desktop\contract> truffle compile

Compiling your contracts...
===========================
> Compiling @openzeppelin\contracts\interfaces\IERC165.sol
> Compiling @openzeppelin\contracts\interfaces\IERC4906.sol
> Compiling @openzeppelin\contracts\interfaces\IERC721.sol
> Compiling @openzeppelin\contracts\token\ERC721\ERC721.sol
> Compiling @openzeppelin\contracts\token\ERC721\IERC721.sol
> Compiling @openzeppelin\contracts\token\ERC721\IERC721Receiver.sol
> Compiling @openzeppelin\contracts\token\ERC721\extensions\ERC721URIStorage.sol
> Compiling @openzeppelin\contracts\token\ERC721\extensions\IERC721Metadata.sol
> Compiling @openzeppelin\contracts\utils\Address.sol
> Compiling @openzeppelin\contracts\utils\Context.sol
> Compiling @openzeppelin\contracts\utils\Counters.sol
> Compiling @openzeppelin\contracts\utils\Strings.sol
> Compiling @openzeppelin\contracts\utils\introspection\ERC165.sol
> Compiling @openzeppelin\contracts\utils\introspection\IERC165.sol
> Compiling @openzeppelin\contracts\utils\math\Math.sol
> Compiling @openzeppelin\contracts\utils\math\SignedMath.sol
> Compiling .\contracts\Nft.sol
> Artifacts written to C:\Users\kulka\OneDrive\Desktop\contract\build\contracts
> Compiled successfully using:
   - solc: 0.8.19+commit.7dd6d404.Emscripten.clang
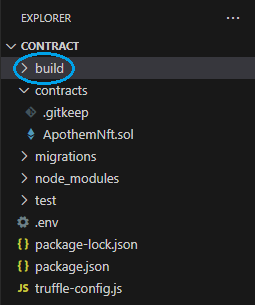
If the compilation is successful, you should see a build directory created within your project, containing the compiled contract artifacts.
Step 5: Deploy the Contract to Apothem Testnet
Once we have successfully compiled our contract and set up our Truffle project, the next step is to create a deployment script that will deploy our contract on the Apothem testnet.
In the migrations folder of your project, create a new file called 1_deploy_contract.js and add the following code:
// Get instance of the Apothem NFT contract
const ApothemNftContract = artifacts.require("ApothemNft");

module.exports = function (deployer) {
    // Deploy the contract to Apothem
    deployer.deploy(ApothemNftContract);
};
Next, let’s migrate the contract to the XDC Apothem network. Run the following command:
truffle migrate --network apothem
If the deployment is successful, you’ll see a response similar to the following:
Starting migrations...
======================
> Network name:    'apothem'
> Network id:      51
> Block gas limit: 420000000 (0x1908b100)


1_deploy_contract.js
====================

   Deploying 'ApothemNft'
   ----------------------
   > transaction hash:    0x99c5bbb2bd105170f77baa985a6087fe6ff8e7b5ea353c5e647352c6b989dd15
   > Blocks: 2            Seconds: 4
   > contract address:    0xCD6E45a39966585d1B4C35B3cc5e4C278c595BB1
   > block number:        50195140
   > block timestamp:     1686328463
   > account:             0x7447Ac246AEefBFBf56D02c4c466a9f33f51eEc7
   > balance:             14963.999221539875
   > gas used:            2763463 (0x2a2ac7)
   > gas price:           0.25 gwei
   > value sent:          0 ETH
   > total cost:          0.00069086575 ETH

   > Saving artifacts
   -------------------------------------
   > Total cost:       0.00069086575 ETH

Summary
=======
> Total deployments:   1
> Final cost:          0.00069086575 ETH
Truffle will deploy the contract to the XDC Apothem network using the configuration we defined earlier. Once the migration is complete, Truffle will display the deployed contract address on the network.
Step 6: Interact with the deployed contract
Congratulations! You have successfully deployed your XRC721 contract on the XDC Apothem network. Now, access the BlocksScan Apothem Explorer to view the Deployed Contract. To view the Contract code, we need to verify the code on BlocksScan Apothem Explorer. Also you can interact with the contract to mint some NFTs.
Conclusion
In this article, we have learned how to deploy an XRC721 contract on the XDC Apothem network using Truffle. You should now have a good understanding of the necessary steps to create and deploy your own NFTs on XDC. Feel free to explore more advanced features and customize your contract to suit your specific requirements. Happy coding!
For any doubts or questions comment below or post on social media by tagging BlocksScan.
Follow BlocksScan to know more updates:


Discussion (0)