Truffle has long been a popular choice for EVM smart contract development, but as the ecosystem evolves, developers are increasingly turning to tools like Hardhat for their flexibility and advanced features. In this guide, we'll walk through the process of migrating your Truffle project to Hardhat, highlighting the benefits along the way.
Understanding the Need for Migration
Truffle has served us well, but Hardhat offers a more robust development environment with features like built-in support for TypeScript, a powerful task system, and extensive plugin support.
Preparing for Migration
Before we dive into migration, ensure you have Node.js installed on your machine. Then, install Hardhat globally using npm:
npm install -g hardhat
Setting Up Your Hardhat Project
Navigate to your project directory and initialize a new Hardhat project:
hardhat init
Migrating Contracts
Copy your contracts from the Truffle contracts/ directory to Hardhat's contracts/ directory. Hardhat fully supports Solidity contracts, so no changes are necessary here.
Migrating Tests
If you have migration written for your Truffle project, move them to the test/ directory in your Hardhat project. Hardhat supports both JavaScript and TypeScript for writing tests, providing flexibility and type safety.
Creating an Environment File
Hardhat supports the use of environment variables for sensitive information like API keys. Create a .env file in your project directory and add your variables in the format VARIABLE_NAME=VALUE. For example:
XDC_TESTNET_URL=https://apothem.xdcrpc.com
PRIVATE_KEY=your_private_key
Configuring Hardhat
Hardhat's configuration file, hardhat.config.js, where you'll define your network configurations, plugins, and other project settings. Customize this file according to your project's requirements.
Adding XDC Network in your hardhat.config.js file
Once you've set up your project and are ready to configure your Hardhat environment, you'll need to add the XDC Network configuration to your hardhat.config.js file. This step is crucial for interacting with the XDC Network and verifying contracts on BlocksScan.
Open your hardhat.config.js file and add the following code snippet:
require('dotenv').config();
require('@nomiclabs/hardhat-ethers');
require("@nomicfoundation/hardhat-verify");

module.exports = {
    solidity: "0.8.24",
    networks: {
        apothem: {
            url: process.env.XDC_TESTNET_URL,
            accounts: [process.env.PRIVATE_KEY]
        }
    },
    etherscan: {
        apiKey: {
            apothem: "abc",
            devnet: "abc",
            xdc: "abc",
        },
        customChains: [
            {
                network: "apothem",
                chainId: 51,
                urls: {
                    apiURL: "https://abapi.blocksscan.io/api",
                    browserURL: "https://apothembeta.blocksscan.io/",
                },
            }
        ],
    },
    sourcify: {
        enabled: false
    }
};
Installing Necessary Plugins
To enhance your Hardhat development experience, it's crucial to install necessary dependencies and enable the hardhat-plugin-verify.
Install the required dependencies using npm:
npm install dotenv
npm install --save-dev @nomiclabs/hardhat-ethers --force
npm install --save-dev @nomicfoundation/hardhat-verify --force
npm install --force @openzeppelin/contracts
npm install --save-dev ethers@^5.7.2
Testing and Debugging
With your project migrated, take advantage of Hardhat's advanced testing and debugging tools. Run your tests using npx hardhat test and leverage Hardhat's console for interactive debugging sessions.
Deploying Your Contracts
Once everything looks good, it's time to deploy your contracts. Hardhat supports deployment to various networks, including local development environments and public testnets.
To deploy your contracts using Hardhat, you can use the following command:
npx hardhat run test/1_initial_migration.js --network apothem
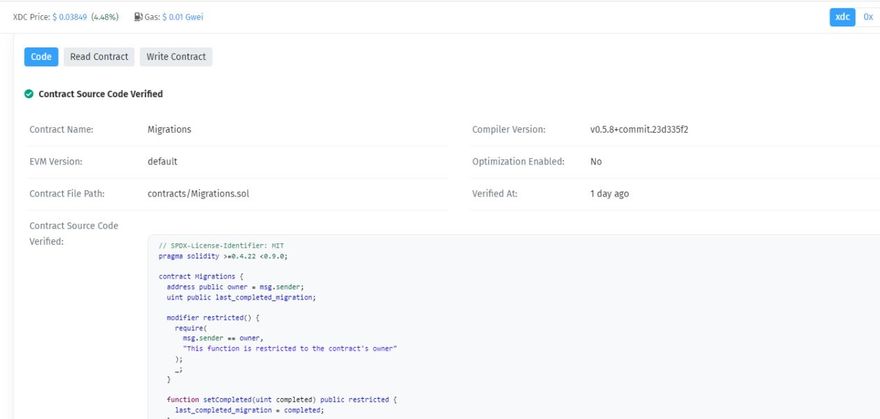
Verifying Contracts on BlocksScan
Similar to Truffle, Hardhat allows for easy contract verification on BlocksScan. Utilize plugins or built-in functionality to verify your contracts and increase transparency for users.
After successful deployment, verify the contract using the following command:
npx hardhat verify --network apothem DEPLOYED_CONTRACT_ADDRESS
Conclusion
Congratulations on successfully deploying your smart contracts on the XDC Network using Hardhat! This achievement marks a significant milestone in your blockchain journey. Armed with the skills to navigate Hardhat's robust toolset and harness the capabilities of the XDC Network efficiently, you're well-equipped to explore decentralized applications (DApps) and smart contract development further.
Keep your curiosity alive, continue learning, and embrace the endless possibilities offered by this groundbreaking technology. For queries or assistance, feel free to leave a comment below or connect with us on social media by tagging XDC Network.
Happy coding!
Follow us to know more updates:


Discussion (0)