![Cover image for [Informative] Unveiling MLETR’s Potential in International Trade with TradeTrust-XDC Network Partnership.](https://www.xdc.dev/images/99Ls2ZQ6cK7-uNA67hxW4aZSEYxgjQtgaS8FNki8iaE/s:1000:420/mb:500000/ar:1/aHR0cHM6Ly93d3cu/eGRjLmRldi91cGxv/YWRzL2FydGljbGVz/L2pyM2VwZGY5dzl1/c2Fqa2Nua2phLlBO/Rw)
A Step-by-Step Guide to Secure Trade Document Verification
The TradeTrust Ecosystem, developed by the Infocomm Media Development Authority (IMDA) in Singapore, has become a game-changer in international trade, providing a secure, transparent, and efficient platform for cross-border transactions. By partnering with the XDC Network, TradeTrust introduces groundbreaking features that enhance document authentication and bolster confidence among businesses worldwide.
The collaboration between TradeTrust and the XDC Network introduces a new era of international trade with MLETR as a pivotal component. As blockchain technology continues to revolutionize global trade, MLETR’s multi-layered escrowed title registry offers a secure, efficient, and transparent framework for managing assets and conducting cross-border transactions.
Within this ecosystem, the concept of MLETR(Model Law on Electronic Transferable Records) emerges as a transformative element. MLETR enhances the security and reliability of title transfers, ensuring the seamless transfer of assets while minimizing potential risks. This multi-layered approach integrates TradeTrust’s document authentication capabilities with the XDC Network’s efficient blockchain solutions, providing users with an unparalleled level of trust and efficiency in managing their assets.
Let’s understand the Workflow!
Before diving into the TradeTrust workflow, ensure you have the following prerequisites:
- Metamask Wallet
- XDC token balance to cover Transaction fees
- Wallet.json file
- Config File for Document Creation
- A Created Document with “.tt” Extension for Verification
Step 1: Installing Open Attestation CLI
To begin generating config files, ensure you have Open Attestation CLI v2.5.2 installed on your computer. You can download the release from the provided link.
Release Link: https://github.com/Open-Attestation/open-attestation-cli/releases
Linux: https://github.com/Open-Attestation/open-attestation-cli/releases/download/v2.5.2/open-attestation-linux
MacOS: https://github.com/Open-Attestation/open-attestation-cli/releases/download/v2.5.2/open-attestation-macos
Windows: https://github.com/Open-Attestation/open-attestation-cli/archive/refs/tags/v2.5.2.zip
Before you construct your configuration file(.json file), please ensure you have the below listed data, which we will get in “Step 3” using a single command.
- Wallet (.json file)
- Document Store (for verifiable document)
- Token Registry (for transferable document)
- Configured DNS
- Decentralized Document Renderer
- Document Storage
Step 2: Acquiring a wallet.json File
To proceed with config file generation, you’ll need a wallet.json file. If you already have one, you can skip this step. If not, follow the steps below to create it:
a. Start by creating a new folder on your computer to store the wallet.json file.
b. Access the terminal or command prompt and navigate to the folder.
c. Use the following command to create the wallet.json file:
open-attestation wallet create --output-file wallet.json
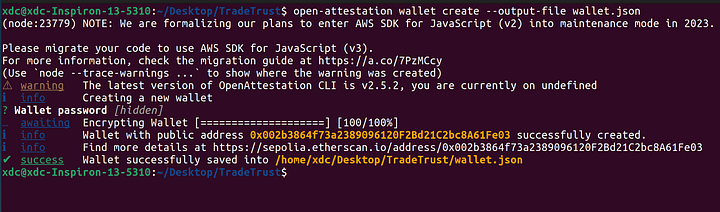
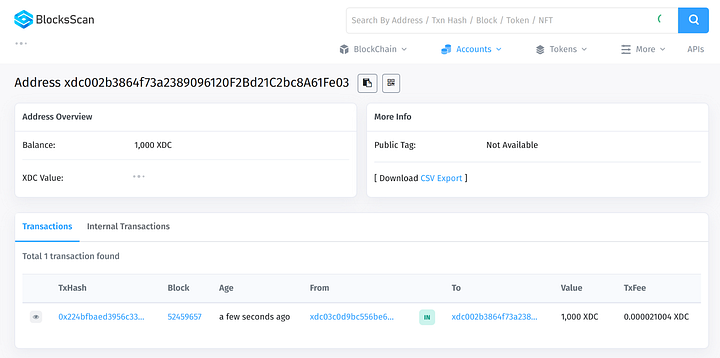
d. Add funds to the wallet address displayed on your console.
Get Testnet XDC from:
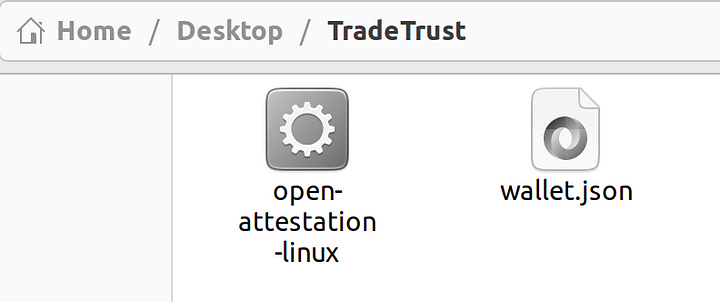
e. Place the open-attestation-cli binary file in the folder containing the wallet.json file.
f. Grant executable permissions to the binary file using below command:
chmod +x ./open-attestation-linux

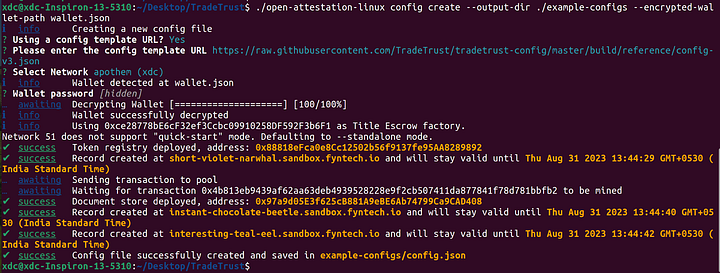
Step 3: Generating the Config File
Now, generate the config file using Config Generator by following these steps:
a. Use the following command to generate the config file:
./open-attestation-linux config create --output-dir ./example-configs --encrypted-wallet-path wallet.json
b. After entering the above command, you will be prompted to create a config file using a template URL or a file path. Here are the options:
Using a Config Template URL: If you have a template URL, type “Yes,” enter the template URL (eg, https://raw.githubusercontent.com/TradeTrust/tradetrust-config/master/build/reference/config-v3.json)
c. Now, you will be asked to choose the network for your config file, Select “XDC Apothem Network”.
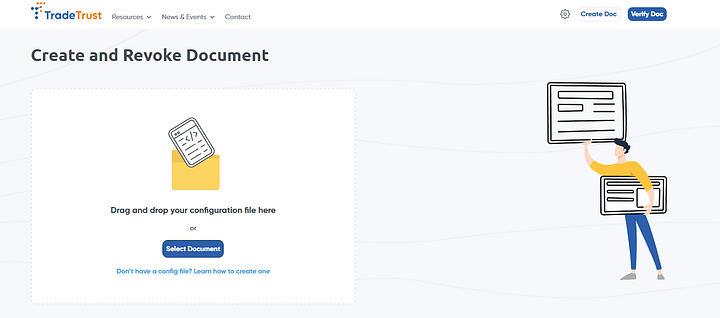
Step 4: Uploading the Config File to TradeTrust Creator Website
Visit the TradeTrust Creator website and click on the “Upload a new config file” to upload the “config.json” file received in Step 3.
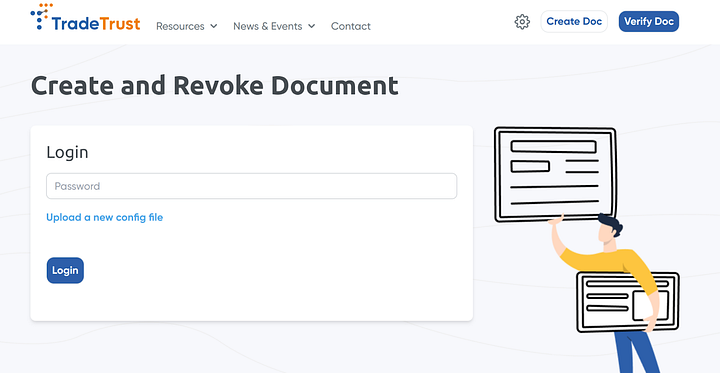
Once you upload the file, you need to enter the password which you have previously used to create a wallet.
Choose the appropriate document type from the following options:
- TradeTrust Bill of Lading v3
- TradeTrust ChAFTA Certificate of Origin v3
- TradeTrust Covering Letter v3
- TradeTrust Invoice v3 (DNS-DID)
- TradeTrust Invoice v3
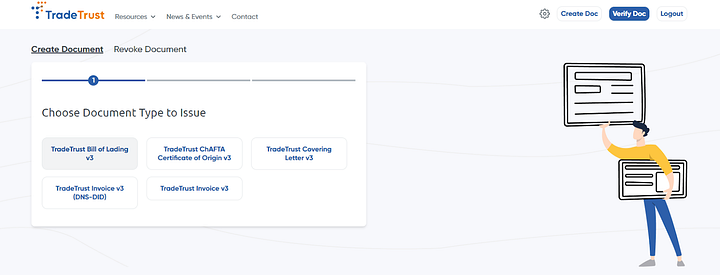
Step 5: Document Type Selection
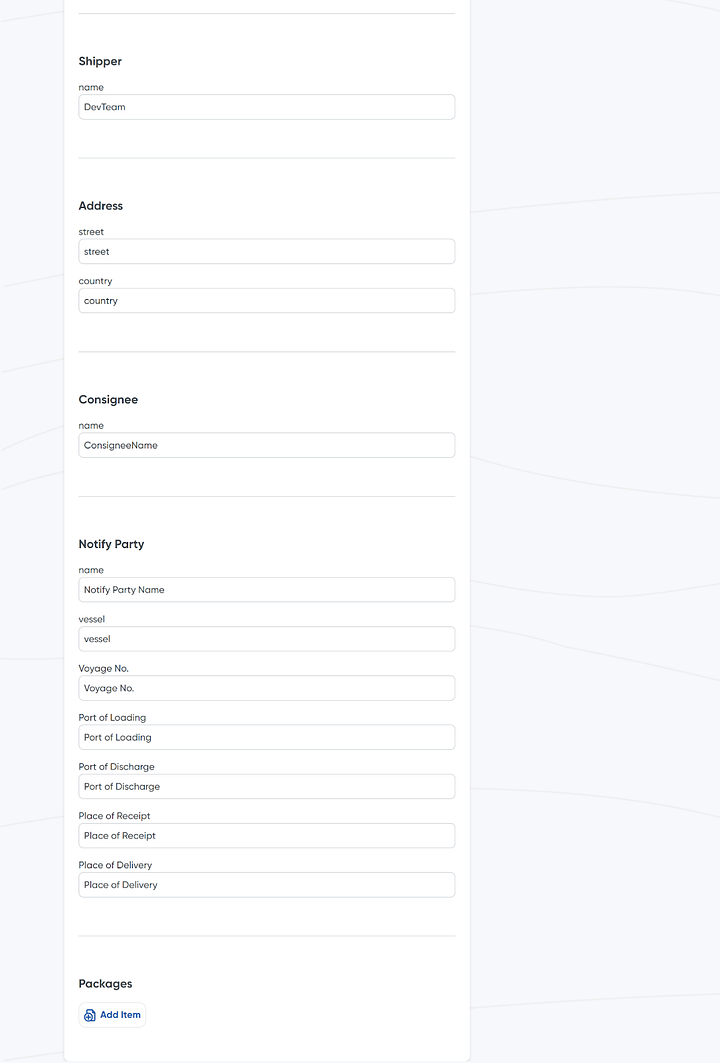
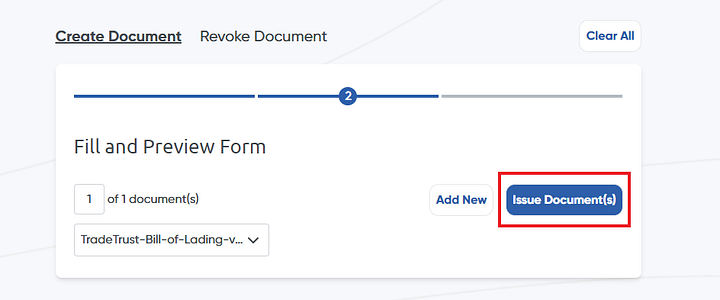
Let’s move with the "TradeTrust Bill of Lading v3", Once you select a “TradeTrust Bill of Lading v3” document type you will be able to see the below form. Fill in the respective details in the selected document type and click on the “Issue Document(s)” button.
*You can either upload a data file(.JSON or .CSV) to pre-fill fields on this form or enter the fields manually.

Step 7: Download Issued Document
Once the file is uploaded successfully, Download the “TradeTrust-Bill-of-Lading-v3–1-xdcapothem.tt” file for verification.

Step 8: Verifying the Document
To verify the document, visit the Verify Documents website and select the “XDC Testnet Apothem” network. Upload the document file(“TradeTrust-Bill-of-Lading-v3–1-xdcapothem.tt”) for verification.
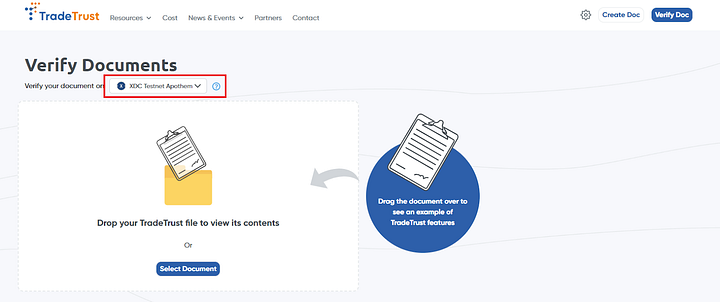
Note: If you are getting “Whoops! There might be an issue with the network or contract. Make sure you are on the correct network for the document.” this type of error. Don’t worry, Simply try uploading your file again.
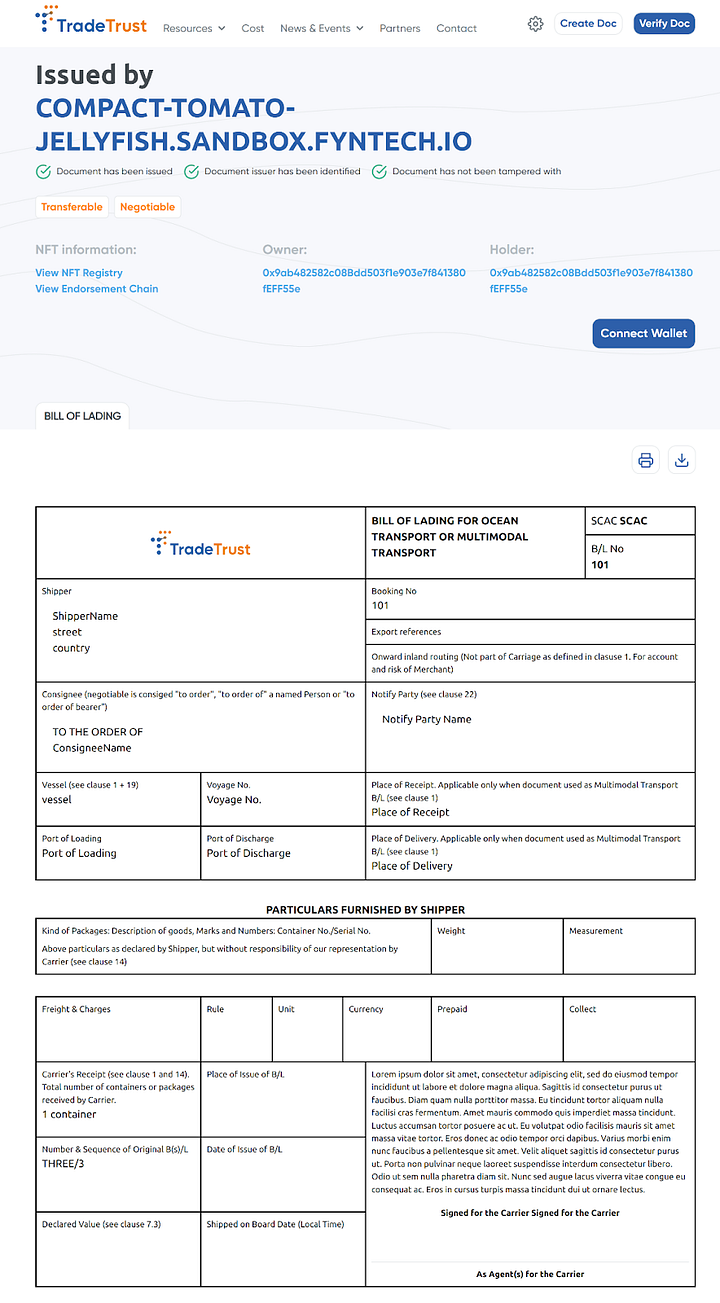
After uploading “TradeTrust-Bill-of-Lading-v3–1-xdcapothem.tt” file, you will be able to see all the details:
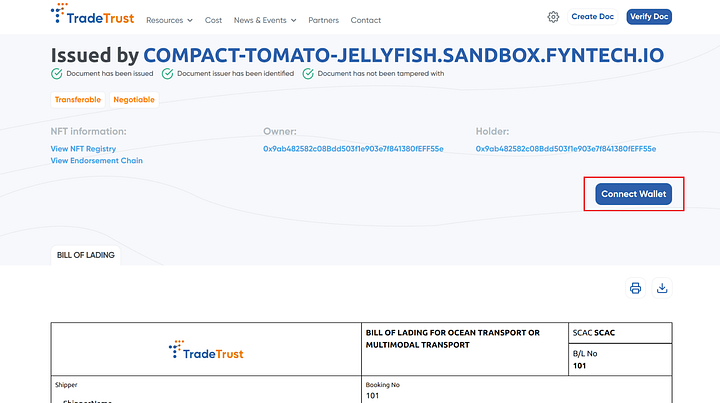
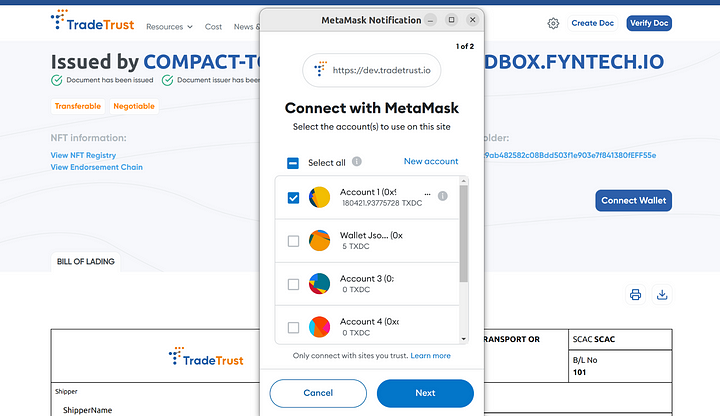
Step 9: Metamask Wallet Connection
Unlock your Metamask wallet, add some Testnet XDC, and click on the “Connect Wallet” button to manage assets.
Note: To add XDC Apothem manually in Metamask, refer below details:
- Network Name: XDC Apothem Network
- RPC URL: https://apothem.xdcrpc.com
- ChainID: 51
- Symbol: XDC
- Block Explorer URL: https://explorer.apothem.network/
By clicking on the Connect wallet button, Metamask screen will appear. Click on the “Next” button to connect with Metamask.
Step 10: Managing Assets
After connecting the Metamask wallet, access the “Manage Assets” dropdown with options such as Transfer Holdership, Surrender Document, and Endorse Transfer of Ownership.
Now you can select the asset option as per your requirement.
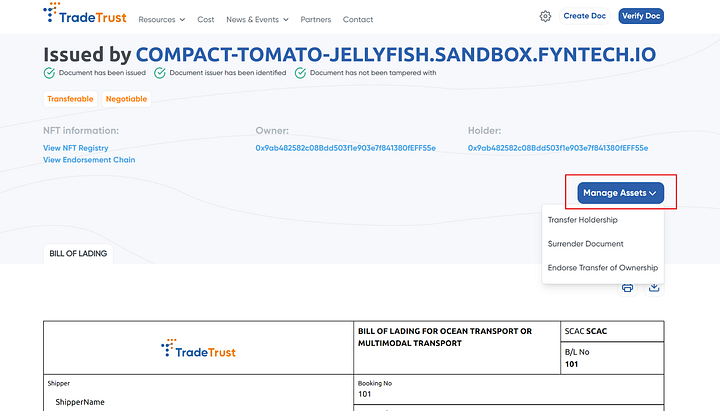
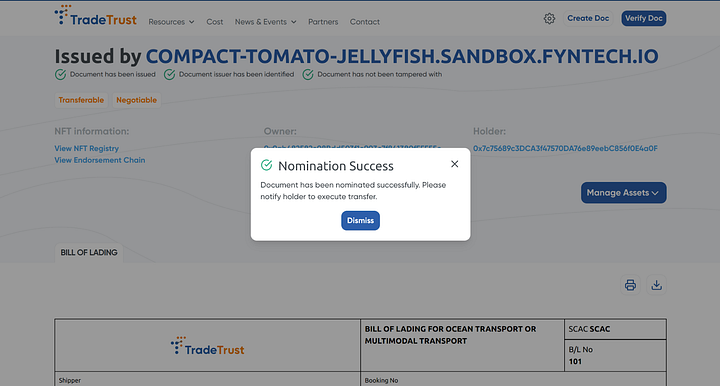
Let’s Transfer Holdership
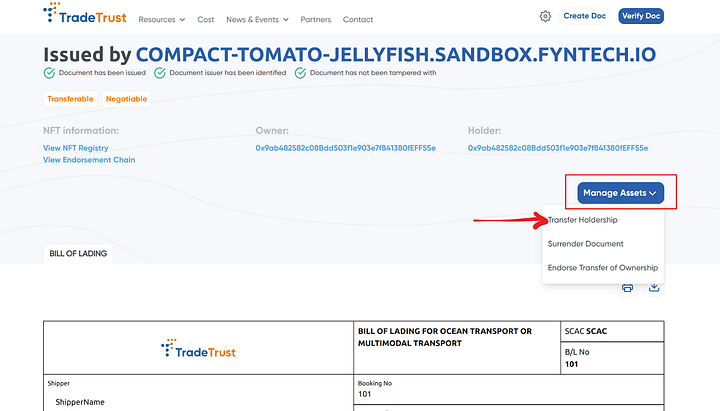
For a comprehensive understanding of TradeTrust’s Contribution, Title Escrow, and Manage Assets features, you can find detailed explanations in the official documentation at https://docs.tradetrust.io/docs/overview/title-transfer.
- Select “Transfer Holdership” from the “Manage Assets” dropdown.
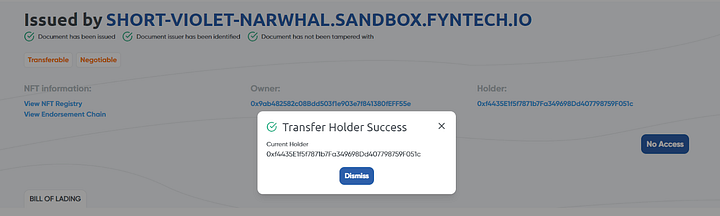
- Enter the “Holder” address and click on the “Transfer” button.
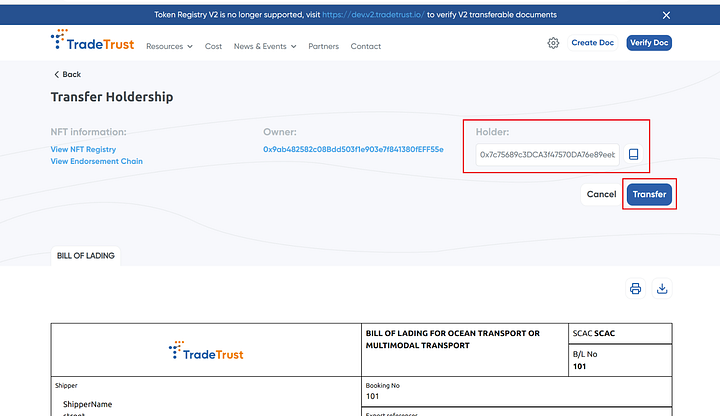
- Now, sign the transaction by clicking on the “Confirm” button.
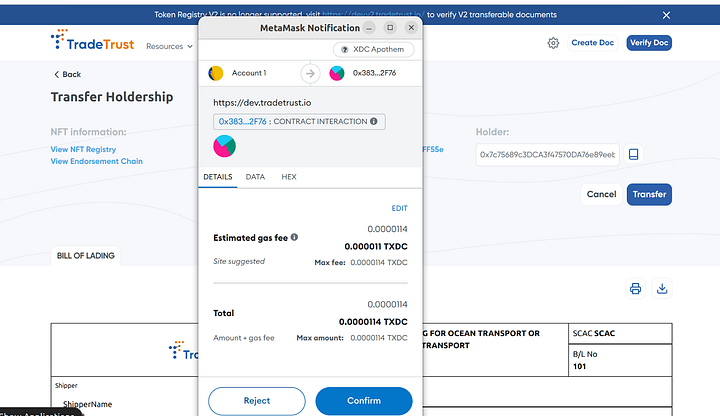

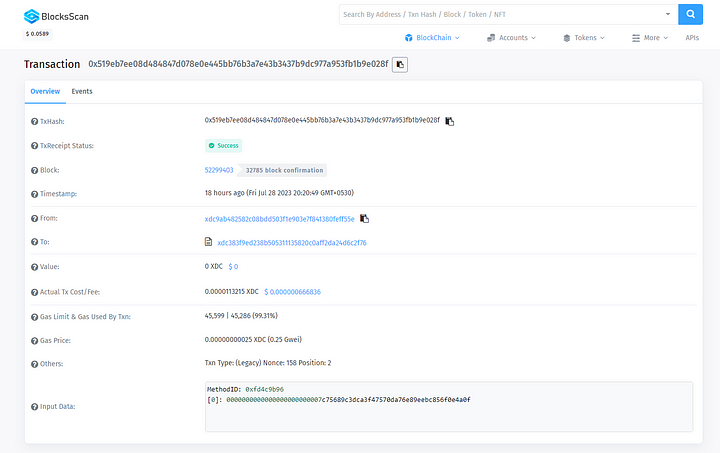
- You can view the transaction on the Apothem Explorer.
Step 11: View Endorsement Chain
The endorsement chain provides an overview of the EBL’s transaction history, showing which wallet is currently the EBL’s ownership/holdership.
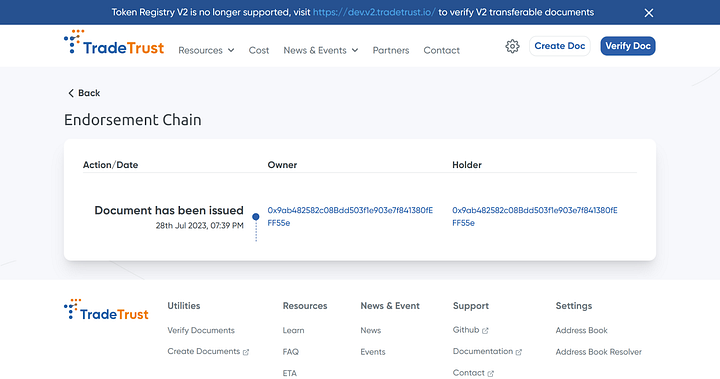
Action description:
Document has been issued:
Document is created by issuer with Owner and Holder being empty at the start. Owner and Holder will then be specified by the issuer during issuance.Transfer of Holdership:
Current Holder can transfer the holdership to another holder.
Nominate Change of Owner:
When Owner and Holder are different, the current Owner can nominate change of owner. This will require current Holder to endorse the change (this will not be reflected in endorsement chain, as it is not a finalized owner/holder record until holder accepts the nomination)
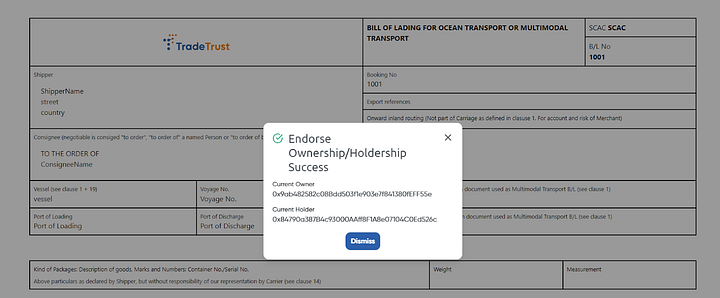
- Endorsement of Change of Owner: When Owner and Holder are same, current Owner/Holder can endorse the change of owner to another owner. This will result in a change of Owner and Holder values.
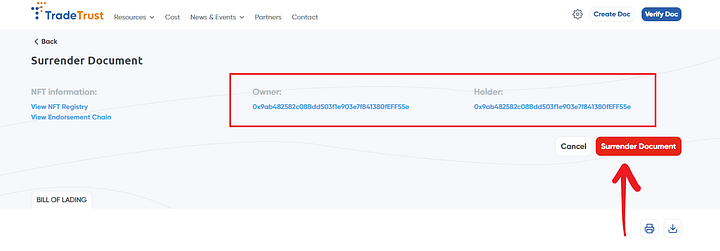
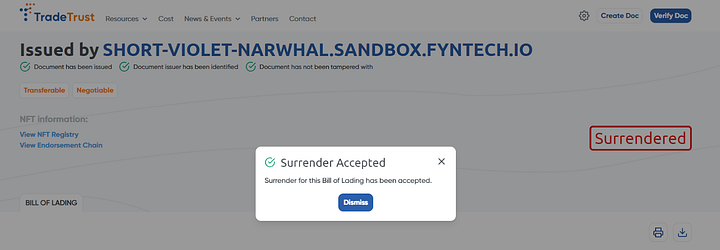
- Surrender of Document: When Owner and Holder are the same, the current Owner/Holder can surrender the document to the issuer. Once the document is surrendered, both Owner and Holder values will be empty because it is no longer in circulation.
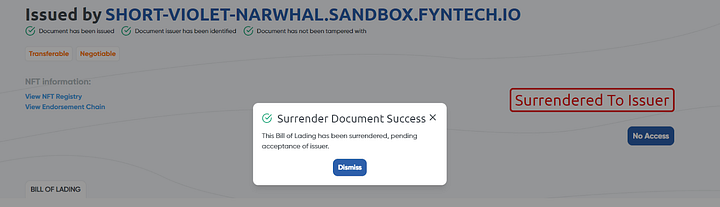
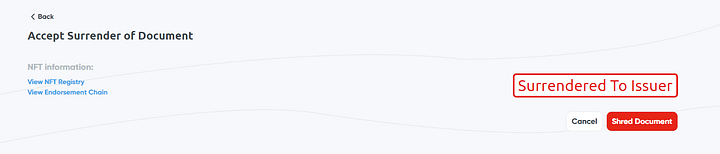
- Surrender of document accepted: Document is shredded and destroyed.
Overview of Issuance Manage Assets:
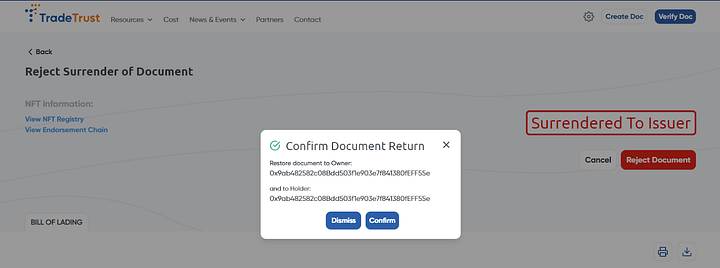
In the Issuance Manage Assets section, the issuer is presented with two options: “Accept Surrender of Document” and “Reject Surrender of Document.”
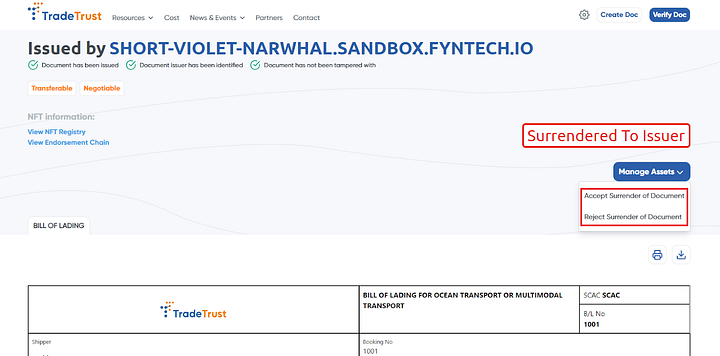
- Let’s check out the steps to Accept Surrender of Document: If the issuer decides to accept the surrender of the document, they can proceed by selecting this option. By accepting the surrender, the issuer acknowledges that the document is no longer in circulation and is willingly returned to them. This action is typically taken when the document’s life cycle is complete, and there is no further need for its usage.
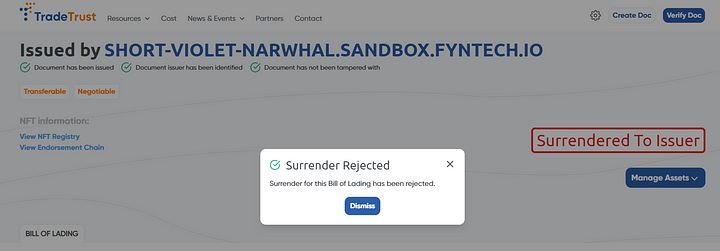
- Reject Surrender of Document: On the other hand, if the issuer determines that the surrender of the document should not be accepted, they can choose the “Reject Surrender of Document” option. This decision indicates that the document will remain in circulation and continues to be held by the current holder. Rejecting the surrender is applicable when there are still valid reasons for the document to be in use, and the issuer wants it to remain active for further transactions.
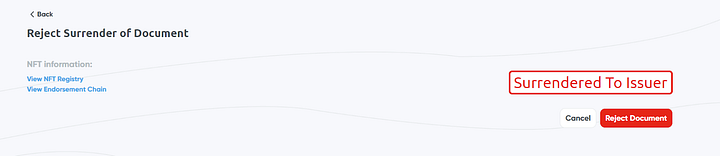
Here you can to confirm the document return, once confirmed the Owner & Holder address you need to click on "Confirm" button.
Before delving into the TradeTrust workflow, you can run trials or tests using the XDC Apothem Network. The XDC Apothem Network serves as a testnet where you can familiarize yourself with the process without using real assets or transactions. This trial enables you to understand the workflow and functionality of MLETR, TradeTrust, and the XDC Network, ensuring a smooth experience when transitioning to the live environment. By utilizing the XDC Apothem Network, users can gain hands-on experience, validate their understanding, and address any queries or concerns before engaging in actual cross-border transactions. It offers a risk-free space to experiment, build confidence, and optimize operations within the TradeTrust ecosystem, further solidifying the foundation for secure and efficient international trade practices.
In conclusion, exploring the TradeTrust Ecosystem and its partnership with the XDC Network opens up new possibilities for secure and efficient international trade. By harnessing the potential of blockchain technology, TradeTrust offers a transparent and streamlined platform for businesses and individuals to conduct cross-border transactions with confidence. To learn more about TradeTrust, you can refer to their official documentation at https://docs.tradetrust.io/docs/introduction/what-is-tradetrust.
Additionally, for further insights into XinFin — XDC Network, visit their website at https://xinfin.org/. Together, these innovative solutions pave the way for a future of trust, scalability, and global interoperability in the world of trade and finance.


Discussion (6)
Dear Team, I am encountering the following error:
Is there a way to resolve this error? It may be related to the gas price on Apothem changing to 12.5 gwei. I have looked into it but was unable to figure out a solution."
Hello @karthick
You can use Open Attestation CLI v2.5.3 as well. Download the zip file for Windows: github.com/Open-Attestation/open-a...
Releases Link: github.com/Open-Attestation/open-a...
Let me know if you are still facing any issues.
Thanks Vrushali. We will take a look and let you know.
I am trying to build off of their document-creator-website, how can I get in touch with the dev team?
Any update on my previous question ?
Dear Team, I tried to install the Open Attestation CLI v2.5.2 in my windows machine using the link provided but the exe file is not opening. Can you please check and provide an update. Thanks