Duplicati
Installation
This section takes you through how to install Duplicati. For more installation instructions, see the documentation for duplicati here.
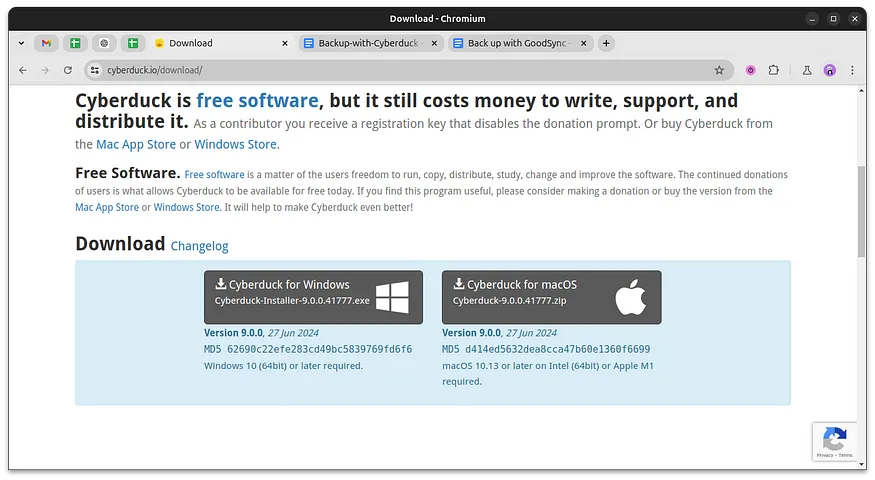
Go to the download page and download the installer for Duplicati that matches your operating system.
Go to your downloads folder and run the downloaded file.
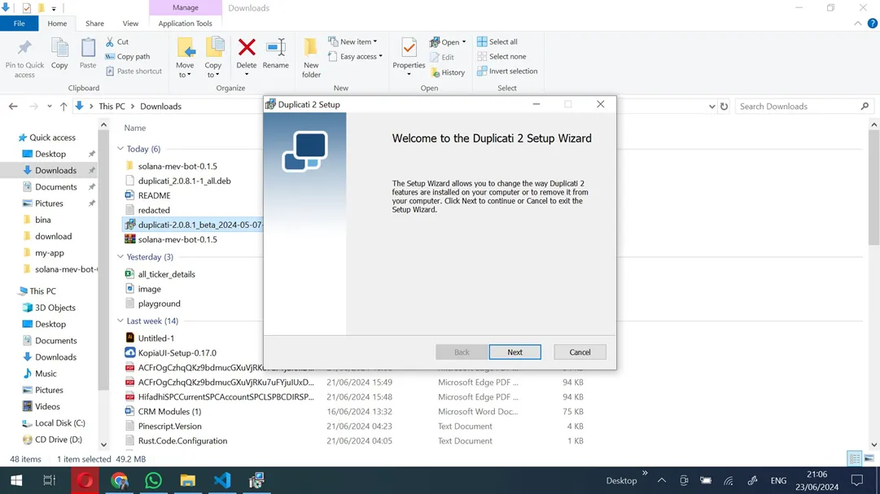
The installer will guide you through the installation steps.
Get API key and secret
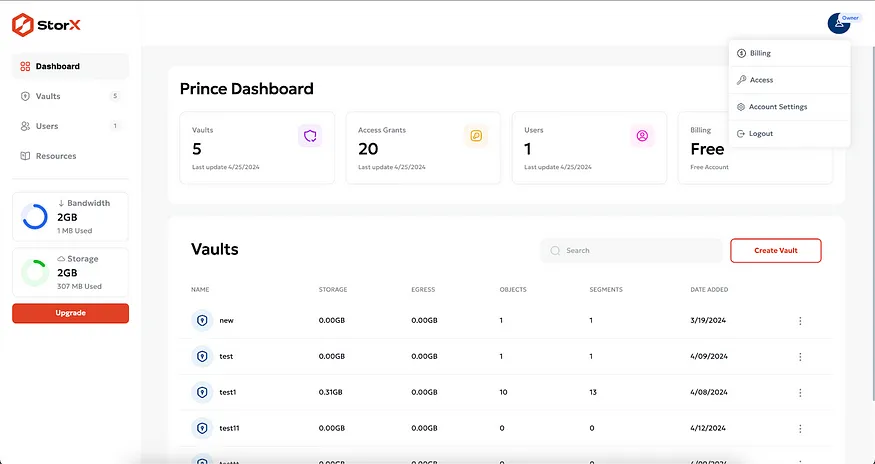
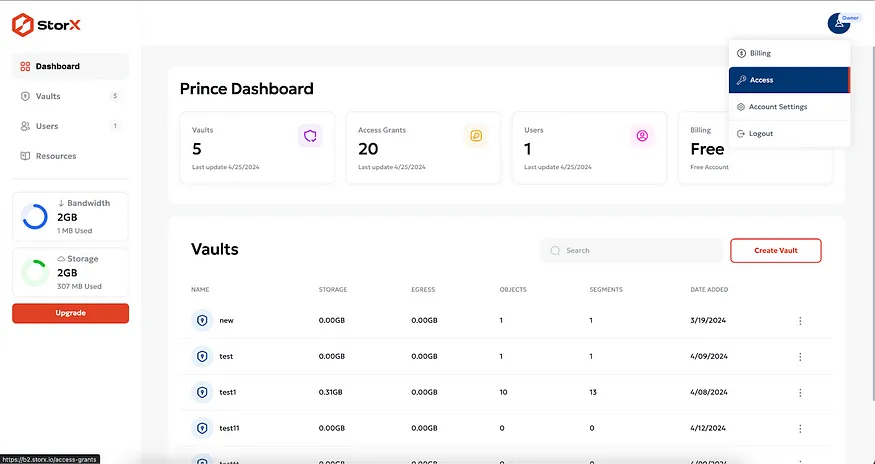
From the top-left corner of the storx dashboard, click the account button and a drop down menu will appear.
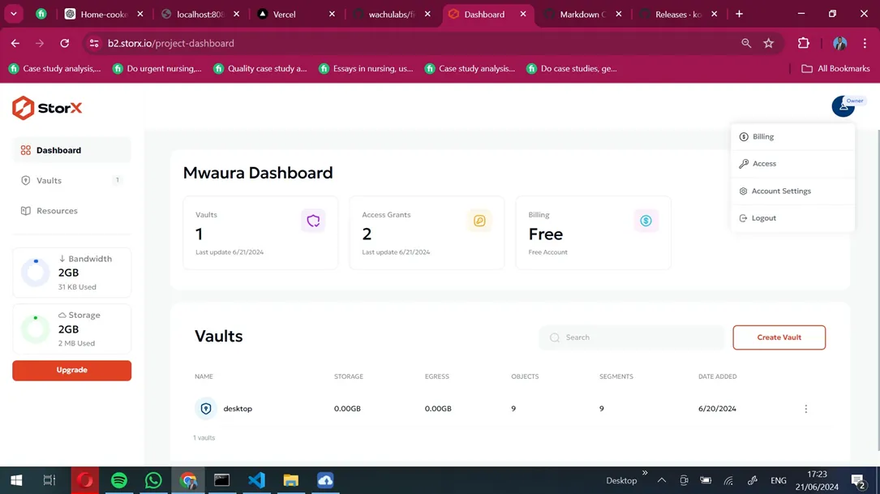
Click Access.
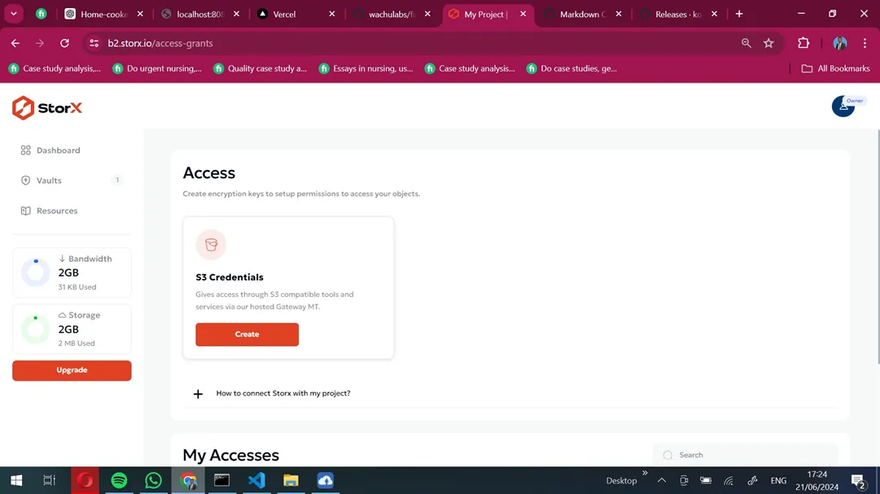
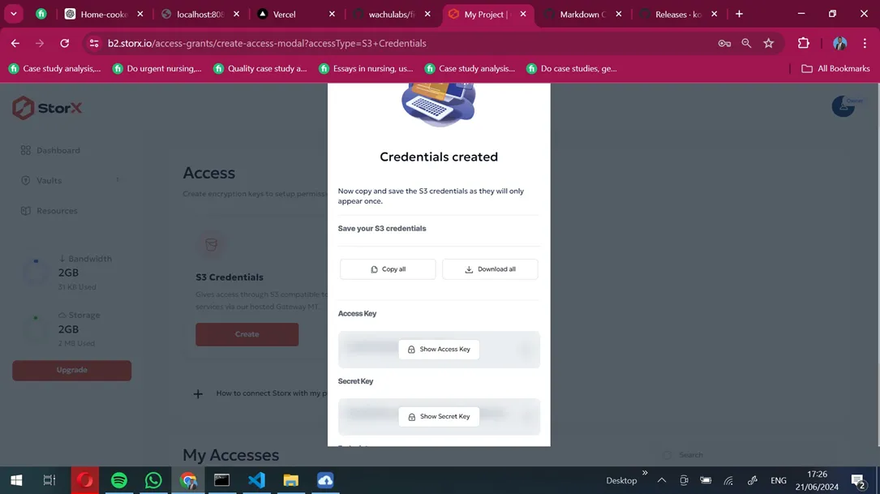
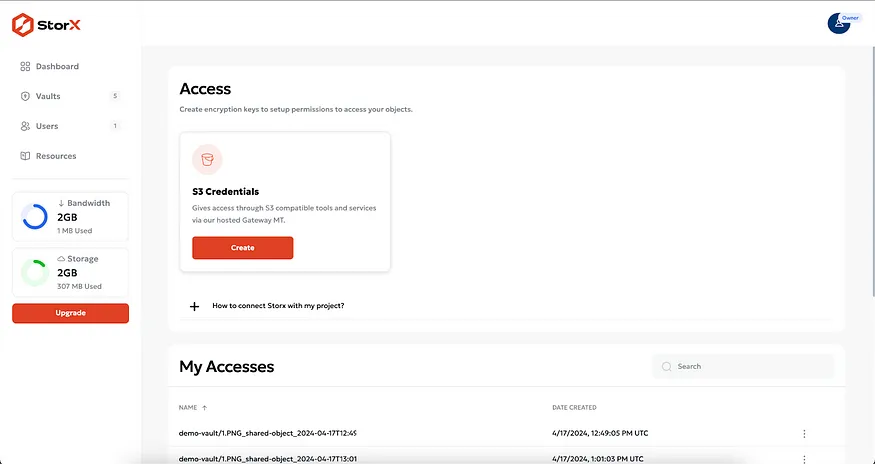
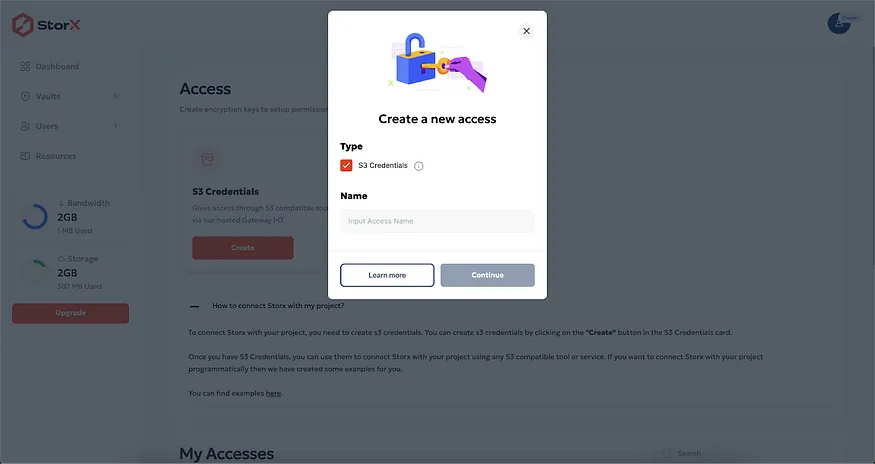
Create s3 credentials.


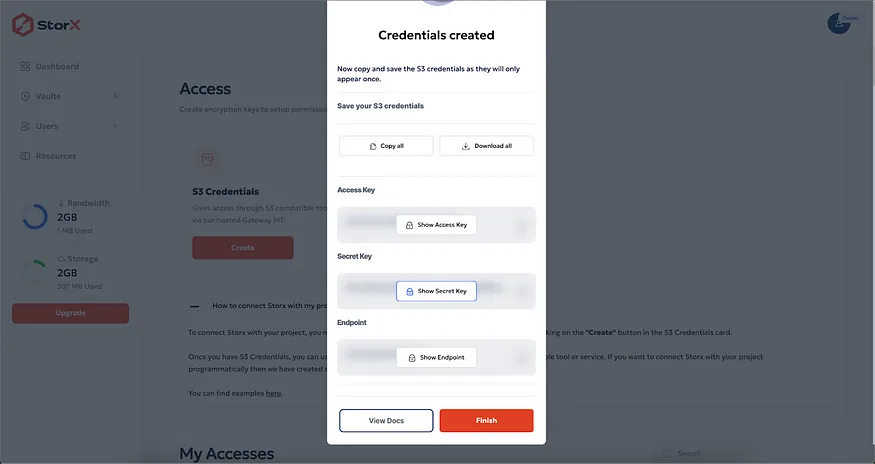
After successful creation, click download all, then finish.
The downloaded file will have all the details you need to backup your files to the storx from your desktop.
json
Access Key:jucp2o2qXXXXXXXXXXXXXXXXXXXX
Secret Key: j3lolq5453ktsnnjfXXXXXXXXXXXXXXXXXXXXXXXXXXXXXXXXXXXX Endpoint:https://gateway.storx.ioCreate a vault that will be used.
Backing up files
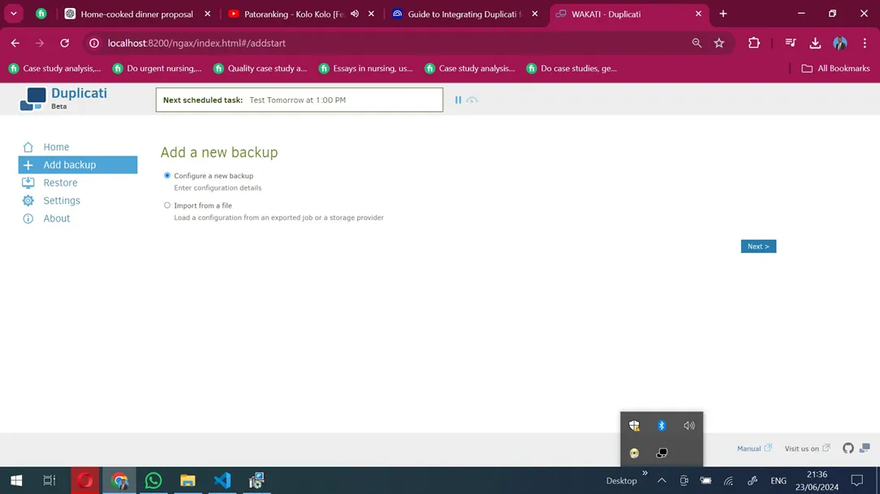
- Navigate to the start menu and open Duplicati.
- Duplicati is likely to run in the background. Check the system tray to see if it is open already. If it is open, head to the browser and open http://localhost:8200

3.To create a backup, click + Add backup
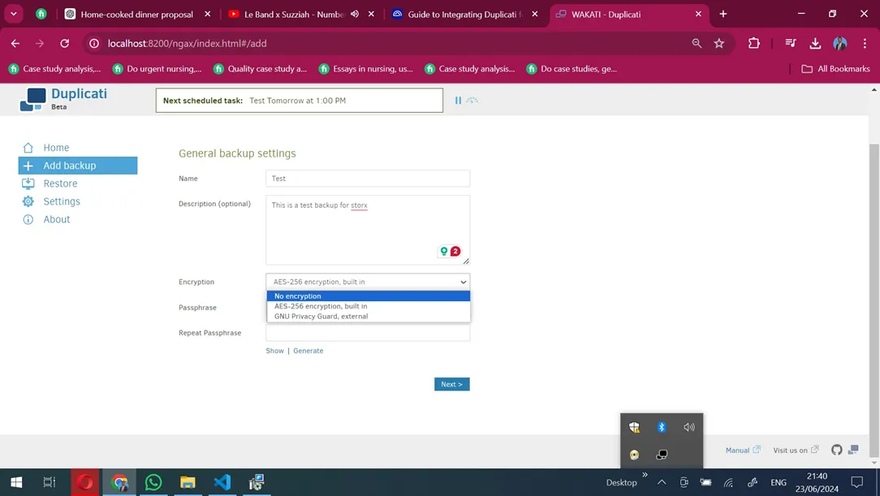
Continue configuring a new backup. On the next page, add the backup folder name, description, and preferred encryption algorithm. Leave the encryption algorithm “none” if you do not want the data encrypted, but encryption is highly recommended.
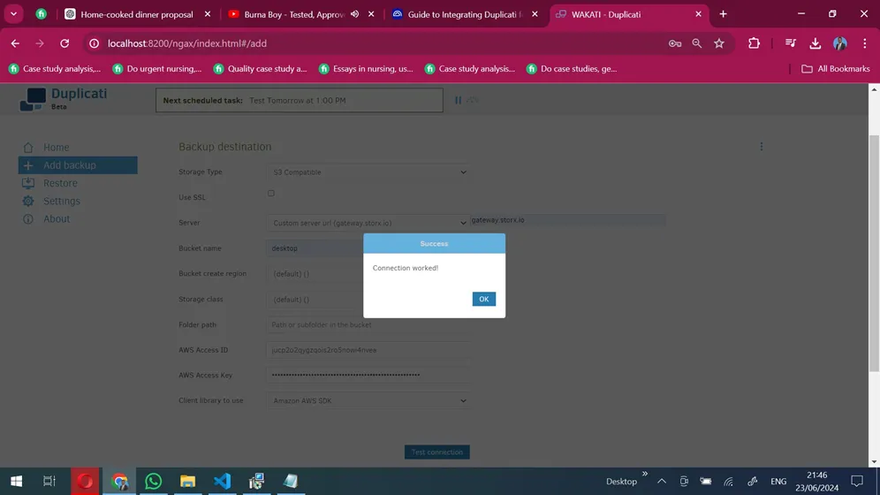
On the next page, Select Storage Type as s3 compatible, and for the server, use the custom server URL and the URL from the downloaded credentials. Fill in the other details, such as the access key and secret from the credentials file.
After filling out all the details, click test connection. If everything has been done correctly, the connection will print as working.
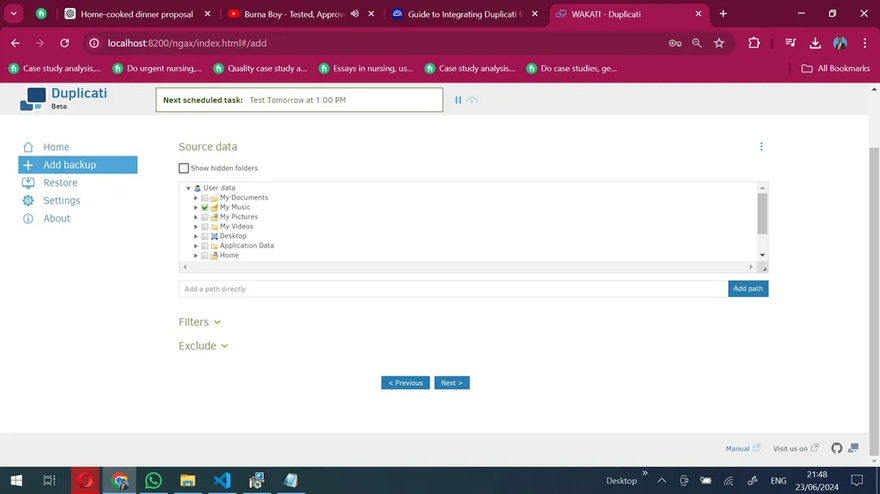
On the next page, select files/folders you would like backed up
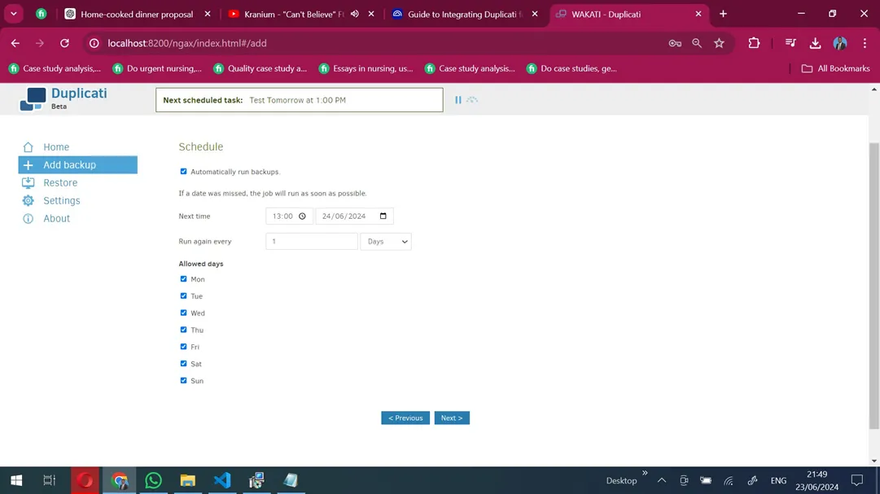
In the next page configure the backup and sync frequency.
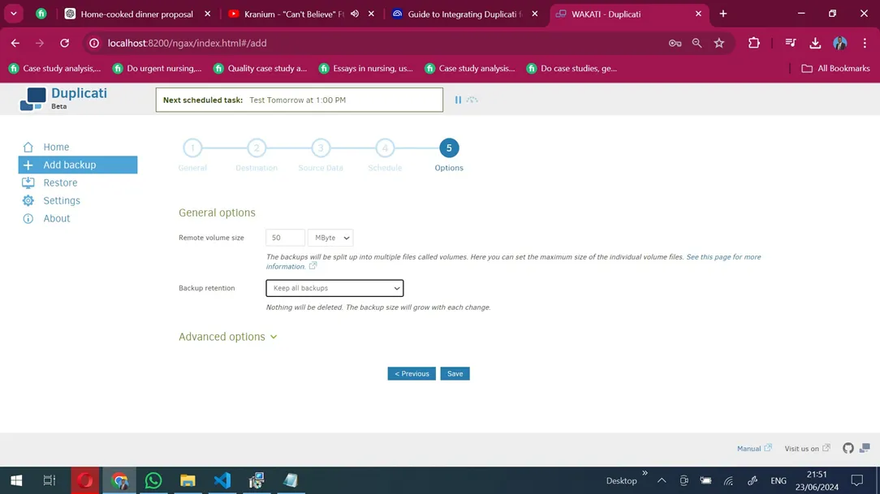
On the last page, select the preferred options and save.
Once you have completed the above steps, you need to return to the Home section. Here, you will find all the backup files created.
· You can click on the run link in the created repository and back up will start.
· Other settings can also be performed here related to the deletion, edit, export, etc.


- Once the backup is complete, Navigate to the storx website on the detail page of the vault. You will find all the files backed up.

— — — — — — — — — — — — — — — — — — — — — — — — — — — — — — — — — — — — — —
CyberDuck
Cyberduck is an open-source client for FTP and SFTP, WebDAV, and cloud storage (OpenStack Swift, Amazon S3, Backblaze B2, and Microsoft Azure), available for macOS and Windows (as of version 4.0) licensed under the GPL.
Getting started with CyberDuck
Step 1: — Installation
Refer to the corresponding Help Center articles for comprehensive instructions on installing Cyber Duck on various platforms:
Installing Cyber Duck Personal on Windows
1) Download the latest version of Cyber Duck for Windows from our download page.
2) Once we have downloaded the application, we need to open it to install it.
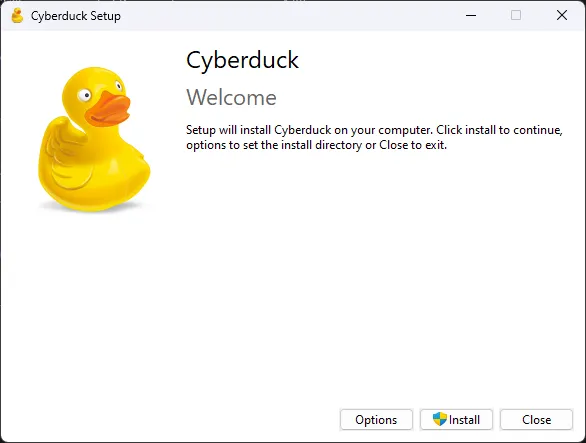
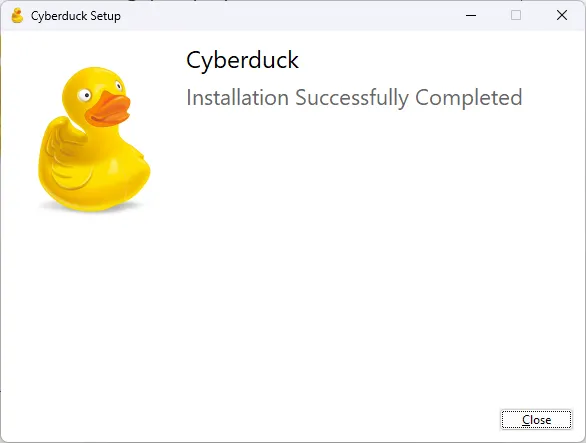
3) Once the installation is complete, you will get the following Pop up.
Step 2: — How to obtain an Amazon S3 access key pair
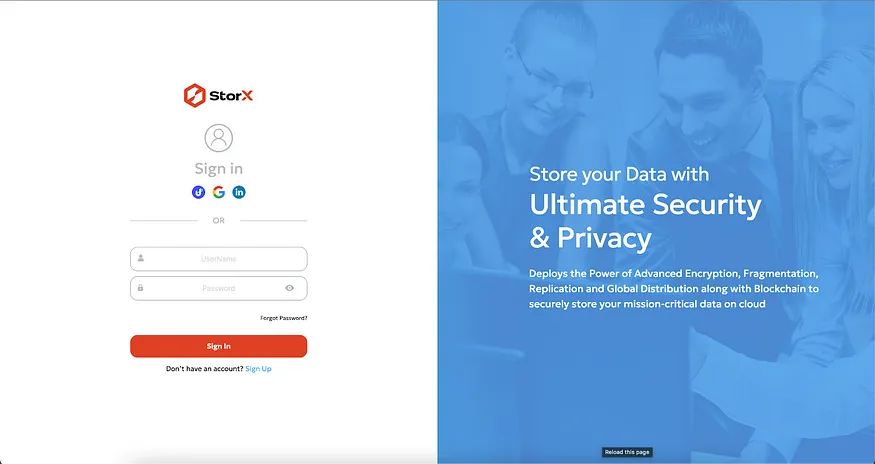
Login to your storx account using your username password or any of the given social signup option
Once you log in, you will be able to access this dashboard. In this dashboard, click on the user icon at the top

When you click on the user icon it will open a dropdown list. From that list, click on access.

When you click on the access list, it will open this screen, from which you can create an access token.

When you click on the Create button, it will open this popup
Provide a name to your access key and click on the “Continue” button

Once you confirm all the details and click on confirm, it will open this popup with all required tokens
To copy All keys, you can click on the “copy” button
To download All keys, you can click on the “Download” button.
If you click on Show Key, it will show the key for that block

These are the example values for how the access key, secret key, and Endpoint will have values.
Getting started with the integration of s3 with the storx
Open the Installed Cyberduck application from the start menu in windows.
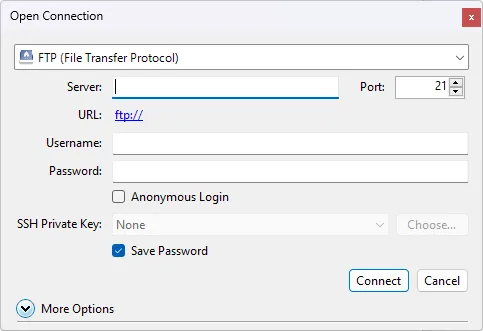
Click on the Open connection. You will get the following pop-up asking for the following details.
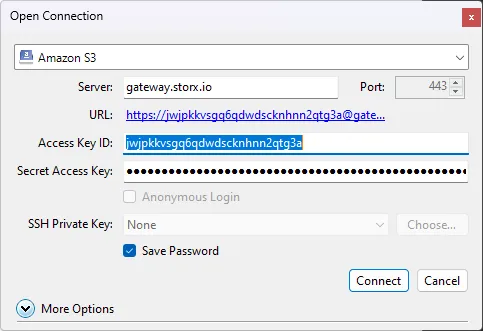
Fill in the credentials according to the image below.
Note the below before you proceed further.
In the server: — Provide your endpoints.
In the Access Key ID: — Provide the access key generated.
In the secret access key: — Provide the secret access key as it is.
Now click on connect.
Once you have done this, you will see the data in the account populate. You can proceed with the auto-sync as per the settings.
— — — — — — — — Integration with Cyberduck completes here — — — — — — — —
CloudBerry
What is Cloudberry Explorer?
CloudBerry Explorer provides a user interface for accessing, moving, and managing files across your local and cloud storage.
Freeware cloud backup for Windows, Linux, Mac, Hyper-V, and VMware
File system backup and restore
Support for AWS, Microsoft Azure, Backblaze B2, Wasabi, Google Cloud Storage
Scheduling and flexible data retention policies
Compression and encryption
Downloading the CloudBerry explorer
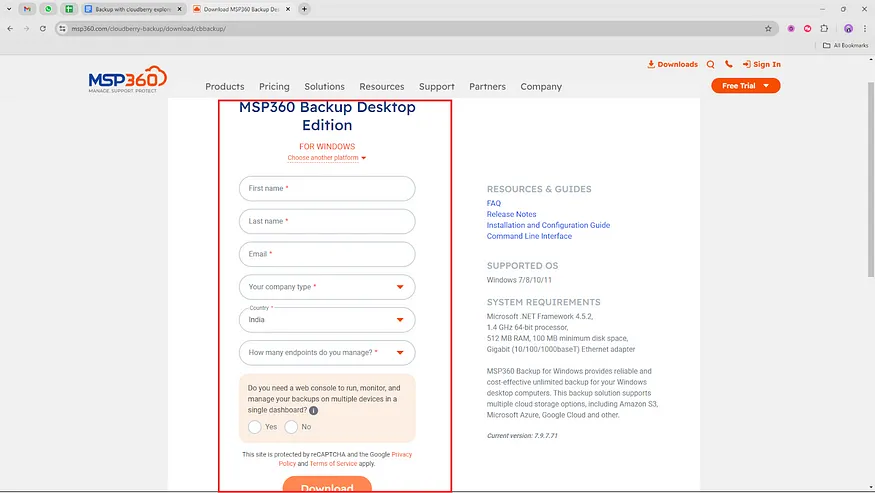
To download the Cloudberry, visit the following address: https://www.msp360.com/free-products/ and click the MSP360 FREE BACKUP Download button.
Fill out the form, and you will get the downloaded file in the local disk-c.
Once you have downloaded the file, you can install the application.
Once the application is installed in the system, you can open it on the desktop. Click on the version you require and proceed.
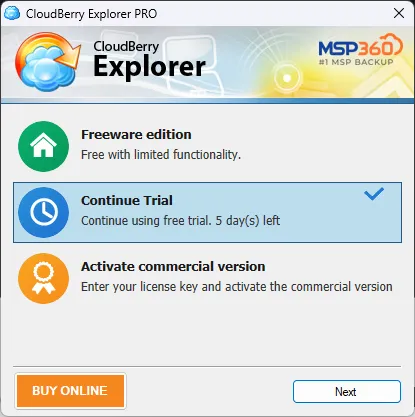
Once you have opened the application, you can view the following interface.

Before we start next, let’s get the pre-request site: —
Access Key
Secret Key
EndPoint
How to obtain an Amazon S3 access key pair

Login to your storx account using your username password or any of the given social signup option

Once you log in you will reach this dashboard. In this dashboard, click on the user icon at the top
When you click on the user icon it will open a dropdown list. From that list, click on access
When you click on the access list, it will open this screen, from which you can create an access token.
When you click on the Create button, it will open this popup
Provide a name to your access key and click on the “Continue” button
Once you confirm all the details and click on confirm, it will open this popup with all required tokens
To copy All keys, you can click on the “copy” button
To download All keys, you can click on the “Download” button
If you click on Show Key, it will show the key for that block

These are the example values for how the access key, secret key, and Endpoint will have values.
Setup in the Desktop
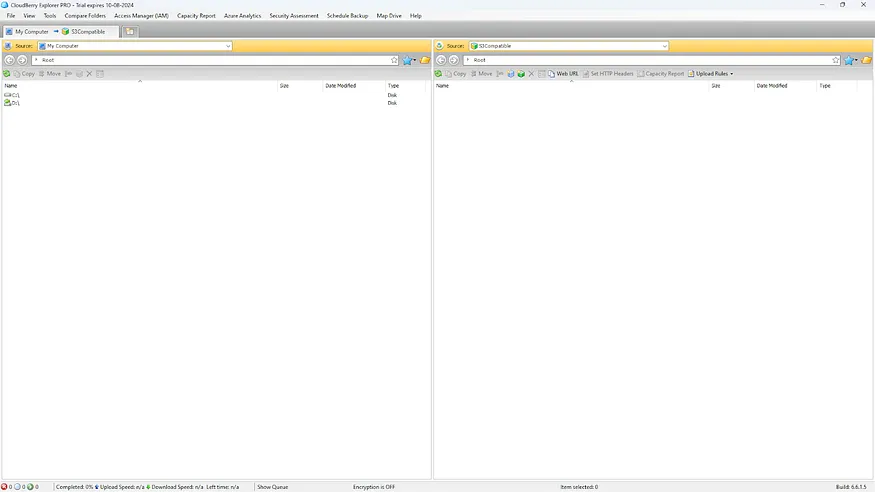
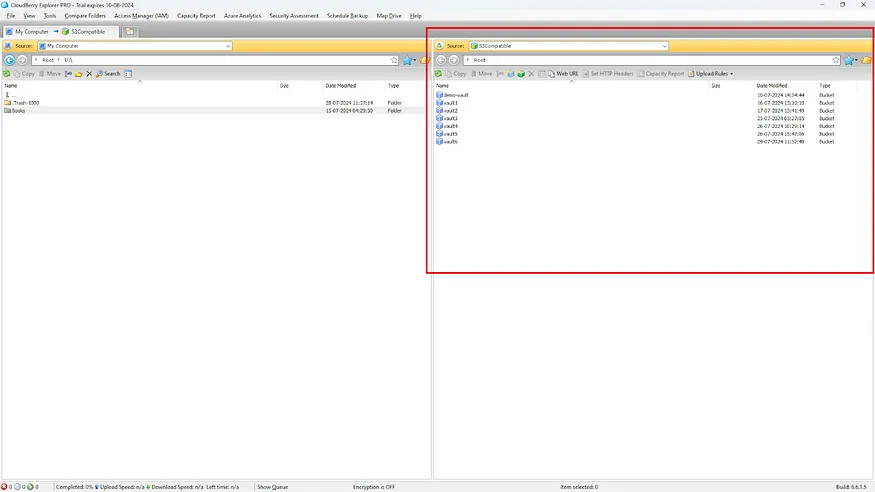
Once the application is installed on the PC you need to open the application. The interface would appear to be as follows:
Now, you must decide the source and the target file to transfer or back up the data.
From the below, select the source as my computer and target as s3 compatible
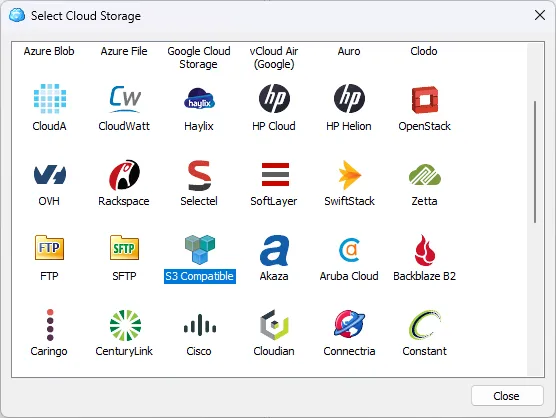
Click on the file in the top nav bar and add the account.
Select the S3 Compatible here in the below pop-up.
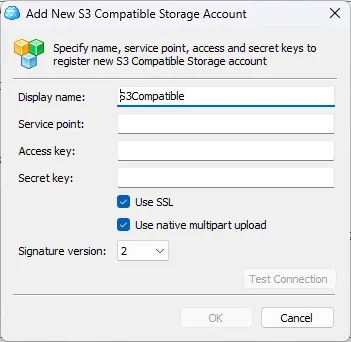
Provide the Access key, Secret Key, and end points.
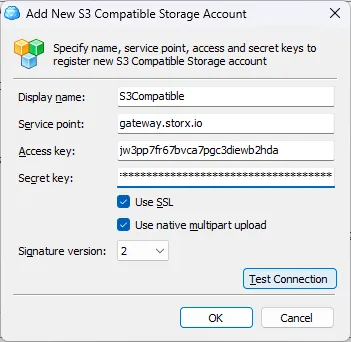
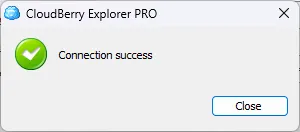
Fill in all the details required in the above and test your connection.
We should get the success message while creating the connection.
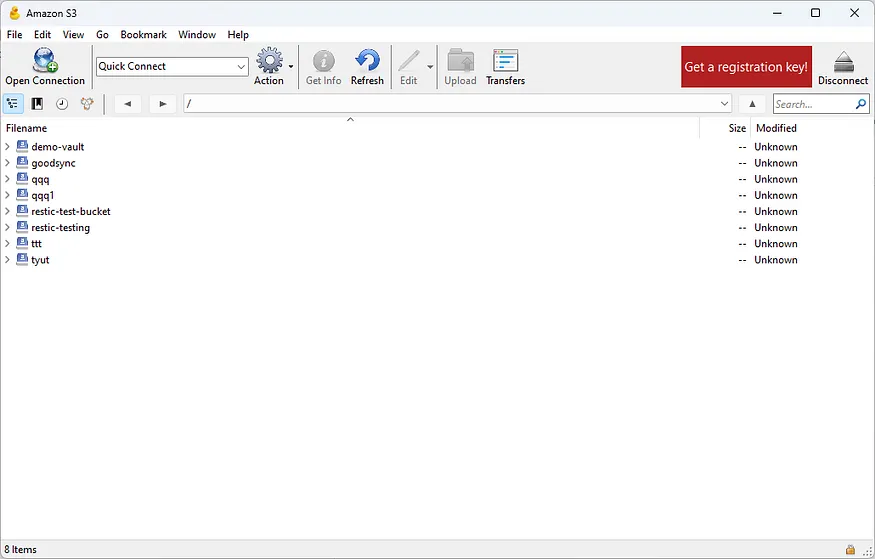
Once you have made the connection, you can locate the file in the figure below.
Now, you can process all the attachments and delete the file at your convenience. You can also transfer the file from another source, such as Backblaze b2, Wasabi, Google Drive, etc.


Discussion (1)