![Cover image for [Informative] Securing your XDC Mainnet Masternode](https://www.xdc.dev/images/3GoAixQCQT1g8aHMsfYCKgtIdkgOBw_V3hXCqtev_Hk/s:1000:420/mb:500000/ar:1/aHR0cHM6Ly93d3cu/eGRjLmRldi91cGxv/YWRzL2FydGljbGVz/LzZ1MzFubHBtdmw5/dWFwdzhqeHh0Lmpw/Zw)
Note: Although this guide refers to masternodes, it will also work for standby nodes as well as non-validator nodes (as long as they are reachable via a public IP address). For non-validator nodes using HTTP/Websocket JSON-RPC connection, you'll also need to take into account your specific port access requirements when dealing with ports 8888 and/or 8989.
XDC network masternodes are important because they validate transactions, help to maintain the network's security and integrity, and ensure that the network runs smoothly. Securing your node will help with all of these issues.
From a high-level consideration, to secure your XDC masternode you would need to:
- Keep it up-to-date with the latest security patches.
- Use a strong and unique password.
- Change your SSH port and enable firewall rules to restrict access to the node.
- Use SSL/TLS encryption to secure communication with it.
- Implement access controls to limit who can interact with it.
- Regularly monitor it for any suspicious activity or unauthorized access attempts.
We will deal with each of these in turn below.
Keeping your node up-to-date with the latest security patches
This has 2 components. Component 1 is the server OS. Component 2 is the XDC client.
Regarding the Server OS
As per XinFin's original XDC network node setup instructions deploying an XDC node by the Docker method is supported on CentOS, RedHat Enterprise Linux (latest release) and Ubuntu 15.04+.
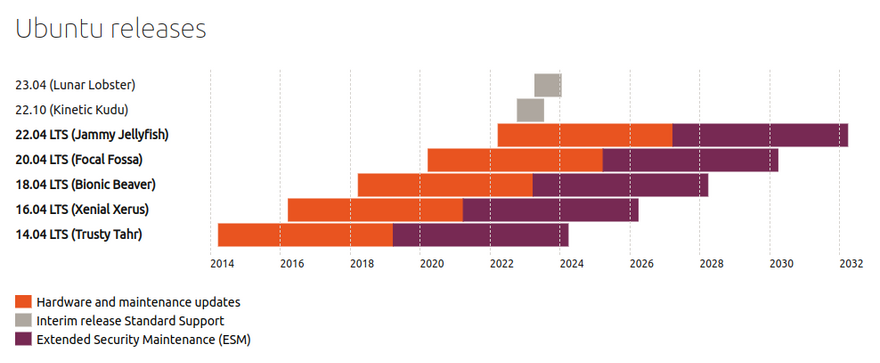
Each OS vendor has a period for which its product is supported. For example we can see in the image below that Ubuntu 20.04LTS has hardware and maintenance updates until 2025 as well as Extended Security Maintenance until 2032. Ensure your OS is supported with current updates.
To update the OS packages on your server we first need to connect to the remote server so we can then do all the following steps on the remote server. Remember to replace “root” in this command with your actual username for the remote server, and replace ip.address with the actual IP address of the remote server:
ssh -lroot -p22 ip.address
Update the OS packages:
sudo apt update -y && sudo apt upgrade -y && sudo apt autoremove -y
Many OS updates often require you to reboot your server, but we must first stop the XDC client. To do this, first change to the Mainnet client directory:
cd ~/XinFin-Node/mainnet
Stop the XDC client:
sudo ./docker-down.sh
Reboot the server:
sudo reboot
You’ll notice this has disconnected your Terminal from the VPS while it reboots. Allow enough time for the VPS to reboot, then reconnect to your VPS as you normally would. Remember to replace “root” with your actual username for the remote server, and replace ip.address with the actual IP address of the remote server:
ssh -lroot -p22 ip.address
Change to the Mainnet client directory:
cd ~/XinFin-Node/mainnet
Start the XDC Client:
sudo ./docker-up.sh
Logout of your server:
logout
Regarding the XDC Network Client
Connect to your VPS as you normally would. Remember to replace “root” with your actual username for the remote server, and replace ip.address with the actual IP address of the remote server:
ssh -lroot -p22 ip.address
Change to the Mainnet client directory:
cd ~/XinFin-Node/mainnet
In the Mainnet client directory there is a script we can run to upgrade the XDC network configuration scripts and the Docker images. Note that as part of the process it will stop and start the XDC client, so expect to see your peers drop on the XDC Foundation Network Stats page. To run the upgrade script:
sudo ./upgrade.sh
Logout of your server:
logout
Using a strong and unique password
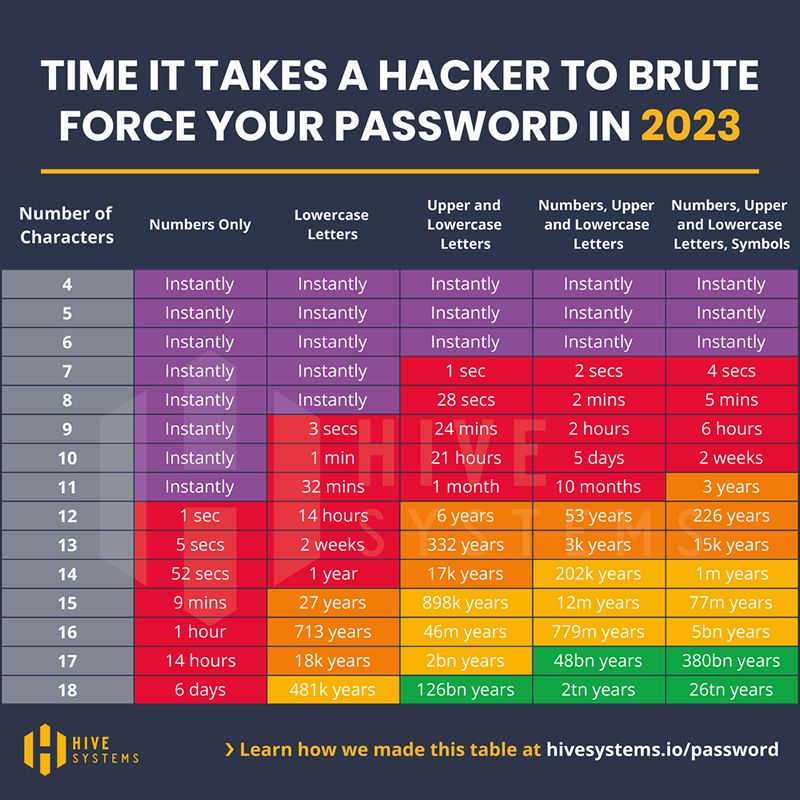
The time it takes to guess passwords by brute force depends on the length and complexity of the password, as well as the computing power of the attacker. It can range from a few seconds to several years or even centuries (or even longer!).
As per the image below (sourced from Hive Systems), in 2023 an 18 character password consisting of only numbers can take as little as 6 days to obtain by brute force. Using the same length password but including random numbers, upper and lowercase letters as well as symbols, can increase the brute force time to 26 trillion years with the same computing power.
Ensuring that a password is not reused is also important. If the same password is used on multiple sites then if ANY of those sites are compromised and your password is somehow obtained, it could potentially allow unauthorised parties to access other accounts/services where you have reused the same password.
If you have difficulty generating a random password with the criteria described above, there are online password generators from reputable vendors. One example of this is the Norton Password Generator

If you already have an existing password and would like to change it, you can do so by first connecting to your VPS as you normally would. Remember to replace “root” with your actual username for the remote server, and replace ip.address with the actual IP address of the remote server:
ssh -lroot -p22 ip.address
Change your password with the following command. Replace <username> with the actual username of the user whose password you want to change. You will be prompted to enter and confirm the new password:
sudo passwd <username>
Logout of your server:
logout
Note: another alternative is to setup ssh key-based authentication and then to disable the ability to use password logins. This will not be covered in this article. If there is demand, I'll consider covering it in a future article.
Change your SSH port and enable firewall rules to restrict access to the node
Securing the server ports and RPC endpoint is important to prevent unauthorized access and potential security breaches such as execution of malicious code.

Those who were around at the time may remember that the Andromeda update to the XDC network implemented an upgrade to Geth 1.9.X.
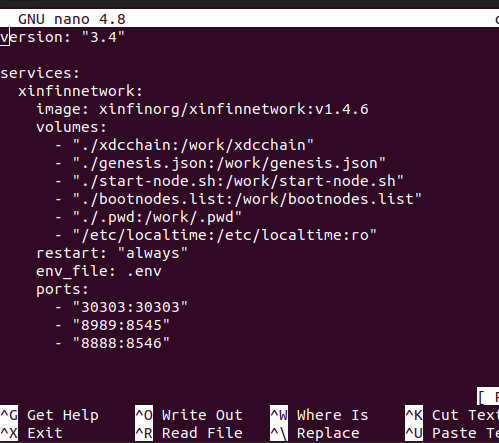
From examining an XDC node's docker-compose.yml file shown in the image below, we can see that Geth nodes on the XDC network use:
- Port 30303 for RLPx(TCP)/UDP peer-to-peer communications allowing node discovery and connection to peers
- Port 8989 for HTTP JSON-RPC API which allows external applications to interact with the XDC blockchain
- Port 8888 for secure Websocket communications to the XDC blockchain
In addition Linux servers normally have their SSH port set at 22 by default, and this is used to connect to the server and access its command line.
For the purposes of this article, we will assume that your masternode is being used only for the purpose of maintaining the XDC blockchain and does not require RPC/Websocket access for external applications to use.
Based on the above, the best way of securing our node with a firewall is to:
- Change our SSH port from 22 to a different number to make it harder for random malcontents to connect
- Use a firewall to block ALL incoming ports
- Then open ONLY ports 30303 and our new SSH port
- We will leave ports 8888 and 8989 blocked (filtered) as we are assuming that these are not needed as noted above
To change the port used for SSH on Ubuntu, you need to first connect to your VPS as you normally would. Remember to replace “root” with your actual username for the remote server, and replace ip.address with the actual IP address of the remote server:
ssh -lroot -p22 ip.address
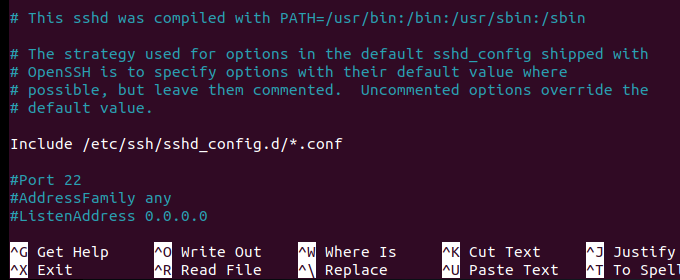
Next you need to edit the SSH configuration file located at /etc/ssh/sshd_config :
sudo nano /etc/ssh/sshd_config
Look for the line that says "Port 22". If there is a # before "Port 22" as in the image below, you'll need to delete the # symbol:
Change the number 22 to whatever new port number you want to use for SSH connections:
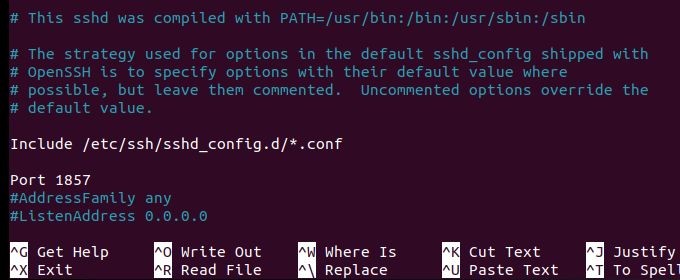
Save the file:
Press "CTRL+X"
Press "y"
Press "ENTER"
Then restart the SSH service:
sudo service ssh restart
Note: Whenever we have previously used "-p22" as part of our command to connect to a VPS via SSH, this is specifying to ssh what port the remote server is using for ssh. From now on whenever you connect to your XDC node, you will need to change the 22 in "-p22" to your new port number instead.

Now to implement a firewall we will use UFW (Uncomplicated Firewall) which is a front-end tool for managing firewall rules on Ubuntu.
First we need to install ufw:
sudo apt install ufw
Next we establish our default policies to block ALL incoming traffic and only allow outgoing traffic:
sudo ufw default deny incoming
sudo ufw default allow outgoing
Then we open up port 30303 so the XDC client is discoverable by peers:
sudo ufw allow 30303
IMPORTANT: Next we need to ensure that we open up our SSH port (22 or whatever port number you changed it to):
sudo ufw allow <yourSSHport>
Lastly we need to enable UFW:
sudo ufw enable
Reboot your server:
reboot
Now ssh to your server to test your new port number instead of 22 and ensure that you can connect ok.
If you are unable to connect and need to get back to the command line on your server to modify the firewall details, most VPS providers will have a console for the server directly accessible through their VPS control panel. So you just need to go to your VPS provider website, login and find the console for the VPS running your XDC client. Then login and do what you need to do.
After rebooting, we will need to restart the XDC Mainnet client, so first we need to SSH to our VPS:
ssh -lroot -p<yourSSHport> ip.address
Change to the XDC Mainnet client directory:
cd ~/XinFin-Node/mainnet
Restart the XDC Mainnet client:
sudo ./docker-up.sh
Then logout of your VPS:
logout
Note: In another planned future article we will be making some further adjustments allowing certain IP addresses restricted access to port 8989 (HTTP JSON-RPC) in the firewall rules.
Use SSL/TLS encryption to secure communication with the node
SSL/TLS encryption makes things safer if external applications are using the JSON-RPC (HTTP/Websocket) functionalities of your node to communicate with the XDC blockchain. The assumption of this article is that your node is not being used for this so this issue will not be discussed here. If there is demand I will explore it in a future article
EDIT: The SSL/TLS article has been published HERE.
Implement access controls to limit who can interact with the node
This involves implementing RPC authentication and configuring firewall rules to restrict access to the node from specific IP addresses or networks and we will be playing with this shortly in an upcoming article where we will be allowing restricted access to specific ports from only certain whitelisted IP addresses.
EDIT: The article on implementing authentication to gate access to RPC endpoints has been published HERE.
Regularly monitor it for any suspicious activity or unauthorized access attempts
You can regularly monitor an XDC node for any suspicious activity or unauthorized access attempts by setting up alerts and notifications for any unusual activity and regularly reviewing logs and metrics. Additionally, you can consider using third-party security tools and services to enhance your node's security. Usage of monitoring should not however replace implementing security best practices such as using strong passwords and keeping your software up to date.
Many VPS providers will have some kind of VPS monitoring in place which is already accessible via their control panel and generally includes alerts when certain preset VPS parameter limits (eg CPU usage, memory usage, network traffic, disk I/O) are breached. If your VPS provider does not provide this, third party solutions such as Netdata can be used to provide it. Use of Netdata will not be covered here. If there is demand I will cover it in a future article.
EDIT: An article on using Uptime Robot to monitor your XDC client's uptime has been published HERE.
EDIT: You can also learn about determining directly if an XDC Client's RPC/WSS endpoints are functional by examining the Github scripts for a load balancer we published information on HERE and HERE. Those articles contain links to 2 separate GitHub repos you can examine to see how to check RPC/WSS endpoints yourself.

Implementing the fail2ban linux package can also be useful for keeping your node safe by blocking IP addresses that attempt to access the node with incorrect login credentials or perform suspicious activities.
Install fail2ban:
sudo apt install fail2ban
Next we create a copy of the configuration file for us to customise:
sudo cp -p /etc/fail2ban/jail.conf /etc/fail2ban/jail.local
Open the new file in nano so we can configure fail2ban:
sudo nano /etc/fail2ban/jail.local
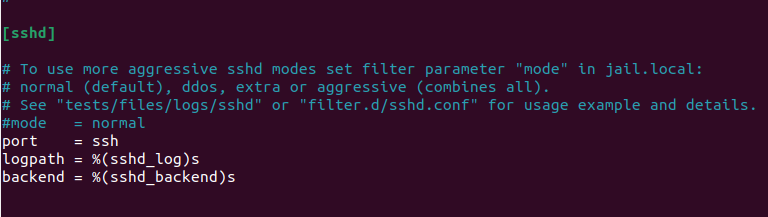
Scroll down until you find this sshd section:
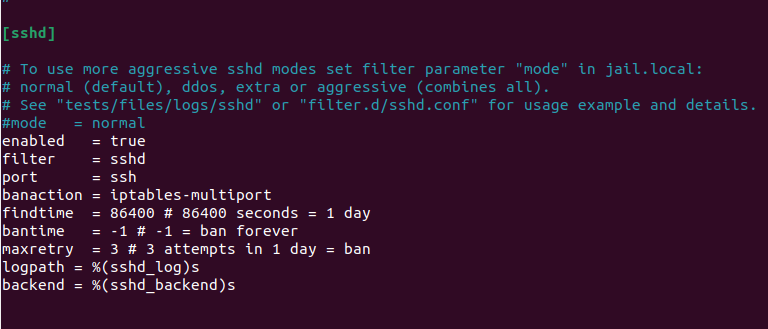
Replace the 3 white lines shown above with all of these lines:
enabled = true
filter = sshd
port = ssh
banaction = iptables-multiport
findtime = 86400
# 86400 seconds = 1 day
bantime = -1
# -1 = ban forever
maxretry = 3
# 3 attempts in 1 day = ban
logpath = %(sshd_log)s
backend = %(sshd_backend)s
Save the file:
Press "CTRL+X"
Press "y"
Press "ENTER"
Restart fail2ban and enable the service:
sudo systemctl restart fail2ban
sudo systemctl enable fail2ban
Logout of your server
logout
Commands to use fail2ban
To check who is banned:
sudo fail2ban-client status sshd
To unban an IP address:
sudo fail2ban-client set sshd unban <ip address>
If you manage to ban yourself by using incorrect passwords etc, you can use the direct console on your VPS provider's control panel to access the command line of your VPS (same as described in the Firewall section above) and unban your IP address using the above command.
(Special thanks to go140point6 GitHub re fail2ban)
In conclusion, securing XDC nodes is crucial to protect the network from potential attacks and ensure the safety of user funds. By implementing the methods discussed in this article, such as using strong passwords, enabling firewalls, regularly updating software, and using monitoring tools, node operators can significantly increase the security of their nodes. It is important to stay vigilant and proactive in maintaining node security to prevent any potential breaches. With these measures in place, the XDC network can continue to operate securely and efficiently.
In case of any technical queries on XDC Network, feel free to drop your queries on XDC.Dev forum.
Quick links:
XinFin.org
XDC Chain Network Tools and Documents
XDC Network Explorer
XDC Dev Forum
Beta — XDC Web Wallet
XDC faucet
XinFin — XDC Social Links:
Twitter
GitHub
Telegram
Facebook
LinkedIn
YouTube


Discussion (1)
You always do good work @s4njk4n! ...thank you!