A smart contract is a program stored on the blockchain and executes an agreement when certain conditions are met. It can be created using a programming language like Vyper, which executes on a decentralized computer with millions of executable projects. Vyper is a Python-based language, and Vyper smart contracts are saved with .vy extensions. This article will look at how to build secure smart contracts using Vyper.
Table of Contents
An overview of smart contracts using XDC Network
1.1. Smart contract on XDC Network examplesHow to implement a smart contract on the XDC Network using Vyper
2.1. Step 1: Install Vyper
2.2. Step 2: Write the code
2.2.1. Vyper code to create a smart contract
2.3. Step 3: Compile the Vyper smart contract
2.4. Step 4: Deploy the contract
2.5. Step 5: Test the deployed contract
An overview of smart contracts using XDC Network
Smart contracts store rules for negotiating the terms of a contract. The conditions are directly written into the code. They automatically verify the conditions when fulfilled and then execute the agreed-upon terms. There is no third party; those involved in the contract can sign it directly. This results in transparency, efficiency, security, speed, and cost reduction. Small wonder that companies are increasingly turning to smart contracts instead of physical ones.
Smart contract blockchain examples
Let’s understand how a smart contract works using a couple of examples.
Example 1:
Consider a crowdfunding platform where anyone can donate money to save patients needing expensive treatment. Patients’ families must pay the platform to advertise their needs and raise funds. The donated money goes to the platform and then to the patients. Clearly, the platform serves as a third party.
If a smart contract were included in the above scenario, it would include the patient’s health problems and hospital reports for proof and facilitate donation collection. There would be no need for a third party.
A Vyper smart contract could be programmed to automatically execute all the actions with respect to certain terms and conditions. If enough funds are raised before the deadline, all the contributions are sent to the patient’s families, and treatment can be administered quickly. If the treatment cannot be given, the funds collected are returned to the donors. In smart contracts, data is stored in a distributed manner over XDC Network. Hence, in the above example, no person controls the money.
Example 2:
Consider a scenario where Tanya buys Maria’s flat. Maria must provide her flat’s address while Tanya must pay the rent. In this case, a smart contract will work in the following manner:
First, independent storage is created where Tanya and Maria can put their values but cannot easily remove them.
Tanya puts her rent in storage while Maria puts her address.
When Maria receives the payment confirmation, Tanya receives the address.
If Tanya goes to the flat and finds that the address provided by Maria is wrong, Tanya’s rent is returned.
If Tanya suddenly changes her plan and doesn’t want the flat anymore, she will have to pay Maria some penalty as liquidated damages. The remaining amount of her rent will be transferred back to her.
At the end of the agreement, the smart contract is considered fulfilled and stored in the XDC Network.
As smart contracts are designed and implemented within XDC Network, they inherit their properties.
They are immutable, meaning that once they are made, no one can tamper with them.
They are distributed. Like any transaction, the outcomes of the contract are validated by all the participants. It is impossible for an attacker to force control to release funds as any participant can detect the attempt and mark it invalid. This feature always ensures the integrity of the blockchain.
How to implement a smart contract on the XDC Network using Vyper
The following steps are used to implement a Vyper smart contract.
Step 1: Install Vyper
Download Python 3.6 or higher versions from Python’s official website.
The pip package manager is essential to install Vyper using the following command:
pip install vyper
Step 2: Write the code
Let’s build a smart contract to store and display a user’s address.
Note: You must register with XDCPay to interact with the XDC Network.
Vyper code to create a smart contract
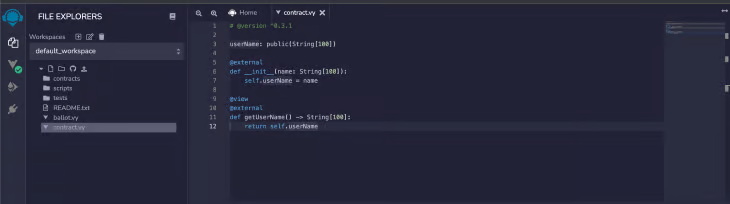
Create a folder, vyper_contract, and a file, contract.vy, inside the folder. Contract.vy is the Vyper code file to create the necessary Vyper smart contract.
The corresponding Vyper code is as follows:
# @version ^0.3.1

address: public(String[100])

@external
def __init__(addr: String[100]):
    self.address = addr

@view
@external
def getAddress() -> String[100]:
    return self.address
The first line is the version pragma. It informs the Vyper compiler to use version 0.3.1 to compile the Vyper smart contract. the address is the state variable. As the name suggests, it stores the user's address as a string. An @external creates an external function that can be invoked from the outside. The init function is the constructor of the Vyper smart contract. It comes into play when the contract is deployed.
The @view informs Vyper that the getAddress function does not change the state of the XDC Network. It returns the address state variable, which holds the user's address.
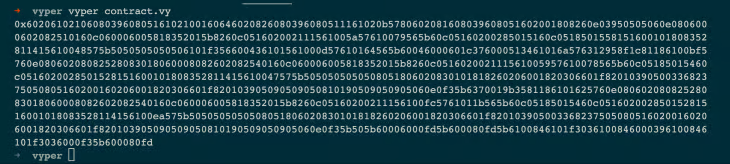
Step 3: Compile the Vyper smart contract
This step checks to ensure the contract works as desired.
vyper .vy, or in this case, vyper contract.vy, is the command to compile the contract.
The output is a hexadecimal string that is the bytecode of the contract.
Compile the contract remotely using Remix IDE. In the IDE, create a new file called contract.vy.
Include the same Vyper code mentioned above in this remote file.
Install the Vyper plugin in the Remix IDE. Click on the socket icon in the sidebar and type “vyper” to search for the same.
Click Activate on the item that appears.
Click on the Vyper icon and press the Compile contract.vy button.
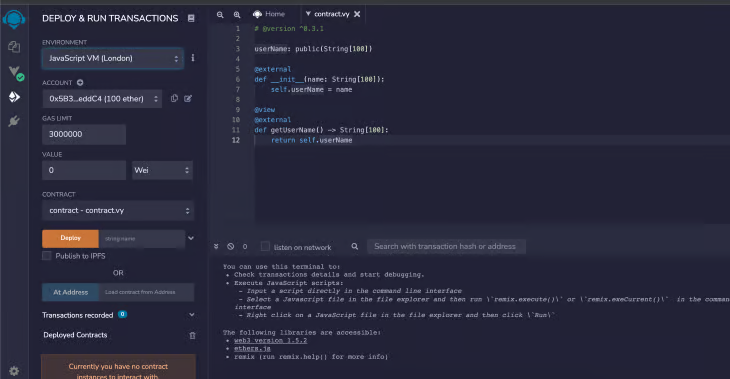
Step 4: Deploy the contract
Click the icon in the sidebar.
From the ENVIRONMENT dropdown, select Injected Web3. A small UI beneath will change to the XDC Apothem Network you are connected to.
Click on Deploy and input a word beside the Deploy button. This word is the user’s address - the desired input.
Clicking the Deploy button will make the XDCPay UI appear.
Click Confirm.
The Vyper smart contract will be deployed to the XDC Apothem Testnet.
Step 5: Test the deployed contract
Now, interact with the contract deployed in the previous step to call the methods in the Remix browser IDE or view the deployed contract on the Ropsten Ethereum Faucet.
Click on the CONTRACT AT xdc26… dropdown.
You will see the functions and state variables, getAddress, and address. Choose getAddress.
It will return the word passed to the constructor during deployment in step 4. The action is called the getAddress function in the contract.
A Vyper smart contract that stores and displays user addresses has been tested and deployed successfully! Try your hand at it by using the codes above. You can also try it with different variables.
In this article, we looked at how to build a smart contract using the pythonic language Vyper on XDC Network. We also touched on some of the features of a smart contract on XDC Network
Important Links related to XDC Network https://XinFin.org XDC Explorer XinFin (XDC) Remix XDCPay XDC Faucet XDC Web Wallet
Web 3.0 is the future of web technologies and XDC Network is one of its main principles. As trust in blockchain grows, smart contracts - being secure, transparent, fast, and cheap - will soon become a lot more mainstream.
For any developer support, post your queries here at https://xdc.dev


Discussion (0)