Learn how to mint burn and blacklist your token
A token is a type of cryptocurrency representing an asset that can be used for payment or investment purposes.
You probably have experience dealing with tokens in real life. Remember the last time you went to carnivals? Before you could play a game, you probably had to change your money into tokens to use at the various stalls:
The stalls at the carnivals would only accept tokens as a form of payment — strictly no cash for them.
In the blockchain world, a token is similar to those you use in carnivals. First, you use fiat currency to change into a cryptocurrency like XDC. Then, you use XDC to change it into a token. The token can then be used as payments for smart contracts running on the XinFin blockchain:
Make sense? In this article, I will walk you through the steps to create your own tokens on the XinFin blockchain. Some programming is required, but it should be manageable if you have some programming background. At the end of this article, you should have a much clearer idea of what tokens are and how to transact with them.
Difference between a coin and a token
Most of the time, it is easy to assume that a token is the same as a coin, but their differences are subtle. Here are some easy criteria to differentiate between a coin and a token:
A coin operates on its own blockchain. By this definition, it is easy to point out that examples of coins are ETher and XDC. A coin also acts like money, where it can replace fiat currencies for payment purposes. Finally, a coin can be mined on the blockchain.
On the other hand, a token does not have its own blockchain. Instead, it runs on an existing blockchain, such as the XDC network. A token usually uses a smart contract to maintain records of who owns what. Unlike coins generally accepted for various services on the Blockchain, tokens are much more restrictive in their uses, and specific tokens are only accepted for specific services (think of the carnivals example).
A coin is essentially a digital version of money, while a token can represent more than just money; it may represent assets or deeds.
You can buy tokens with coins, but not the other way round.
Token Contract
Tokens are created using smart contracts in XDC Network. A token smart contract is essentially a smart contract that contains a map of account addresses and their balances:
On the XDC network, most tokens are based on the XRC-20 method. XRC-20 defines a fungible token standard that token implementers must adhere to.
A fungible token means that the token is divisible and can be broken down into smaller fractions. E.g., one token is equivalent to the sum of 0.5 tokens, 0.3 tokens, and 0.2 tokens.
Programmatically, XRC-20 compliant tokens must implement the following functions:
totalSupply — returns the total token supply
balanceOf(address _owner) — returns the account balance of _owner
transfer(address _to, uint256 _value) — transfers _value to _to and fire the Transfer event. The function should revert if the _from account does not have enough tokens to spend
approve(address _spender, uint256 _value) — Allows _spender to withdraw from the account several times, up to the _value amount
transferFrom(address _from, address _to, uint256 _value) — transfers _value from _from to _to and fires the Transfer event. The function should revert unless the _from account has deliberately authorized the sender of the message via some mechanism
allowance(address _owner, address _spender) — returns the amount which the _spender is still allowed to withdraw from the _owner.
XRC-20 also defines the following events:
Blacklistupdate — Allows to block the users by entering the user address and entering the boot value as True and false. Once the address is blacklisted the blacklisted address will not be able to receive or send the funds
Mint — Allows the owner to mint the new tokens
Burn — Allows the owner to burn the existing tokens.
Many of these functions are used when you use your token for service payment. For this article, I will focus on the following:
How to create your token on the XDC network
How to mint, burn and blacklist your token
Creating Your Token Contract
To make it easy to create your token, you can check out the GitHub repository https://github.com/RuslanWing/Smartcontracts/blob/main/Gold.sol. All you need to do is to import this base implementation in your own contract and do add it to your own implementation, like this:
`// SPDX-License-Identifier: MIT
pragma solidity >=0.7.0 <0.8.0;
import “https://github.com/OpenZeppelin/openzeppelin-contracts/blob/release-v3.2.0-solc-0.7/contracts/token/ERC20/ERC20.sol";
import “https://github.com/OpenZeppelin/openzeppelin-contracts/blob/release-v3.2.0-solc-0.7/contracts/token/ERC20/ERC20Burnable.sol";
import “https://github.com/OpenZeppelin/openzeppelin-contracts/blob/release-v3.2.0-solc-0.7/contracts/access/Ownable.sol";
contract Goldtoken is ERC20Burnable, Ownable {
mapping(address => bool) _blacklist;
event BlacklistUpdated(address indexed user, bool value);
constructor()
ERC20(“Gold Token”, “GLD”)
Ownable()
{
// _owner = _msgSender();
_mint(msg.sender, 10000000 * (10 ** uint256(decimals())));
}
function mint(address to, uint256 amount) public virtual onlyOwner {
// require(_owner == _msgSender(), “Only owner is allowed to mint token.”);
_mint(to, amount);
}
function blacklistUpdate(address user, bool value) public virtual onlyOwner {
// require(_owner == _msgSender(), “Only owner is allowed to modify blacklist.”);
_blacklist[user] = value;
emit BlacklistUpdated(user, value);
}
function isBlackListed(address user) public view returns (bool) {
return _blacklist[user];
}
function _beforeTokenTransfer(address from, address to, uint256 amount) internal virtual override(ERC20) {
require (!isBlackListed(to), “Token transfer refused. Receiver is on blacklist”);
require (!isBlackListed(from), “Token transfer refused. You are on blacklist”);
super._beforeTokenTransfer(from, to, amount);
}
}`
Using OpenZeppelin’s base token contract means you don’t have to worry about implementing all the XRC20 functions I have described above.
In the above token contract:
you imported the base ERC20.sol (ERC20) contract from OpenZeppelin
your token contract (Goldtoken) is inheriting from the ERC20 base contract with the blacklist functionalities
in the constructor of the contract, you (the contract owner) are minting 1000 tokens using the _mint() function (defined in the ERC20 contract). Internally, you will represent these 1000 tokens as 1000 x 1⁰¹⁸.
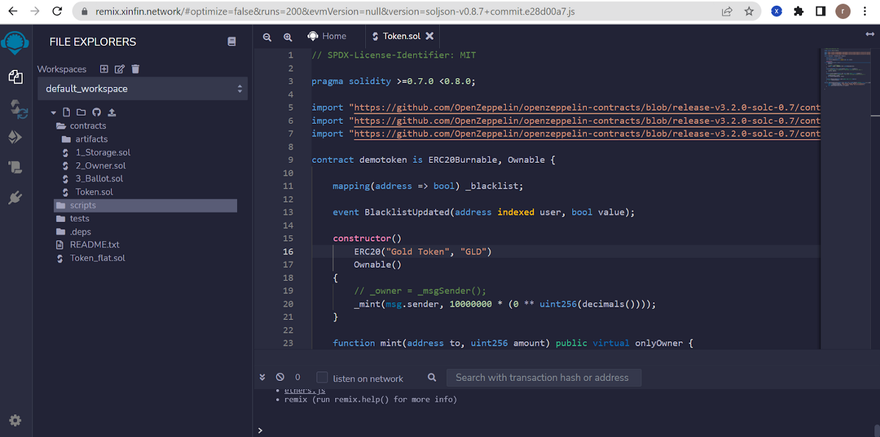
If you are following along, go ahead and paste the above code in the Remix IDE ( https://remix.xinfin.network/ )
Deploying the Contract using XDCPay
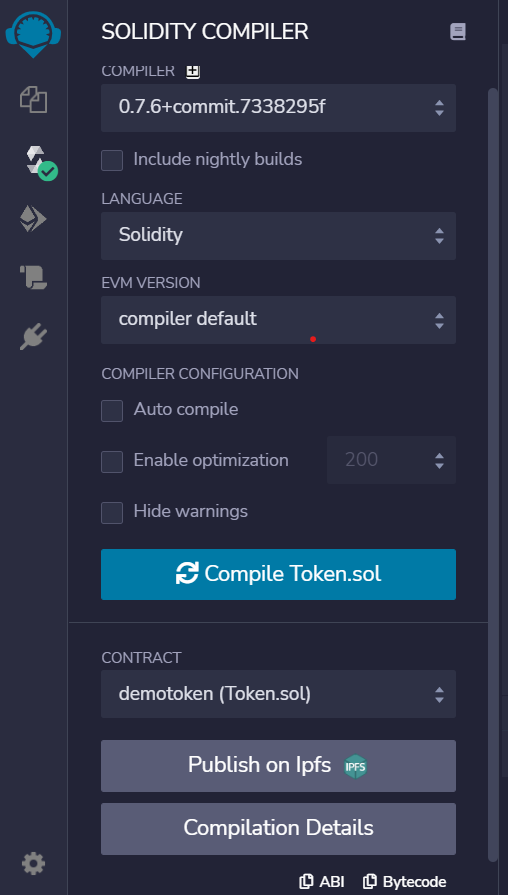
In the Remix IDE, ensure that the token contract is compiled and without any errors:
Next, in the DEPLOY AND TRANSACTIONS tab of the Remix IDE, locate the Deploy button (in orange), and enter the following strings separated by a comma:
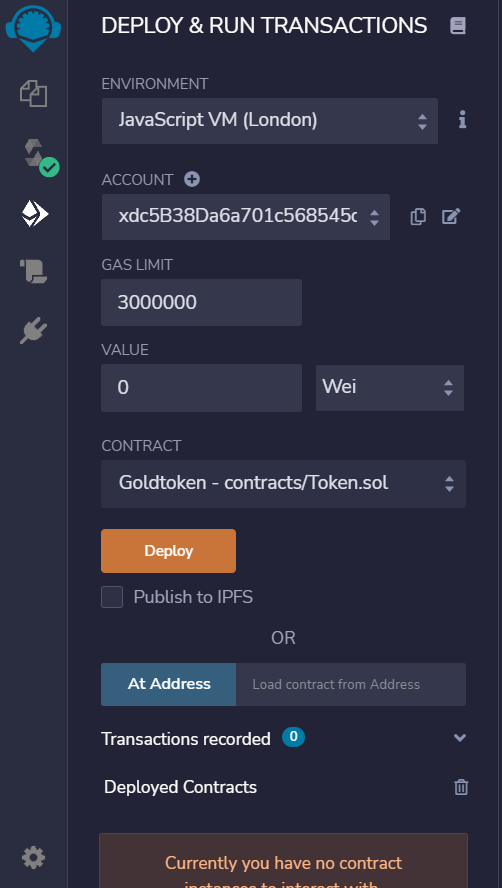
Click Deploy to deploy the token contract onto the Apothem testnet. XDCPay will now appear, so go ahead and confirm the transaction.
Once the token contract has been confirmed, you will see the contract at the bottom of the page. Click the Copy button to copy the contract address to the clipboard:
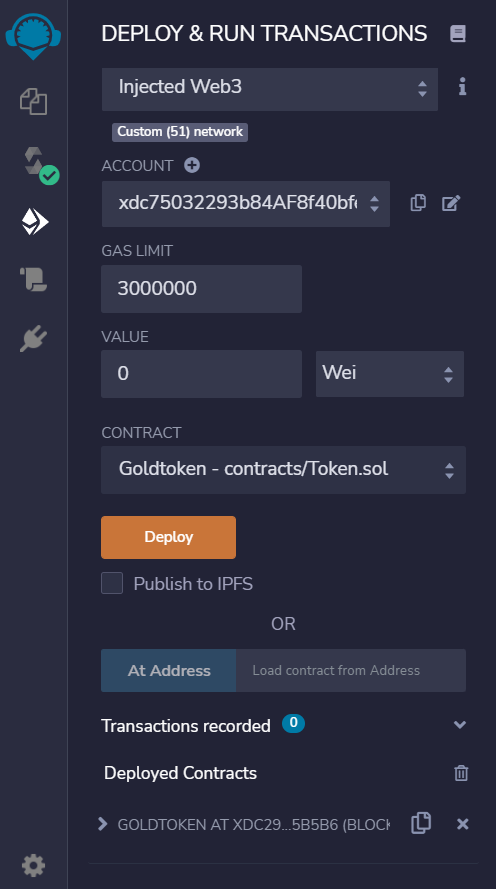
My token contract address is xdc29D70C865Be7fc065F4036Bb651580ed7AE5B5B6
Importing the token into XDCPay
In XDCPay, click on the Add Token:
Enter the token contract address and wait for the Token Symbol to populate. Then, click Add Custom Token:
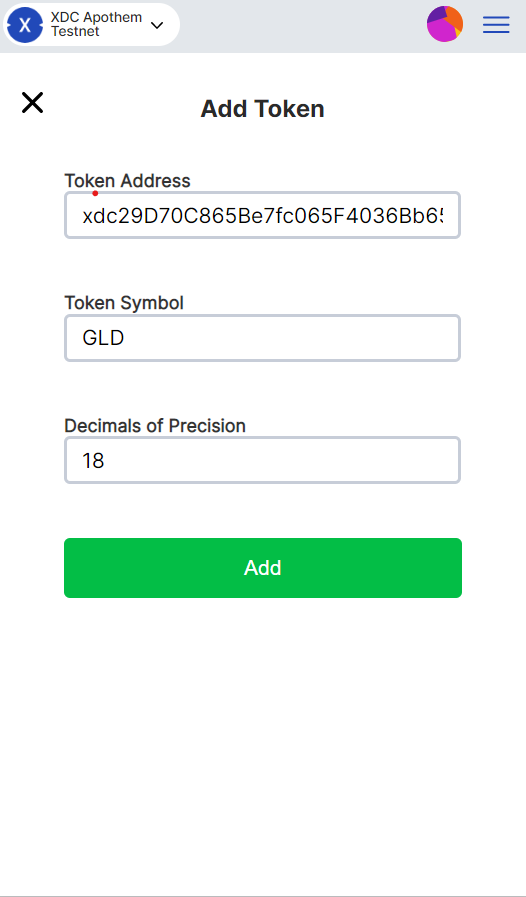
You will now see your token and the balance.
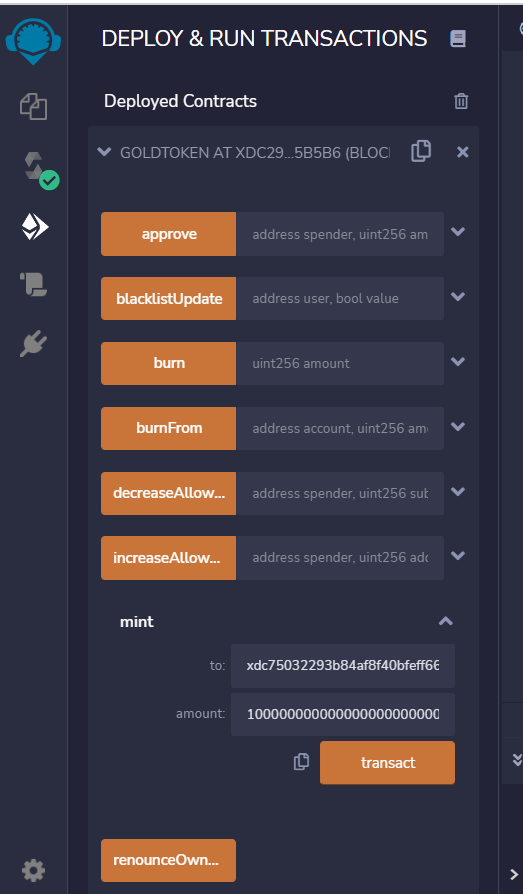
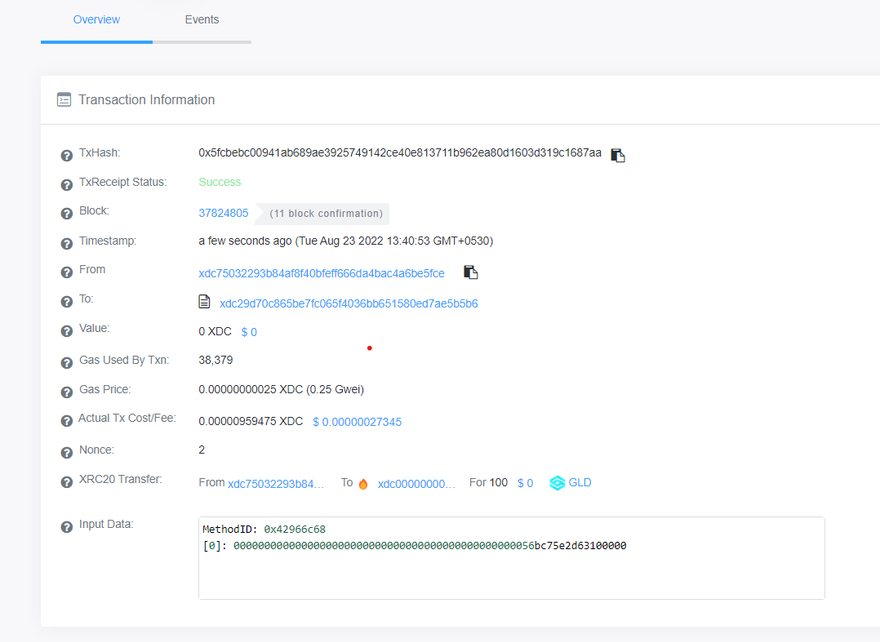
Minting new tokens
To mint a new token to the total supply, you will have to go to remix and select the mint functionality, where you will have to enter the owner’s address and the amount of the tokens to be minted and make sure you have entered 18 decimal at the end.
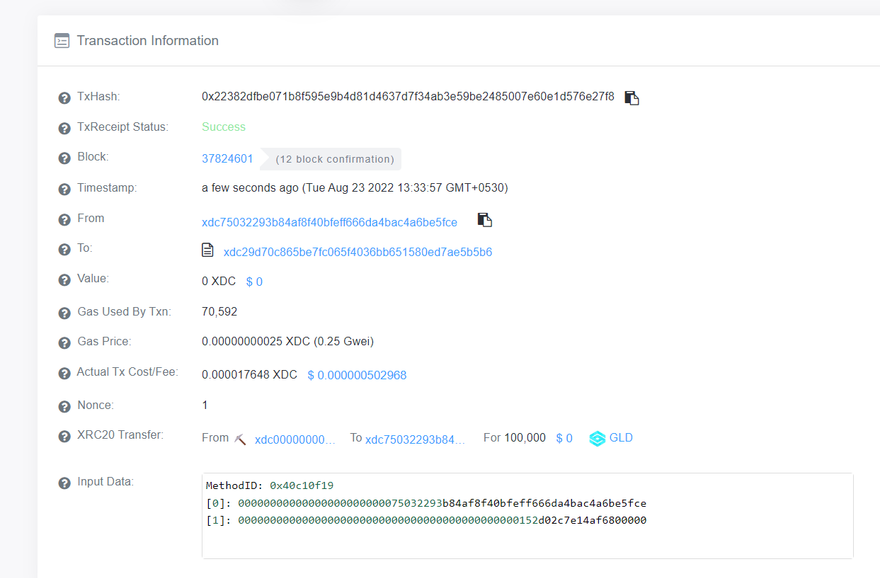
After click on transact you will see the pop up from XDCPay submit the transaction and after that you will receive the tx hash and on explorer you can see new tokens has been minted and added to the total supply.
Burning Tokens
To Burn the tokens from the total supply you will have to go at remix and select the burn functionality and enter the amount of the tokens you would like to burn with 18 decimals
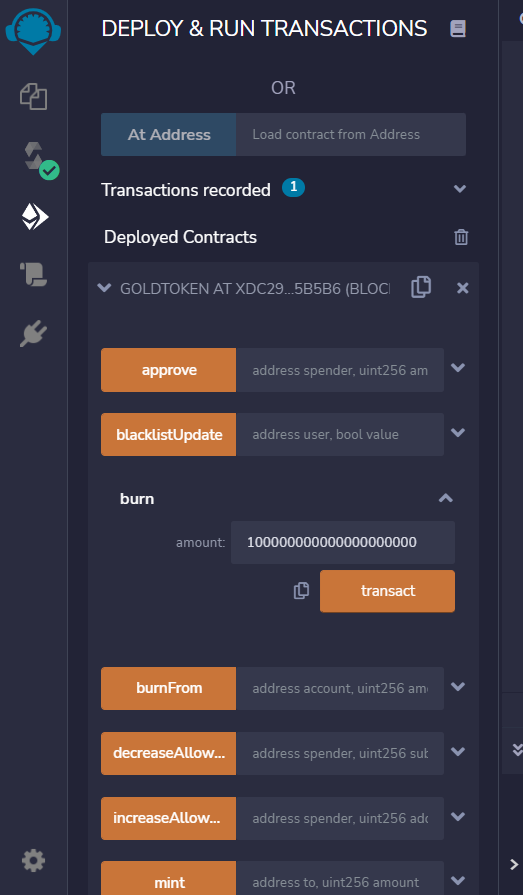
After click on transact you will see the pop up from XDCPay submit the transaction and after that you will receive the tx hash and on explorer you can see the tokens has been burned from the total supply.
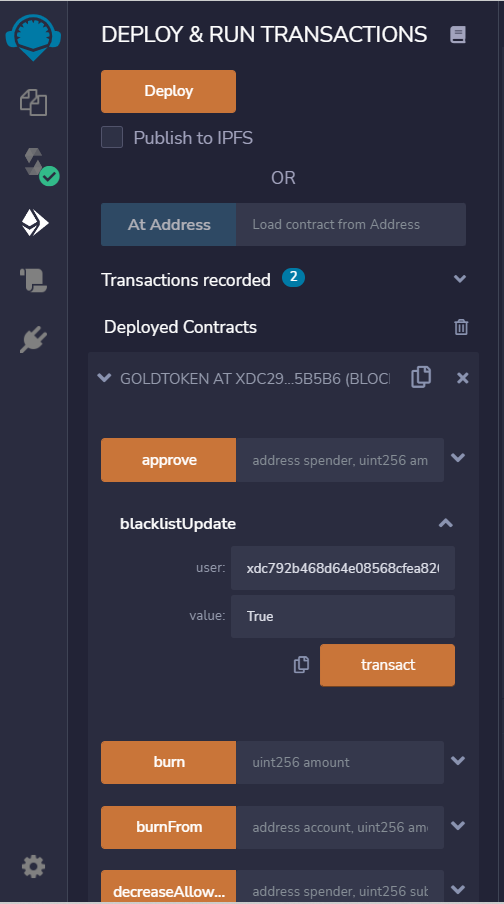
Blacklisting address
If the contract owner would like to blacklist the specific address. You will have to visit the remix and select the update blacklist functionality where you will have to enter the address which you want to blacklist and enter the value as True or False if you would like to blacklist enter True and if you would like to remove from blacklist enter the value as a false.
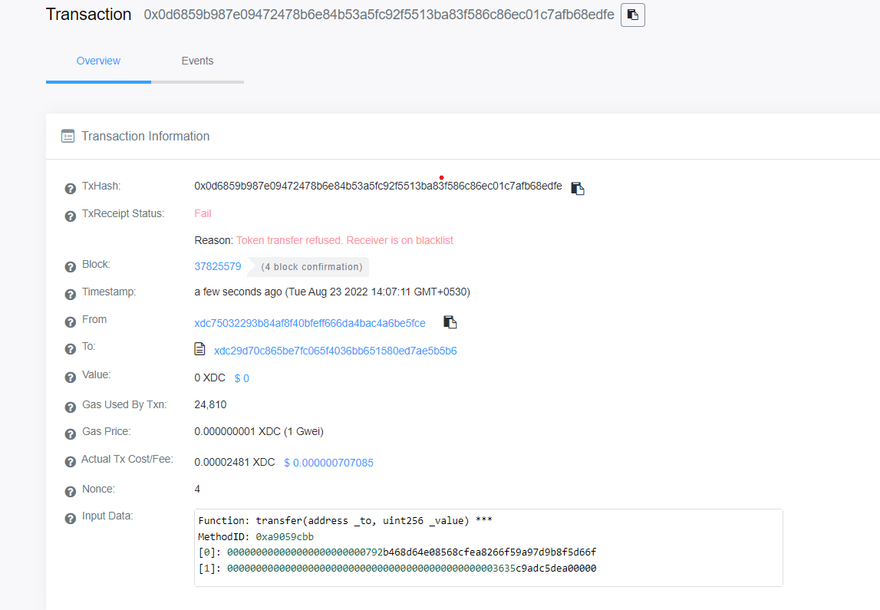
Once the address is blacklist the blacklisted address will not be able to send or receive the tokens and receive the error and the tx will be failed
Notice in particular the last line where you see an address of xdc000000…. This address (abbreviated as xdc00) is known as the null address. When you mint your token, this null address will be used as the origin account where tokens will be transferred to the token owner.
Please do not send XDC or any other tokens to this null address. All Tokens sent to this address will be lost forever.
If you have any questions please feel free to post it at https://xdc.dev


Discussion (1)
Great work as always Ruslan