XDC Network now supports development environments like Truffle and Hardhat, making it easier to work with smart contracts and Ethereum nodes. They provide tools to write seamlessly, test, and deploy smart contracts. In this guide, we’ll create a hello world smart contract and deploy it using hardhat.
Prerequisites:
- Node.js installed on your system
- CLI/Terminal
- Text Editor
What is Hardhat?
Hardhat is a development environment that helps developers compile, deploy, test, and debug their Ethereum applications. It has some of the cleanest, most detailed documentation. Hardhat also provides console.log() functionality, similar to javascript for debugging purposes. Hardhat also has many plugins, which further increases its functionality.
Installing hardhat and other dependencies
We’ll install hardhat using npm, which comes with node.js.
First, create a new project directory and cd into it. Feel free to use your own names here instead:
mkdir HardhatTutorial
cd HardhatTutorial
Open terminal/cmd in your project directory and type the following.
npm install -d hardhat
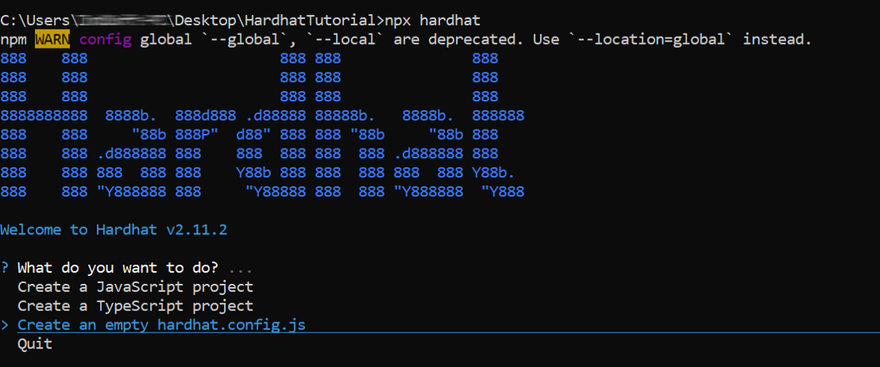
Now that we have the hardhat installed let’s start a new hardhat project. We’ll use npx to do so. Npx helps process node.js executables.
npx hardhat
You’ll be greeted with a CLI hardhat interface. Select the second option, “Create an empty hardhat.config.js”, and press enter.
Now, let’s install other dependencies required to work with hardhat.
npm install — save-dev @nomiclabs/hardhat-ethers ethers @nomiclabs/hardhat-waffle ethereum-waffle chai
We need these dependencies to write automated tests for contracts.
The most common issue while installing packages with npm can be an internal failure with node-gyp. You can follow the node-gyp installation instructions here.
Note: If you encounter the node-gyp issue, you will need to have your python version match one of the compatible versions listed in the instructions above.
Another common issue is a stale cache. Clear your npm cache by simply typing the below into your terminal:
npm cache clean
Now, let’s get a private key for our wallet and some XDC tokens for gas fees which will be used for the deployment.
Getting the private key
We’ll need an XDC wallet/address to sign the smart contract deployment transaction. To set up the wallet, get its private key and add it to the config file of the hardhat.
You can also get a private key from your XDCPay wallet or XinFin Web Wallet.
Setting up the config file
Open the hardhat.config.js file and paste the following into it:
require(“@nomiclabs/hardhat-waffle”);
/**
* @type import(‘hardhat/config’).HardhatUserConfig
*/
const Private_Key = “ADD_YOUR_PRIVATE_KEY_HERE”
module.exports = {
solidity: “0.7.3”,
networks: {
xinfin: {
url: `ADD_YOUR_RPC_ ENDPOINT_HERE`,
accounts: [`0x${Private_Key}`]
}
}
};
Replace ADD_YOUR_PRIVATE_KEY_HERE with the private key we obtained in the previous step, and replace ADD_YOUR_RPC_ENDPOINT_HERE with the https://erpc.xinfin.network
Explanation of the code above:
Line 1: Importing the hardhat-waffle package.
Line 7: Storing our private key in the Private_Key variable.
Line 9–17: Mentioning Solidity version, network type, node URL, and accounts where we are supplying the private key and adding 0x as a prefix.
Save the file.
Creating contract
Now, for our contract, create a new directory “contracts” and place a new file “helloworld.sol” inside.
Copy-paste the following into your solidity script file:
// SPDX-License-Identifier: MIT
pragma solidity ^0.7.3;
contract HelloWorld {
string saySomething;
constructor() {
saySomething = “Hello World!”;
}
function speak() public view returns(string memory) {
return saySomething;
}
}
Explanation of the code above:
Line 1: Specifying SPDX license type, which is an addition after Solidity ^0.6.8.
Line 2: Declaring the solidity version.
Line 4: Starting our contract named HelloWorld.
Line 6: Creating a variable saySomething of type string.
Line 8–10: Initiating the constructor and storing the string “Hello World!” in the saySomething variable.
Line 12–14: Creating a function called to speak of type public will return the string stored in the saySomething variable.
Save the file and compile the contract using the following hardhat command.
npx hardhat compile
If your contract compiles successfully, it will give an output like this:

Deploying contract
Now to deploy our contract, let’s create a deploy.js file in a new directory named scripts.
Copy-paste the following into your deploy.js file:
async function main() {
const [deployer] = await ethers.getSigners();
console.log(
“Deploying contracts with the account:”,
deployer.address
);
console.log(“Account balance:”, (await deployer.getBalance()).toString());
const HelloWorld = await ethers.getContractFactory(“HelloWorld”);
const contract = await HelloWorld.deploy();
console.log(“Contract deployed at:”, contract.address);
}
main()
.then(() => process.exit(0))
.catch(error => {
console.error(error);
process.exit(1);
});
Explanation of the code above.
Line 1: Starting an async function.
Line 3: Getting the XDC address to sign the transaction and storing it in the deployer address.
Line 5–8: Printing the XDC address along with a string to the console.
Line 10: Printing the balance of the Ethereum address in wei to console. Wei is the smallest unit of ether, one Wei = 10^−18 ETH.
Line 12: Calling the ethers.js method ContractFactory. This will look for the “HelloWorld.sol” file, and return an instance that we can use ContractFactory methods on.
Line 13: Calling deploy on ContractFactory to deploy the contract.
Line 15: Printing the address of the deployed contract to the console.
Line 18: Invoking the function “main”.
Line 19–22: Checking for error, printing if any error, and exiting the process.
Save the file and run the following to deploy the contract.
npx hardhat run scripts/deploy.js — network xinfin
On the successful deployment of the contract you will see an output containing the deployed contract’s address.

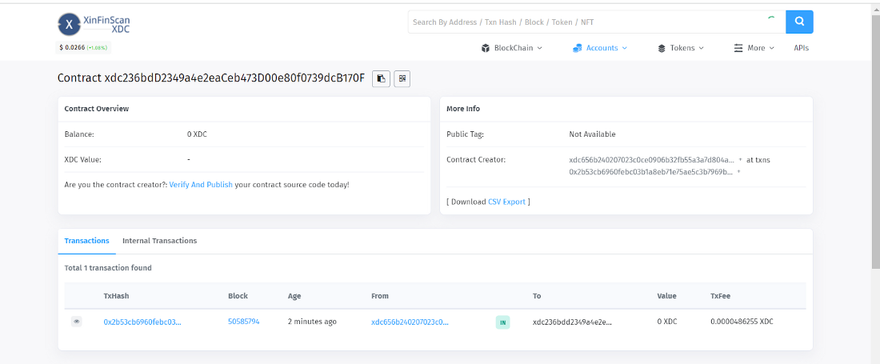
We can verify the deployment by copying and pasting the deployed contract’s address with xdc prefix address in XinFin Explorer search bar. This will display information about the deployed contract.
Here we saw how to work with hardhat. Using hardhat, you can write tests for your contracts and debug them without sweating too much. Refer to hardhat’s official documentation for more information.
If you have any questions regarding the XDC Network please feel free to post it on the forum at https://xdc.dev


Discussion (0)