Welcome, DeFi beginners! This tutorial will guide you step-by-step on how to provide liquidity on Oku using the psXDC/WXDC and WXDC/USDC.e liquidity pools. By the end, you'll learn what Oku is, why it’s beneficial to provide liquidity there, and how to navigate the process with confidence. We’ll also demystify Uniswap v3’s concentrated liquidity (price range selection) and its implications for your yields.
Providing liquidity is a form of DeFi yield farming – you’ll be putting your crypto (XDC, psXDC, USDC.e) to work in a pool so others can trade, and you earn fees in return. Let’s dive in!
What is Oku and Why Provide Liquidity There?
Oku is a professional-grade DeFi trading platform built on top of Uniswap v3. It acts as a meta-aggregator that finds the best swap and bridge rates across 31+ chains, giving users the best quotes anywhere in DeFi. Oku was funded by the Uniswap Foundation to build a pro interface on Uniswap v3, meaning you get advanced trading features with the reliability of Uniswap’s protocol. In simpler terms, Oku lets you trade and manage liquidity on multiple networks (now including XDC) through one slick interface.
Why provide liquidity on Oku? When you provide liquidity, you deposit a pair of tokens into a pool so that others can trade between them. In return, you earn a portion of the trading fees pro-rata to your share of the pool. On Oku (Uniswap v3), liquidity provision is non-custodial (you hold your keys) and concentrated (you can choose the price range to allocate your funds, leading to more efficient use of capital). By providing liquidity on the XDC Network via Oku, you:
Earn passive income from trading fees (often called WXDC DeFi farming, since your WXDC and other tokens earn yield).
Support the XDC ecosystem by increasing the liquidity for key trading pairs, which reduces slippage for traders.
Benefit from Uniswap v3’s flexibility – you can set custom price ranges to potentially earn more fees than traditional liquidity pools (more on this later).
Use Oku’s user-friendly interface and analytics at https://oku.trade/info/xdc/overview to monitor and manage your positions easily.
Quick Definitions: Before we start, let’s clarify the tokens and terms we'll use:
XDC – The native coin of the XDC Network (used for gas fees).
WXDC (Wrapped XDC) – An XRC-20 wrapped version of XDC. 1 XDC = 1 WXDC. We wrap XDC into WXDC to use it in smart contracts and DEXs (similar to how WETH works for ETH). Oku.trade supports swapping XDC directly (it wraps under the hood), but for liquidity pools you'll interface with WXDC.
pstXDC / psXDC (Prime Staked XDC) – A liquid staking token representing staked XDC. When you stake XDC via Prime Numbers' platform, you receive pstXDC (now upgraded to psXDC) 1:1 for your XDC. This token earns staking rewards in the background while remaining liquid (you can trade or use it in DeFi). Essentially, psXDC lets you keep your XDC invested in staking but also participate in DeFi at the same time.
USDC.e – A USD stablecoin on XDC Network, specifically bridged USDC from Ethereum. The “.e” denotes it came from Ethereum. USDC.e maintains a 1:1 peg with USD and is transferable on XDC. It arrives via the official bridge, enabling fast, cheap stablecoin transactions on XDC while remaining interoperable with Ethereum. (In short, treat USDC.e as USDC on XDC.)
Liquidity Pool (LP) – Smart contract where users deposit two tokens to facilitate swaps. Our focus: WXDC/USDC.e (for XDC vs stablecoin trades) and psXDC/WXDC (for staked-XDC vs XDC trades).
Liquidity Provider (LP) – You! The person depositing tokens into the pool. LPs earn fees from each swap.
Concentrated Liquidity & Range – Unique to Uniswap v3. Instead of providing liquidity across all prices, you select a price range to allocate your liquidity. This concentrates your funds where they are most likely to trade, earning higher fees if the market price stays in your range. If price leaves your range, your liquidity becomes inactive (no fees) until it returns. Don’t worry, we will explain how to choose a range that balances earnings with “stay-active” time.
Prerequisites:
A Web3 wallet (e.g. MetaMask or XDCPay) configured for XDC Network. (XDC is chain ID 50; if not set up, you can add it in MetaMask with RPC URL erpc.xinfin.network, chain ID 50, symbol XDC, etc..)
Some XDC in your wallet for gas fees (transactions on XDC cost a tiny amount of XDC).
The tokens you plan to provide: psXDC, WXDC, USDC.e. If you don’t have these yet, no worries – we’ll cover how to get psXDC and WXDC next.
Now, let’s get started with the actual steps!
Step 1: Obtain psXDC via PrimeStaking (Skip if You Have psXDC Already)
To join the psXDC/WXDC liquidity pool, you’ll need psXDC tokens. If you already have psXDC (Prime Staked XDC) in your wallet, you can skip to Step 2. If not, follow these options:
Option A: Migrate pstXDC to psXDC: If you previously used Prime Numbers’ liquid staking and have the old pstXDC token, you should convert it to the new psXDC token. Head to the PrimeStaking XDC Liquid Staking site at Primestaking.xyz and connect your wallet. The platform will guide you to migrate pstXDC into psXDC with just a few clicks (connect wallet and follow the prompts). This upgrade is one-time and has zero fees for staking XDC (as of the latest update). After migration, you’ll have an equal amount of psXDC in your wallet.
Option B: Stake XDC for psXDC: If you have plain XDC and want to stake it to get psXDC, you can do that on the same PrimeStaking platform. Connect your wallet on Primestaking.xyz, deposit XDC into the liquid staking contract, and you will receive psXDC at a 1:1 rate. For example, staking 100 XDC yields 100 psXDC. Your XDC is now staked (earning rewards in the background), and your psXDC represents that staked XDC in your wallet.
Option C: Acquire psXDC via DEX: Alternatively, you could swap for psXDC on a DEX if liquidity is available (e.g., on Oku itself once the psXDC/WXDC pool is live). However, early on the liquidity might be low, so staking is the primary way.
After this step, you should have some psXDC **tokens ready to provide, along with some regular **XDC(or WXDC) for pairing. If you staked all your XDC, note that you’ll need at least a little XDC left for gas fees and to wrap into WXDC for the pool.
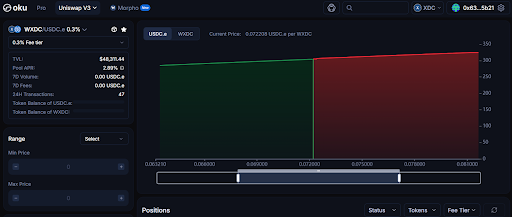
Step 2: Provide Liquidity to the WXDC/USDC.e Pool on Oku
Now we’ll add liquidity to the WXDC/USDC.e pool. This pool allows trading between wrapped XDC and the USDC stablecoin on XDC network. It’s a great starting point for liquidity providers because it involves a major asset (XDC) and a stablecoin (USDC.e).
1. Navigate to the Liquidity Provision Interface:
Go to the Oku Trade interface for liquidity on XDC. You can use Oku’s Position Manager on the XDC network. For example, visit the Uniswap v3 liquidity page for XDC – this direct link will open the WXDC/USDC.e pool directly. (Ensure your wallet is connected to XDC network and to the site. The interface might be a staging app provided by GFX Labs/Oku for XDC liquidity management.)
- If the direct link doesn’t work: Go to oku.trade, connect your wallet (top-right Connect Wallet button), and switch to the XDC Network. Then navigate to the Pools / Liquidity section and find the WXDC–USDC.e pool (you might search by token symbols or contract addresses). Select that pool to manage liquidity.
2. Connect Wallet: If prompted, connect your Web3 wallet. Approve any network switching to XDC if needed. Once connected, you should see the pool interface with WXDC and USDC.e as the pair.
3. Enter Liquidity Parameters (Price Range & Amount): This is the key step. On Uniswap v3 (and thus Oku), you must specify a price range for your liquidity position:
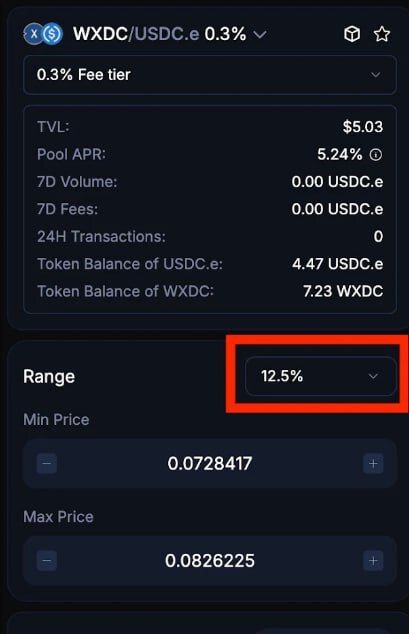
Select a Price Range: You’ll usually see a price chart or sliders. The current market price of WXDC in USDC (or vice versa) will be indicated. You need to choose a minimum price and maximum price between which your liquidity will be active. You can do this by dragging the range sliders on the chart, by selecting a preset range percentage, or by typing exact prices. For beginners, using a preset range is easiest: look for options like 1%, 5%, 12.5%, etc., which refer to how wide the range is around the current price.
If you set a narrow range (e.g. ±1% around current price), your liquidity is highly concentrated and will earn high fees when the price stays in that tight range. But if the price moves more than 1% away, your position will fall “out of range.”
If you set a wider range (e.g. ±12.5% or more), your liquidity covers more potential price movement, so it’s less likely to go out of range quickly. The trade-off is that your funds are spread out more, so you earn slightly less fees per volume when in range (compared to a narrow range).
Tip: For volatile pairs like XDC vs USD, it’s often wise to choose a moderately wide range to avoid constant maintenance. The guide from the XDC community suggests around a ±12.5% range for the WXDC/USDC.e pool. This means the pool would remain active even if XDC’s price swings 12.5% up or down against USD before you’d need to adjust. A 25% or 50% range would be even safer (less frequent adjustments) but with more diluted earnings. If you are comfortable monitoring and adjusting your position frequently, you could go narrower for higher fee returns. Otherwise, 10–15% is a balanced choice for beginners.
Implications of Range – Stay in Range to Earn Fees: Remember that Uniswap v3 only pays fees when the market price is within your set range. If price falls out of your range, your liquidity stops earning fees (it effectively gets converted entirely into one of the two assets until the price comes back). You can always re-adjust your range later by editing or re-creating the position, but that requires a transaction. By setting a reasonable range now, you minimize how often you’ll need to “fix” your position. Oku does not yet have an automated range management tool (the team is exploring solutions), so manual adjustment is necessary if the range is exceeded.
Enter the Deposit Amounts: Once you’ve chosen the range, input how much liquidity you want to provide. You can enter an amount for one token (either WXDC or USDC.e) and the interface will calculate the required amount of the other token based on the current price and your range. For example, if 1 XDC ≈ $0.07, and you input 10,000 WXDC (~$700) at a symmetric range around the current price, it will require roughly 700 USDC.e to pair with it. The UI should show your pool share or expected fees, etc.
Approve Tokens: If this is your first time using WXDC or USDC.e in the app, you will have to approve each token for the smart contract to use. The interface will prompt you (usually a button “Approve WXDC” and “Approve USDC.e”). Click approve and confirm those transactions in your wallet. This is a one-time setup per token.
- Deploy the Position: After setting range and amounts, double-check everything (range bounds, token amounts). The interface might label this action as “Add Liquidity” or **“Deploy Position.” **Click the button to submit your liquidity. Confirm the transaction in your wallet. In a few seconds, your liquidity position will be created on the XDC blockchain.
Once deployed, you’ll receive a Uniswap v3 LP NFT representing your position ((Oku manages this behind the scenes; you don't need to do anything special with the NFT, but it's how Uniswap v3 tracks youOnce deployed, you’ll receive a Uniswap v3 LP NFT representing your position (Oku manages this behind the scenes; you don't need to do anything special with the NFT, but it's how Uniswap v3 tracks your stake).
The UI should now show your position details, including the range, the amount of each tokThe UI should now show your position details, including the range, the amount of each token deposited, and a growing counter of fees earned (fees accumulate separately and can be claimed anytime).
- Verify and Manage: Congratulations! You are now providing liquidity in the WXDC/USDC.e pool. You can see your position on Oku’s Position Manager page – it will display your active range on a chart and stats like current value, fees earned, etc. You can click options (often a “...” menu) to collect fees or remove liquidity whenever you want. Fees are not auto-compounded (they don’t automatically add to your position), so you must manually claim them when you wish.
Important considerations:
Stay aware of the price range: If XDC’s price moves dramatically (say a big rally or drop beyond your range), your position becomes inactive (earning 0 fees) until you adjust. For example, if you set ±12.5% range and XDC moves more than 12.5% versus USD, you’d want to update your range. You could withdraw and re-add liquidity with a new range that covers the new price, or use Oku’s edit position feature. Keep an eye on it perhaps daily or weekly depending on volatility.
Impermanent Loss (IL): As with any liquidity pool, be aware of IL. In the WXDC/USDC.e pool, if XDC’s price changes relative to USD between when you deposit and withdraw, you might end up with more of one token and less of the other, and the total value of your assets could be slightly lower than if you held them separately. However, the earned fees often compensate for IL, especially if the price oscillates in your range. For long-term LPs in a volatile pair, IL is a real consideration. Since one asset is a stablecoin (USDC.e) and the other is XDC, significant XDC price moves will cause IL. This is normal – just something to understand for the future. For now, with a moderate range and by possibly not committing all your holdings, you can mitigate risk.
You have now successfully added liquidity to a major XDC trading pair! Next, we will add liquidity to the psXDC/WXDC pool, which is slightly different because we might need to create the pool if it doesn’t exist yet.
Step 3: Provide Liquidity to the psXDC/WXDC Pool (Creating a New Pool)
The psXDC/WXDC pool lets people swap between liquid-staked XDC (psXDC) and regular (wrapped) XDC. This is useful for those who want to switch between staked and unstaked XDC, and it helps maintain the 1:1 parity of psXDC to XDC via arbitrage. As a liquidity provider, this pool might see less volatile price movement (psXDC and XDC are supposed to be equal in value), so you can keep a very tight range and earn fees whenever anyone trades between staked and unstaked XDC.
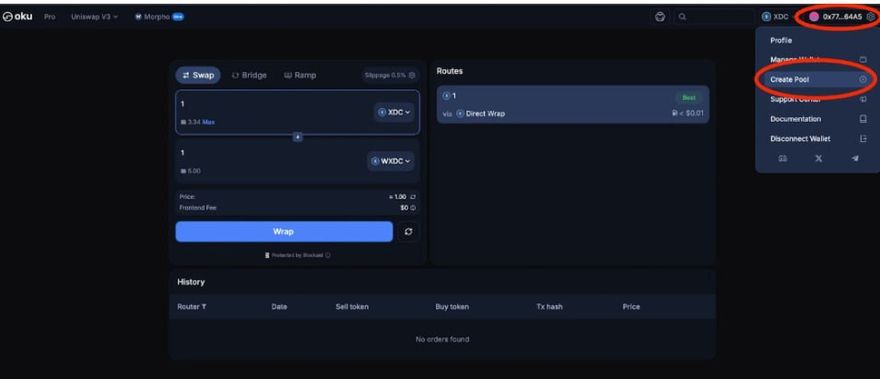
Creating the Pool: If the psXDC/WXDC pool hasn’t been initialized by someone else, you’ll have to create it yourself. Oku (via Uniswap v3 interface) allows users to create a new pool for any token pair. If the pool already exists, you can simply add liquidity to it (similar to step 2, by selecting the pair). We’ll outline the creation steps in case it’s new:
- Open the Pool Creator: In the Oku interface (still on XDC network), find and click “Create Pool”. (On the GFX Unitrade app, there might be a “Create Pool” button on the liquidity page or a + icon.) This opens a form to input the new pool details.
- Input Token Addresses: Since psXDC and WXDC might not be pre-loaded in the interface’s token list, you’ll need to paste their contract addresses to specify the tokens. Use the following official addresses:
WXDC token address: 0x951857744785E80e2De051c32EE7b25f9c458C42 (this is Wrapped XDC’s contract on XDC network).
psXDC token address: 0x9B8e12b0BAC165B86967E771d98B520Ec3F665A6 (Prime Staked XDC contract).
Paste the WXDC address in the Token0 field and psXDC address in Token1 (or vice-versa; the order doesn’t matter much, it just defines which is considered token0 vs token1). The UI should fetch the token names (you might see them appear as “WXDC” and “PSXDC”). Confirm that they are correct (double-check the last 4–6 digits of the addresses to avoid any typo).
- Choose the Fee Tier: Uniswap v3 offers fee tiers of 0.01%, 0.05%, 0.3%, or 1% for each pool. This determines the trading fee that traders pay (and you earn). For psXDC/WXDC, which is effectively a low-volatility pair (both tokens represent XDC), a low fee tier is ideal to encourage more trading volume. The XDC community guide suggests using the lowest fee tier (0.01%) for this pool. Uniswap docs note that stable or pegged asset pairs gravitate to the lowest fees, because price risk is low and traders seek minimal fees.
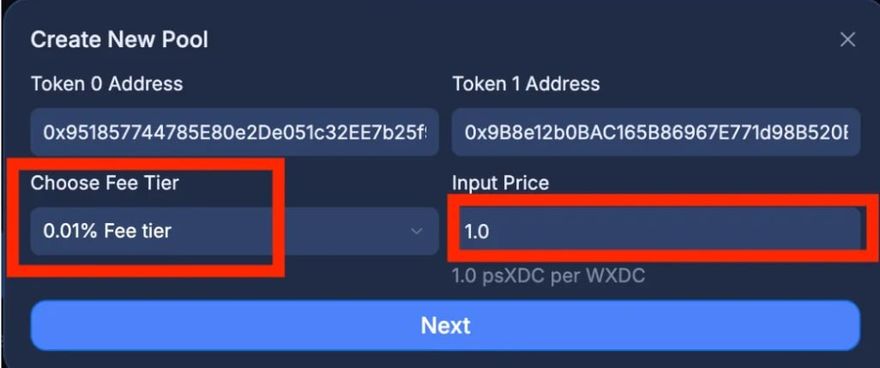
Select 0.01% if available. This is a 1 basis point fee, appropriate for a near-1:1 peg pair (similar concept as a stablecoin/stablecoin pool).
If 0.01% is not an option or you prefer otherwise, the next best is 0.05% (5 bps). Avoid higher tiers like 0.3% or 1% for this particular pair, as those would likely deter traders – psXDC and XDC should swap with minimal friction.
- Set the Initial Price: When creating a new pool, you must set the initial price of Token0 in terms of Token1. Essentially, what is 1 psXDC worth in WXDC at launch? Since psXDC is meant to equal XDC, the price should be 1.0 (1 psXDC = 1 XDC). Enter 1.0000 as the initial price. Double-check that you didn't mix up token order: if you accidentally put psXDC as Token0 and WXDC as Token1 (or vice versa), adjust the price accordingly (it should still equate to 1:1). In our example, if Token0 = WXDC and Token1 = psXDC, you’d also set 1 WXDC = 1 psXDC, which is still 1.0. The goal is to reflect parity.
5.Fund the Pool (Set Range and Amounts): Now specify your price range and deposit amounts for liquidity, similar to Step 2:
For psXDC/WXDC, you can choose a very tight range around 1.0, because the expectation is the price will hover extremely close to 1. (Any significant divergence would be arbitraged or indicate something is off with the peg). A narrow range lets you concentrate liquidity and earn more fees since the price shouldn’t stray much. The guide suggests a range like 0.995 to 1.005 for min/max price, which is a ±0.5% band around 1.0. This is quite tight (perhaps corresponding to the 1% preset range in the UI). You can certainly go a bit wider if you want more cushion (e.g. 0.99 to 1.01 for ±1%, or even wider). But even if the price of psXDC relative to XDC does move slightly (due to small market fluctuations or unclaimed staking rewards accruing), it's likely to stay very close to 1. A tighter range means nearly all your liquidity is always active in the small band where trades occur, maximizing fee generation.
Enter the amount of psXDC and WXDC you want to add. Since the price is 1 and your range is centered at 1, you will need to deposit roughly a 50/50 value split of the two tokens. For example, if you provide 1,000 WXDC, you should also provide about 1,000 psXDC to keep the 1:1 ratio at the current price. The interface will auto-calculate the second amount once you input the first token amount, as long as the price is within your specified range.
Approve psXDC and WXDC for the contract if prompted (likely you’ll get an approval request for psXDC since you already approved WXDC in Step 2).
- Create/Deploy the Pool Position: After filling all fields (addresses, fee, price, range, amounts), review them carefully. Then click “Create Pool” or “Add Liquidity” to deploy this new pool with your liquidity. Confirm the transaction in your wallet. This will create the pool contract on XDC and mint your LP position NFT in one go. It might take a few extra seconds since it's the inaugural pool setup.
Once confirmed, psXDC/WXDC is now live! You have become the first liquidity provider for this pair (or one of the early providers). The interface will show your position details as with any liquidity position.
Other users can now swap between psXDC and XDC using this pool on Oku, and your liquidity will earn fees from those trades.

- Verify and Monitor: Check that the pool shows the correct price (approximately 1 psXDC per WXDC). If it’s slightly off (e.g., 1 psXDC = 1.002 WXDC), that could be due to the specific amounts you added – it’s okay, arbitrage traders will trade it to equilibrium quickly and you’ll earn a bit of fee from that too. Now you can monitor your psXDC/WXDC position on the Oku dashboard. You’ll likely see very small price movements; your tight range means you’ll capture essentially all trading activity between psXDC and XDC.
Management tips for psXDC/WXDC position:
This position may not require much adjustment because psXDC and XDC are pegged. However, keep an eye on announcements from the staking protocol: if, say, psXDC starts to slowly increase in value relative to XDC because of accruing staking rewards (if they ever make 1 psXDC redeemable for >1 XDC over time), you might eventually need to widen or shift your range upward. For now, the design is 1:1, so you should be fine.
Impermanent loss here is minimal since the assets track each other. Essentially, you’re just arbitraging between staked and unstaked XDC. The primary risk is if something causes psXDC to depeg from XDC (which should not happen under normal conditions because it’s redeemable for XDC). In a healthy scenario, providing liquidity here is almost like providing to a stablecoin/stablecoin pool – low risk, low volatility, and steady fee earnings.
You can claim fees at any time via the interface (likely they will be in XDC and/or psXDC depending on trade flow). Since volume might be lower here than the XDC/USDC pool, fees might trickle in slowly, but any time someone stakes/unstakes via swapping, you benefit.
Understanding Uniswap v3 Range Selection (Concentrated Liquidity 101)
At this point, you have hands-on experience selecting ranges for two liquidity positions. Let’s solidify your understanding of range selection and why it matters:
In Uniswap v3 (which Oku uses for liquidity), you concentrate your liquidity in a specific price range instead of spreading it across all prices. This is like saying “I will act as a market maker only when the price is between X and Y.” Within that range, you provide much more liquidity than you would have in Uniswap v2, making your capital more efficient and earning you more fees for the same investment – as long as the market stays in your range.
Earning Fees: Traders pay a fee on each swap (e.g., 0.3% in the WXDC/USDC.e pool). These fees are split among all LPs who are in range at that moment. If you're the only one or one of few in range, you get all or a large share of fees. If many are in range, you share with them. By choosing a narrower range, you exclude some prices and thus take on more risk of going out-of-range, but when in range you have a proportionally larger stake of the active liquidity, so you earn more per swap.
Out of Range = No Fees: If the market price moves outside your min–max range, your liquidity is considered out of range. It essentially means you’ve effectively converted entirely into one of the two assets (whichever side the price moved toward) and you are no longer facilitating trades. As the Uniswap docs state: “If the spot price moves out of a position’s range, the given liquidity is no longer active and does not generate any fees. If the spot price reverses and re-enters the position’s range, the position’s liquidity becomes active again.”. So, you won’t earn anything during the out-of-range period, and your assets will be sitting idle (all in X or all in USDC, for example, instead of balanced).
Range Adjustments: You always have the ability to update your position. Oku’s interface (Position Manager) lets you edit or remove and recreate positions. Editing might involve withdrawing and re-adding at new ranges (some UIs handle it seamlessly). Each time you adjust, you’ll pay a transaction fee, so you don’t want to do it too frequently on any network (though XDC’s gas fees are very low). The key is finding a sweet spot for your range: wide enough that you don’t have to tweak it constantly, but not so wide that you earn negligible fees.
Example Recap: In our WXDC/USDC.e example, a ±12.5% range was chosen to reduce maintenance. That means as long as 1 XDC is between about $0.065 and $0.082 (if $0.073 was the mid price), you keep earning fees. If XDC breaks out beyond that (say XDC pumps to $0.085), you’d need to adjust. But small daily fluctuations won’t knock you out immediately. Conversely, in the psXDC/WXDC example, we set ~±0.5% range (0.995–1.005) because we expect the price to remain ~1. If somehow psXDC traded at 1.010 (0.5% higher than XDC), our position would go out of range (converted fully to one token) until we move the range or the price comes back.
Fee Tier vs Range: Another related factor is fee tier selection. We chose 0.3% for XDC/USDC (that pool was 0.3% by default) and 0.01% for psXDC/XDC. Higher fee tiers (like 1%) mean each swap gives you more fees per volume, but if the fee is too high for the type of pair, traders might avoid using the pool, resulting in low volume. Generally:
Stable pairs (low volatility, like pegged tokens or stablecoins) => use low fees (0.01% or 0.05%) to attract lots of trading. LPs rely on high volume and low IL.
Volatile pairs (unrelated tokens) => use higher fees (0.3% or 1%) so that LPs are compensated for taking on more IL risk, and small volume can still yield decent fees.
In our case, psXDC/WXDC is akin to a stable pair (hence 0.01%), while WXDC/USDC is between a major coin and a stable (0.3% is standard for such pairs on Uniswap, balancing trader cost and LP reward).
Understanding these concepts will help you become a savvy liquidity provider. You can experiment with different ranges and see how it affects your fee earnings. Oku’s analytics can also help; for example, you can see current liquidity distribution in a pool to identify where most liquidity sits and where fees are being generated.
Start Your Liquidity Journey on XDC Today 🚀
You’ve got the knowledge, now it’s time to take action. Whether you're just getting started or scaling your DeFi activity, Oku makes it easy to provide liquidity, earn trading fees, and support the XDC ecosystem. Explore the platform, analyze your positions, and manage your trades with confidence:
🔗 Trade on Oku: oku.trade
📊 View Analytics: oku.trade/info/xdc/overview
💧 Add Liquidity (WXDC/USDC.e pool): https://oku.trade/app/xdc/liquidity/0x1e5aEC37F6dF6653c3342df75eDd92bEb3fb9846
🧑💼 Trade Like a Pro: Oku Pro Trade Interface
Have questions? Join the XDC developer and DeFi community on https://xdc.dev, or follow announcements to stay updated on new incentives and opportunities. Welcome to Oku — and happy yield farming on the XDC Network!


Discussion (0)