The Web3 landscape is evolving at lightning speed. From decentralized finance (DeFi) to NFTs and gaming dApps, the ecosystem is becoming increasingly diverse — and so are the blockchain networks that power it. In this multi-chain world, users need a wallet that is fast, flexible, and future-ready.
Enter BlocksPay Wallet 2.0: the next generation of the popular browser extension wallet that empowers users to truly experience multi-chain freedom in Web3.
What is BlocksPay Wallet?
BlocksPay Wallet is a secure and intuitive browser extension crypto wallet that allows users to:
- Safely store, send, and receive digital assets.
- Interact directly with decentralized applications (dApps).
- Manage tokens across multiple blockchain networks.
- Retain full ownership of their assets through private key control and encryption.
With BlocksPay 2.0, the wallet goes beyond basics and introduces a revamped user experience, enhanced security, and seamless multi-chain management — everything Web3 users need in one place.
Download the extension form here: https://chromewebstore.google.com/detail/blockspay-xdc-eth-btc-and/pogabilnghhbafaheaepaaeopjpleimd
What’s New in BlocksPay Wallet 2.0?
The upgrade isn’t just a facelift — it’s a complete redefinition of how a Web3 wallet should feel and function.
🔹 Modern & Intuitive UI
BlocksPay 2.0 introduces a clean, modern design that makes navigating networks, tokens, and dApps effortless.
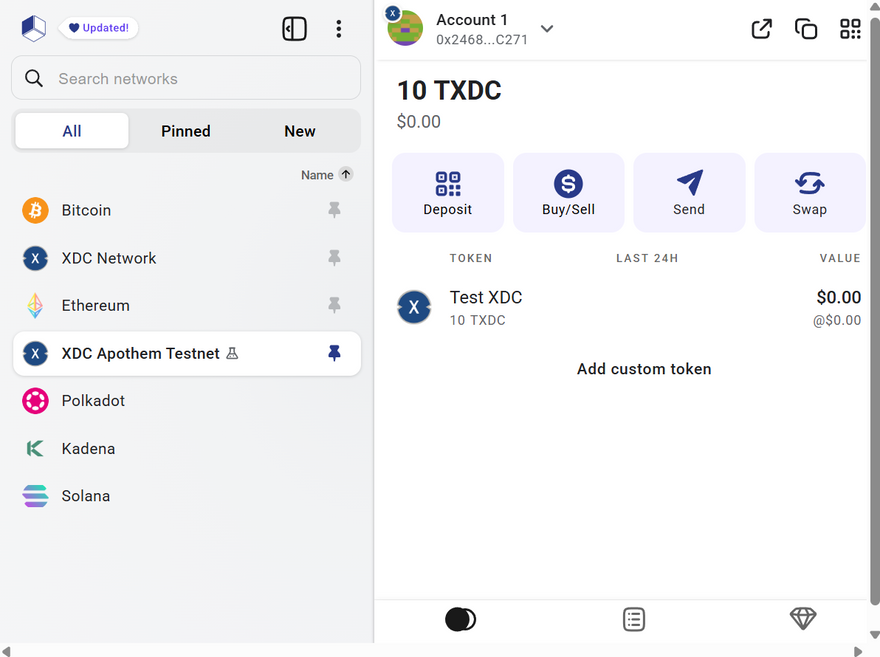
🔹 Multi-Chain Dashboard
Get a consolidated view of your portfolio across supported networks. Instantly check balances, track tokens, and view USD valuations — all in one unified dashboard.
🔹 Advanced Network Management
Switching between chains has never been easier:
- All Networks → View everything supported by BlocksPay.
- Pinned Networks → Customize shortcuts for quick access.
- New Networks → Instantly discover the latest additions.
🔹 Secure & Private
Your keys, your control. BlocksPay 2.0 continues to prioritize seed phrase protection and strong password security so that your assets remain safe.
🔹 Faster Transactions
With optimized performance, token transfers and dApp interactions are smoother than ever — a true boost for everyday Web3 users.
The Full Experience: BlocksPay 2.0 Walkthrough
Before diving into the features, check out the full video walkthrough here:
This guide will take you step by step through everything BlocksPay Wallet 2.0 has to offer.
Quick Setup in Seconds
Getting started shouldn’t be complicated. With BlocksPay Wallet 2.0, your crypto journey begins in just a few clicks.
Quick steps to setup wallet
Step 1: Download the extension – BlocksPay Extension
Step 2: Choose an option – either import your wallet using a private key or create a new wallet.
Step 3: If creating a new wallet, securely save your seed phrase in a safe place.
Step 4: Re-confirm your seed phrase.
Step 5: Your new account is now successfully created on the BlocksPay extension.
No technical knowledge required. Just download, set up, and you’re ready to explore Web3.
Importing Accounts Made Easy
Moving from another wallet? No problem. Import your existing account and access your funds instantly.
Quick steps
Step 1: Unlock your wallet.
Step 2: Click on the account icon in the upper corner.
Step 3: Select “Import Account from Another Wallet.”
Step 4: Choose one of the options – Keystore file or Private Key.
Step 5: Paste your private key (you can also set a custom account name while importing).
Step 6: Confirm with your wallet password.
Step 7: Your account has been successfully imported.
🎬 How to Import Account
Your keys, your crypto, your control. Always.
Adding Custom Tokens
Why limit yourself? With BlocksPay, you can add ANY token — beyond the defaults.
Quick steps
Step 1: Unlock your wallet.
Step 2: Choose your preferred network by expanding the menu on the left.
Step 3: On the dashboard, click the “Add Custom Token” button in the center.
Step 4: Paste your contract address and click “Add.”
Step 5: Your token has been successfully added.
Seamlessly manage your favorite assets without restrictions.
Sending XDC with Ease
Whether you’re a trader, investor, or just getting started — sending $XDC has never been simpler.
Quick steps
Step 1: Unlock your wallet.
Step 2: Select your preferred account and network.
Step 3: On the dashboard, click “Send.”
Step 4: Paste the receiver’s address and enter the amount you want to send.
Step 5: Click “Send.”
🎬 Send XDC
One wallet. Instant transactions. Total freedom.
XRC20 & XRC721 Support
BlocksPay Wallet 2.0 fully supports XRC20 and XRC721 tokens, so you can send and receive assets without a hitch.
Quick steps
Step 1: Unlock your wallet.
Step 2: Select your preferred account and network.
Step 3: On the dashboard, click “Send.”
Step 4: Paste the receiver’s address, select the token you want to send from the dropdown, and enter the amount.
Step 5: Click “Send.”
From utility tokens to NFTs — manage it all in one place.
Add Custom Networks — Unlock New Worlds
The decentralized world is expanding — and so is your access.
With BlocksPay 2.0, you can add ANY custom network in seconds.
Quick steps
Step 1: Unlock your wallet.
Step 2: Expand the menu from the upper-left corner.
Step 3: Click on the three-dot options and select “Other Networks.”
Step 4: Click on the plus (+) icon near the search bar and enter your network details:
- RPC URL
- Network Name
- Chain ID
- Currency Symbol
- (Optional) Block Explorer URL
Step 5: Click “Add Network.” Your custom network is now added, and you can switch to it to start transactions.
Your wallet. Your network. Your rules.
Why Does BlocksPay Wallet 2.0 Change the Game?
- True Multi-Chain Freedom — Explore every chain, not just the defaults.
- Unmatched Simplicity — Designed for both beginners & experts.
- Security First — Your keys, your assets, your control.
- Scalable & Future-Ready — Add new tokens, networks, and features anytime.
BlocksPay 2.0 bridges this gap by combining usability, multi-chain connectivity, and advanced tools in one extension. It’s not just a wallet; it’s a gateway to Web3 freedom.
Upgrade today and experience multi-chain freedom redefined with BlocksPay Wallet 2.0.
Please Follow👇


Discussion (2)