![Cover image for [Informative]XDC Node Peering Guide](https://www.xdc.dev/images/To4Z0OQSA-F3WfR3IeQELj0vWZ4iDuA2znYKwU9shsM/s:1000:420/mb:500000/ar:1/aHR0cHM6Ly93d3cu/eGRjLmRldi91cGxv/YWRzL2FydGljbGVz/LzVja3YyMnd5Mmdq/ZDg4NmE4a3I0LnBu/Zw)
Introduction
Deploying a node on the XDC Network is a straightforward process, but users occasionally encounter challenges where the node fails to connect to peers effectively. This can manifest as the blockchain downloading slowly or halting, with peer counts remaining stuck at 0–1 for extended periods. This issue prevents the node from fully syncing with the network, participating in consensus (and earning rewards).
The first time we encountered this, we tested further by deploying nodes across multiple data centers from a specific VPS provider in different geographic locations, and the problem persisted. Initial checks confirmed that essential configurations were generally ok, such as disabling firewalls (e.g., ufw not enabled on mainnet nodes). The issue for us turned out to be an externally blocked port 30303 but there are several other potential causes that need to be considered whenever this issue arises.
This guide expands on our original troubleshooting steps by incorporating additional diagnostic methods and updated best practices as of 2026. We’ll cover how XDC nodes acquire peers, some common root causes of issues and their detailed solutions as well as some preventive measures you can take. While this focuses on mainnet XDC nodes, similar principles apply to Apothem testnet nodes (which use port 30304 instead of 30303).
How XDC Nodes Acquire Peers
Understanding peer acquisition is key to diagnosing issues. When an XDC node starts:
- Initial Bootstrapping: The node connects to a predefined set of “bootnodes” listed in the
bootnodes.listfile. These are trusted, always-online nodes that serve as entry points to the network.
- Peer Discovery and Propagation: Once connected to the bootnodes, the node then queries them for additional peers. Incoming connections are also accepted if the node is discoverable.
- Networking Protocols: Peering occurs over TCP/UDP on port 30303 for mainnet (or 30304 for testnet). The node advertises itself via UDP for discovery and uses TCP (RLPx) for data exchange. The default maximum peer count (
maxpeers) is set to 25 in XDC configurations, so counts above this are rare unless customized.
- Ongoing Maintenance: Peers are dynamically added and dropped based on factors like latency, reliability, and network health. The node also supports UPnP (Universal Plug and Play) for automatic port mapping on compatible routers.
If any step fails due to network blocks, configuration errors or faulty bootnodes, then the peer count remains low, leading to isolation from the network.
Common Causes of Low or Zero Peers
In our experience, the most frequent culprits of low or zero peers are:
- Port 30303 Blocked or Not Forwarded: This was the cuplrit for us that we mentioned above. Even if local checks show the port as open, external factors like firewalls, VPS provider restrictions, router NAT settings, or ISP blocks can prevent incoming connections.
- Firewall or Security Group Misconfigurations: Tools like
ufw,iptables, or cloud provider security groups (e.g., AWS EC2, Google Cloud) can block traffic despite appearing inactive. - Resource Constraints: High memory usage from peering surges can cause nodes to slow or crash, indirectly affecting peer connections. Older hardware or unoptimized setups exacerbate this.
- Outdated or Faulty Bootnodes List: The
bootnodes.listfile may contain inactive, unreachable, or deprecated nodes. - Network or Sync Issues: Slow internet, geographic latency, or incomplete blockchain sync can deter peers. Testnet/mainnet port mismatches can also contribute to this.
- Nodekey or Cache Problems: Corrupted
nodekeyfiles or stale peer databases can hinder fresh connections.
For completeness, we always recommend ruling out port issues first.
Comprehensive Solutions
Follow these steps in order. We’ll start first with port verification, then address bootnodes, followed by using an official script peer.sh included in the XDC nodes that allows forcing addition of peers. Then we'll finish off with restarts and monitoring.
Step 1: Verify and Open Port 30303
Even if you believe the port is open, double-check externally.
Tools Needed
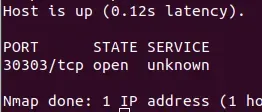
Install nmap on a separate machine on a network external to the node (not the VPS or server the XDC node is running on):
sudo apt install nmap
Check Port Status
Run nmap from that separate external machine, replacing YOUR.NODE.IP with your XDC node’s public IP:
nmap -p 30303 YOUR.NODE.IP
If STATE shows “closed” or “filtered,” the port is blocked.
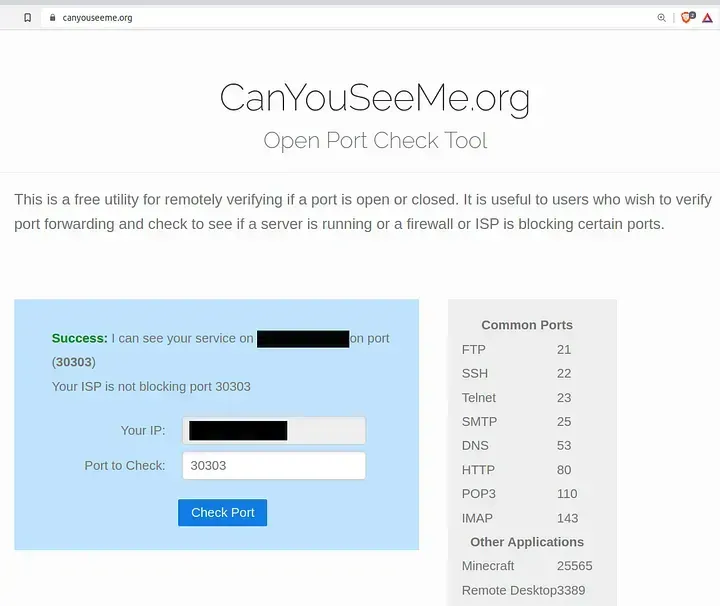
Alternative: If your node is running on a LAN that is local to you, for example in your office, you can instead use online tools like https://canyouseeme.org/ (enter port 30303), but prefer external nmap for security.
Address Firewalls (e.g., ufw)
SSH into your node:
ssh -l root -p 22 YOUR.NODE.IP # Adjust username/port/IP
Check firewall:
sudo ufw status verbose
If active and blocking 30303, allow it:
sudo ufw allow 30303/tcp
sudo ufw allow 30303/udp
sudo ufw reload
For iptables or other firewalls, consult your OS docs.
For VPS Providers (e.g., AWS, DigitalOcean)
Log into your provider’s console and check security groups/inbound rules. Add rules for TCP/UDP on 30303 from any IP (0.0.0.0/0).
If blocked at the provider level, submit a support ticket to unblock it.
For Local Servers/Routers
Enable port forwarding on your router: Forward TCP/UDP 30303 to your node’s LAN IP. You can find your node’s LAN IP by running either of the following commands in the terminal of your node:
ifconfig
or
ip addr
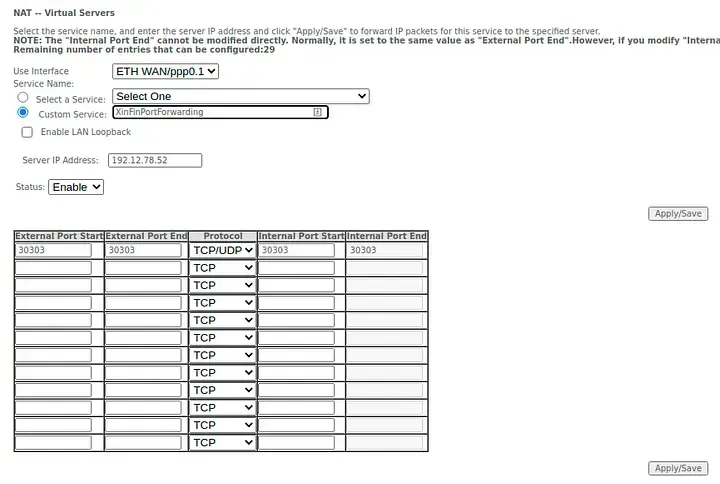
Power cycle the router after changes.
Check with ISP for port blocks; request unblocking if needed.
After changes, retest with nmap as above and then reboot the server:
sudo reboot
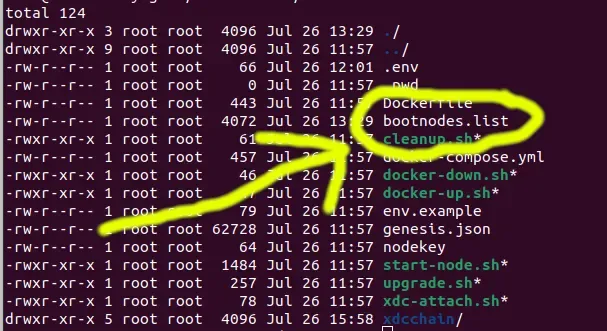
Step 2: Update the Bootnodes List
If ports are open but peers remain low, replace bootnodes.list.
SSH into your node:
ssh -l root -p 22 YOUR.NODE.IP
Navigate to the mainnet directory:
cd ~/XinFin-Node/mainnet
Stop the node:
sudo bash ./docker-down.sh
Backup the old file:
sudo mv bootnodes.list bootnodes.list.old
Download the latest official list (as of 2026):
sudo wget -O bootnodes.list https://raw.githubusercontent.com/XinFinOrg/XinFin-Node/master/mainnet/bootnodes.list
Note: This is the official XDC Network GitHub version.
For quicker peer pickup, delete the nodekey (forces fresh identity):
sudo rm -rf ../xdcchain/XDC/nodekey
Restart the node:
sudo bash ./docker-up.sh
Step 3: Force Peer Connections with peer.sh
Before resorting to restarts or resyncs, we can try the peer.sh script. This utility manually adds peers from your bootnodes.list to kickstart connections, often resolving issues without data loss or extended downtime. It’s especially useful for temporary glitches or outdated discovery processes.
- Ensure your XDC node is running (start it with
sudo bash ./docker-up.shif necessary). - Navigate to the mainnet directory (or testnet for Apothem nodes):
cd ~/XinFin-Node/mainnet
- For best results, always update
bootnodes.listbefore runningpeer.sh(as outlined in Step 2). - Execute the
peer.shscript:
sudo bash ./peer.sh
- Monitor the output for confirmation of added peers. You can then check the peer count in the node console by using
sudo bash ./xdc-attach.shand runningnet.peerCount, oradmin.peers, or by viewing the XDC Network Stats page. You can use theexitcommand to exit the console when needed.
This step can avoid more invasive actions like container restarts or full resyncs. If successful, proceed to verification. For more details on how peer.sh works, see the dedicated Appendix at the end of this article.
Step 4: Handle Resource or Sync Issues
Monitor memory/CPU with htop or top. If high, upgrade hardware or optimize (e.g., limit maxpeers in config).
If your XDC node (mainnet or testnet) is stuck during synchronization, you can either restart the Docker container (a quicker fix that preserves existing data) or resync from scratch (note: a thorough reset can also be done using the latest chain snapshot and this will be much quicker than manually syncing from scratch). Always back up critical data first to avoid losing access to your wallet, staked tokens or node configuration. Step by step instructions are as follows. For testnet issues, repeat steps but use port 30304 and Apothem configs.
Backup Data (Mandatory Before Any Restart or Resync)
Before proceeding, back up your node’s key files and data to prevent irreversible loss. This is crucial because subsequent steps can involve deleting/overwriting directories.
- Locate Your Node’s Directory: Navigate to your XinFin-Node installation folder (e.g.,
~/XinFin-Node/mainnetfor mainnet or~/XinFin-Node/testnetfor testnet). - Backup the Keystore: The keystore contains your private keys. Copy the entire
keystorefolder (or specific files likeUTC — [DateTime] — [Address]) to a backup location and preferably also keep a copy on a secure external device.
mkdir ~/backup_XDCnode
sudo cp -r xdcchain/XDC/keystore ~/backup_XDCnode
-
Backup your Coinbase address: Stored in
coinbase.txt.
sudo cp xdcchain/XDC/coinbase.txt ~/backup_XDCnode
- Backup Chain Data (Optional but Recommended for Quick Restoration): If you have enough drive space and want to preserve your current blockchain state (e.g., for debugging later), tar and copy the entire
xdcchain/XDCfolder.
sudo tar -czvf xdc_chain_backup.tar.gz ~/XinFin-Node/mainnet/xdcchain/XDC
sudo cp xdc_chain_backup.tar.gz ~/backup_XDCnode
- Backup Configuration Files: Copy
.env(environment variables) and any custom configs.
cp .env ~/backup_XDCnode
- For Testnet (Apothem): The process is similar, but files will be in the
testnetsubfolder instead ofmainnet. Use port 30304 and Apothem-specific configs.
Store backups offline and securely. Test restoring them in a safe environment to ensure they’re valid.
Option 1: Restart the Container (Quick Fix for Stuck Sync)
This preserves your existing data and is ideal if the issue is temporary (e.g., high resource usage). It restarts the Docker container without deleting chain data.
- Stop the Container: Gracefully stop it to avoid data corruption.
sudo bash ./docker-down.sh
- Optionally inspect Logs for Issues:
sudo tail -50 xdcchain/<logfile_name>
- Common fixes: Optimize config (e.g., set maxpeers to limit connections) or free up resources (close other processes).
- Restart the Container:
sudo bash ./docker-up.sh
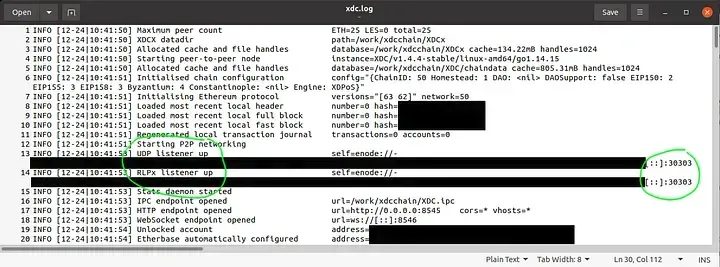
- Monitor Sync Progress: Attach the node console.
sudo bash ./xdc-attach.sh
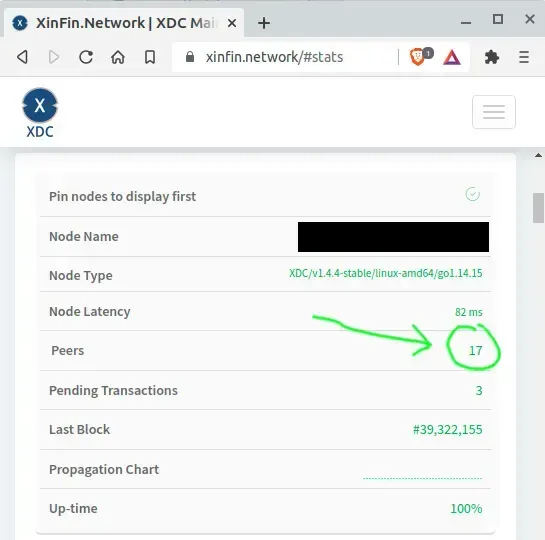
In the console, use eth.syncing command to check block height sync status, use admin.peers command to list connected peers, use net.peerCount to see how many peers are connected, and use exit command to exit the console. You can also view overall network stats at https://xinfin.network/ or https://apothem.network/ for testnet.
For Testnet: Repeat using port 30304 and Apothem configs.
This should resolve minor sync hangs without full data loss. If unresolved, proceed to resync.
Option 2: Resync from Scratch (Thorough Reset for Persistent Issues)
If restarting doesn’t help (e.g., corrupted data), resync by wiping the chain data and starting over. Use a snapshot for faster sync (days instead of weeks); otherwise, it syncs from genesis (very slow). Backups as described above are essential here.
- Stop the Node/Container: As in Option 1 above.
- Delete Existing Chain Data: Remove the corrupted or stuck data (but ensure backups are done first as described above in Option 1!).
sudo rm -rf xdcchain/XDC # DANGER: MAKE SURE YOU HAVE BACKUPS FIRST
For full resync without snapshot, skip the snapshot step below. This will sync from block 0 (expect 1–2 weeks on decent hardware).
-
Download a Snapshot (Recommended for Speed):
Snapshots update ~every 20 days.
Mainnet:
Full node: https://download.xinfin.network/xdcchain.tar
Archive node: http://downloads.xinfin.network/xdcchain_archive.tarTestnet (Apothem):
Snapshots may not always be available; check https://download.xinfin.network/apothem.tar. If not available, check with XinFin or community forums. If unavailable, resync from genesis.
wget https://download.xinfin.network/xdcchain.tar
- Extract and Clean Up the Snapshot (and move it into the correct directory):
sudo tar -xvf xdcchain.tar  # Creates XDC directory
cd XDC
sudo rm -rf nodekey  # Remove old node key
sudo rm -rf transactions.rlp  # Clean up pending transactions
cd ..
sudo mv XDC ~/XinFin-Node/mainnet/xdcchain/ # Use testnet/devnet if needed
For archive nodes, edit start-node.sh or .env to add gcmode=archive.
- Configure and Start the Node: Edit
.envif needed (e.g.,ENABLE_RPC=trueetc). Copy back keystore and coinbase.txt from backups if wiped. Start:
sudo bash ./docker-up.sh.
- Monitor and Verify: As in Option 1 above, the node should now sync from the snapshot’s block height. If peers are low:
sudo bash ./peer.sh
- For Testnet: Use Apothem snapshot if available, port 30304, and configs (e.g.,
NETWORK=apothemin.env). Repeat steps but with testnet folder/scripts.
Additional Tips
- Resource Monitoring: As mentioned, use
htoportopto watch CPU/memory. If high during resync, limit peers or upgrade the server. - Security: After resync, verify your node on the stats page. Enable firewalls (e.g., open only ports 30303 for mainnet, 30304 for testnet).
- If Issues Persist: Check XDC community forums, GitHub repos, or stats page for known network problems.
- Time Estimates: Restart: Minutes. Resync with snapshot: Hours to days. From scratch: Weeks.
Verification and Monitoring
- Wait 1–2 hours post-restart.
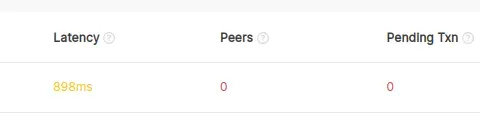
- Check peer count on: XDC Network Stats
- If peers climb to 10–25, the issue is resolved. Congratulations! If problems continue, check XDC forums for further information/help.
Preventive Measures
- Regularly update your node software via official repos.
- Monitor XDC announcements for updates (e.g., bootnode changes).
- Join community channels: XDC.Dev Forum, GitHub, X.com.
- Consider running multiple nodes for redundancy.
Appendix: The peer.sh Script
What it is Used For
The peer.sh script is a helper utility included in the XDC node installation (found in the ~/XinFin-Node/mainnet directory). It is designed to assist in troubleshooting peer connection issues by manually forcing the node to connect to known peers. This is particularly useful when automatic peer discovery fails due to network configuration problems, outdated bootnodes, or temporary network glitches, helping to kickstart the syncing process and increase the peer count.
What it Does
The script automates the process of adding peers to your XDC node. Since the current XDC client is based on Go-Ethereum (geth), it leverages the node’s JavaScript console (via xdc-attach.sh) to execute the admin.addPeer() command for each enode listed in the bootnodes.list file. This manually establishes connections to trusted bootnodes, bypassing potential discovery failures. Once connected, these bootnodes can propagate additional peers, improving overall network participation and sync speed.
How to Use It
- Ensure your XDC node is running (start it with
sudo bash ./docker-up.shif necessary). - Navigate to the mainnet directory (or testnet for Apothem nodes)
cd ~/XinFin-Node/mainnet
- For best results, always update
bootnodes.listbefore runningpeer.sh. See above article for instructions on how to do this. - Then execute the
peer.shscript:
sudo bash ./peer.sh
- Monitor the output for confirmation of added peers. You can then check the peer count in the node console by using
sudo bash ./xdc-attach.shand runningnet.peerCount, oradmin.peers, or by viewing the XDC Network Stats page. You can use theexitcommand to exit the console when needed.
In case of any technical queries on XDC Network, feel free to drop your queries on XDC.Dev forum.
Quick links
XinFin.org
XDC Chain Network Tools and Documents
XDC Network Explorer
XDC Dev Forum
XDC Testnet/Devnet Faucet — Blocksscan


Discussion (0)