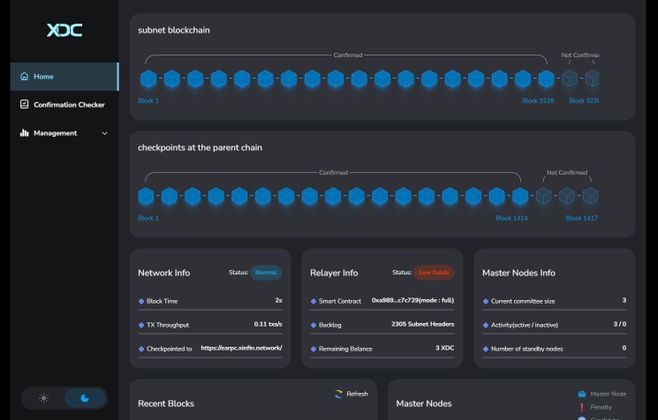
The XDC Network has introduced a subnet feature, enabling developers to deploy private and customizable blockchain networks within the XDC ecosystem. These subnets provide enhanced privacy, scalability, and flexibility, making them ideal for enterprises and developers seeking an isolated blockchain environment for specific use cases. Here’s a comprehensive guide on setting up and deploying an XDC Subnet.
Prerequisites for Launching an XDC Subnet
To set up an XDC Subnet, ensure that your system meets the following requirements:
Operating System:
- Linux: Supported for full deployment.
- Mac: Supported only for single-machine testing environments.
Software Dependencies:
- Docker and Docker Compose V2 are required. For detailed installation instructions, refer to the Docker Compose documentation for Linux: Docker Compose Install Guide.
Hardware Requirements:
- CPU: Minimum 2 cores.
- Memory: Minimum 4 GB RAM per subnet node.
Web3 Wallet:
- A Web3 wallet with funds is required. For testing, XDC Network provides faucets to obtain test tokens:
- XDC Faucet on Apothem Network
- BlocksScan Faucet
Step-by-Step Guide to Generate XDC Subnet Configurations Using UI
Once prerequisites are set, you can generate the necessary configuration files for the XDC Subnet.
Step 1: Create a Directory and Download the Configuration Generator Script
Create a new directory for your subnet files. For instance, let’s name it “XDCSubnet”:
mkdir XDCSubnet
cd XDCSubnet
Download the generate.sh script from XDC’s official GitHub repository:
curl -O https://raw.githubusercontent.com/XinFinOrg/XinFin-Node/master/subnet/deployment-generator/scripts/generate.sh
Step 2: Run the Configuration Generator Script
Make the downloaded script executable:
chmod +x generate.sh
Execute the script to launch the local configuration server:
./generate.sh
Step 3: Access the Local Webserver UI
- Open a web browser and go to http://localhost:5210/ for local setup. If you’re on a remote server, use http://your_ip_address:5210/.
- This interface allows you to enter and customize your subnet configurations according to your specific requirements.
Step 4: Configure Subnet Settings
Enter the necessary details in the form for configuring your subnet (e.g., name, nodes, and any custom options).
Submit the form, and upon successful configuration, you’ll receive a confirmation message on the same screen: “Config Generation Success. Please follow instructions in generated/commands.txt.”
- Check the server console for a final message confirming the success of the subnet configuration with “subnet generation successful.”
- Once the Subnet generation successfully done, Change the directory to “/generated”
Step 5: Deploy the XDC Subnet
With the configuration set up, proceed with the deployment steps detailed in commands.txt.
- Open the commands.txt file using:
nano commands.txt
- Copy the commands to a notepad, then execute them step-by-step as instructed. Below is a general overview:
Note: Please refer your updated commands.txt file
1. Deploy Subnet Nodes:
docker compose --env-file docker-compose.env --profile machine1 pull
docker compose --env-file docker-compose.env --profile machine1 up -d
2. Confirm the Subnet is Running (after 60 seconds):
./scripts/check-mining.sh
Resetting the Subnet If Mining Does Not Start
Error:
“Getting latest block
No block has been mined; please check if nodes are peering properly.”
If you encounter an above issue where the subnet is not mining, you can try resetting it with the following commands:
- Stop the subnet nodes:
docker compose --env-file docker-compose.env --profile machine1 down
- Remove any existing bootnode and chain data to ensure a fresh start:
rm -r bootnodes
rm -r xdcchain*
- Restart the subnet nodes:
docker compose --env-file docker-compose.env --profile machine1 up -d
This should reset the subnet and allow mining to begin.
3. Deploy Checkpoint Smart Contract (CSC)
docker pull xinfinorg/csc:v0.2.1
docker run - env-file contract_deploy.env - network generated_docker_net xinfinorg/csc:v0.2.1 full
4. Add CSC Configuration to common.env:
Copy the CHECKPOINT_CONTRACT output from Step 3 and add it to common.env.
Note: If you are running the subnet on a server, ensure you update the common.env file. Replace 127.0.0.1 with the server's IP address to ensure proper connectivity and functionality.
This step is critical for accessing the frontend and related services remotely.
To access common.env file enter:
nano common.env
5. Start services (relayer, backend, frontend)
docker compose - env-file docker-compose.env - profile services pull
docker compose - env-file docker-compose.env - profile services up -d
6. Confirm Subnet services through browser UI
- Frontend: http://127.0.0.1:5214
- Relayer: http://127.0.0.1:5215
Note: Replace 127.0.0.1 with the server's IP address to ensure proper connectivity and functionality.
Step 6: Verify Deployment and Access UI
Once deployment is complete, refer to the UI usage guide for managing and monitoring your subnet’s operational aspects.
Your XDC-based private chain or subnet is now ready for testing or production use, depending on your configuration and setup.
Additional Resources and Tools
For more advanced development and monitoring capabilities, consider leveraging tools like:
- XDC Subnet Official Documentation
- Coderun.ai: An AI-powered developer tool that provides enhanced coding and debugging support, making blockchain development more efficient.
- XDC Documentation: For further insights and advanced configuration options, visit the XDC Documentation.
Conclusion
Deploying an XDC-based private chain or subnet allows projects to benefit from greater control, enhanced privacy, and scalability within the XDC ecosystem. By following this step-by-step guide, you can create a customized subnet suited to your unique project requirements. XDC subnets are ideal for enterprises and developers seeking a private, highly scalable blockchain solution integrated within the XDC Network.


Discussion (1)