What is the safepal s1 Hardware wallet?
SafePal is a cryptocurrency wallet launched in 2018 that helps users to protect and grow their digital assets. SafePal provides hardware and software wallets, all paired and managed through the SafePal App, and was the first hardware wallet invested in and backed by Binance.
Before setting up your safepal S1 wallet, please make sure you have updated the latest firmware to V1.0.44. For more details check out here
Link to buy Safepal s1 wallet https://store.safepal.com/safepal-s1-hardware-wallet.html
XinFin XDC Network CoFounder Mr. Ritesh Kakkad has also advice to keep assets under control with private key and not with exchange https://twitter.com/riteshkakkad/status/1591840908097486851?s=20&t=aYdYplQBCW54kBC-FLjYhw
So let’s start with activate our safepal S1 wallet
Step 1 Start the authentication.
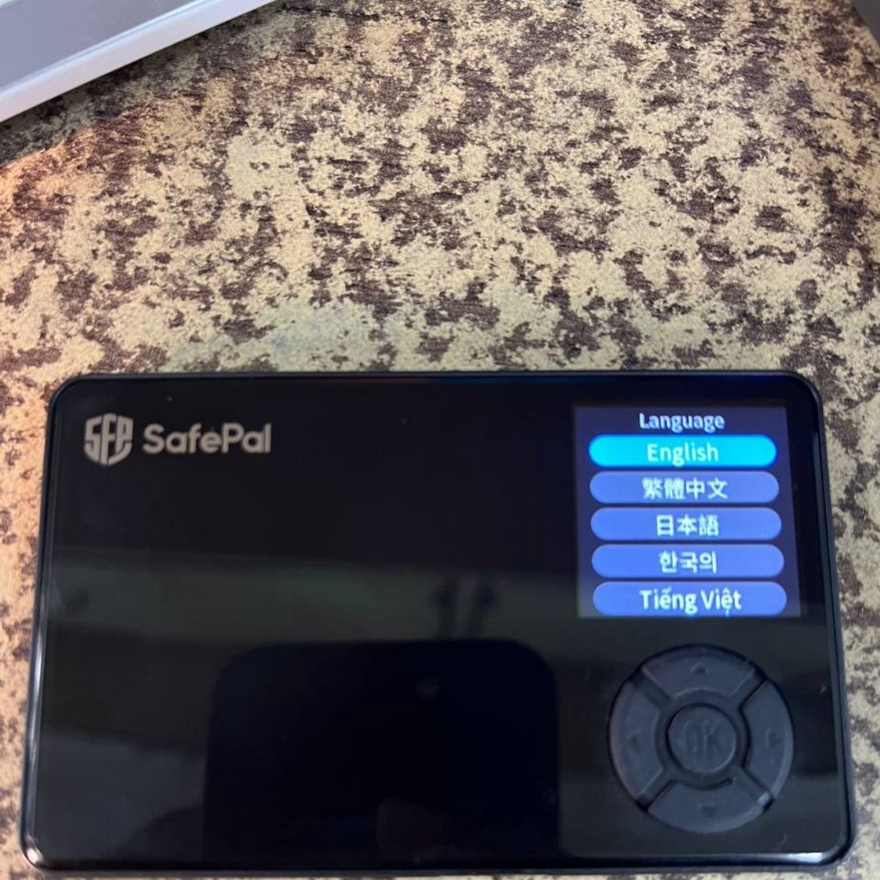
When you start the SafePal hardware wallet, the first step is to select a language.
After doing so, you will see the “Device Authentication” interface. By clicking ‘Next,’ you will see a unique QRcode shown on your S1 device.

Step:- 2 Use the browser on your cell phone to scan the QR code shown on the S1 device. The QRcode will redirect you to a verification page. On the S1 device, click the OK button to enter the next step, where you will see a 6-digit code randomly generated by the S1 device. Enter the 6-digit verification code to the verification page opened on your mobile browser.
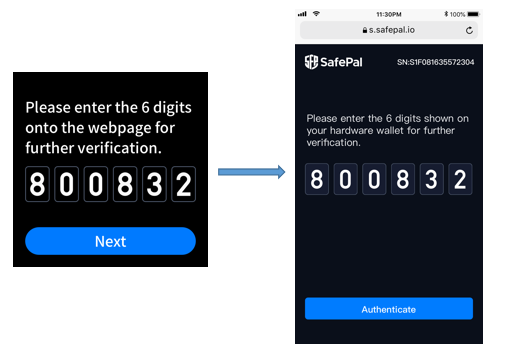
Step3:- Get the authentication result
By entering the verification code on the cellphone browser and click ‘Authenticate’, you will see the authentication result. If the result shows that the device is a genuine device and has never been used, then congratulations, your device is safe to use! If you are seeing a different result instead, please contact us for further assistance.

Step 4 Activate the device
On the S1 device, click ‘Next’, and scan the QRcode shown on the result page to activate the S1 hardware wallet. The activation process might take a few minutes. Please wait patiently. Once the activation completes, you can then go on to set up the S1 hardware wallet.
Setting up S1 hardware wallet
Once you have verified your S1 hardware wallet as genuine and safe to use, you can then set up the device by creating a new wallet or recovering an existing wallet in it.
On the S1 device, you will see an option to choose between ‘Create New Wallet’ or ‘Recovery My Wallet’.

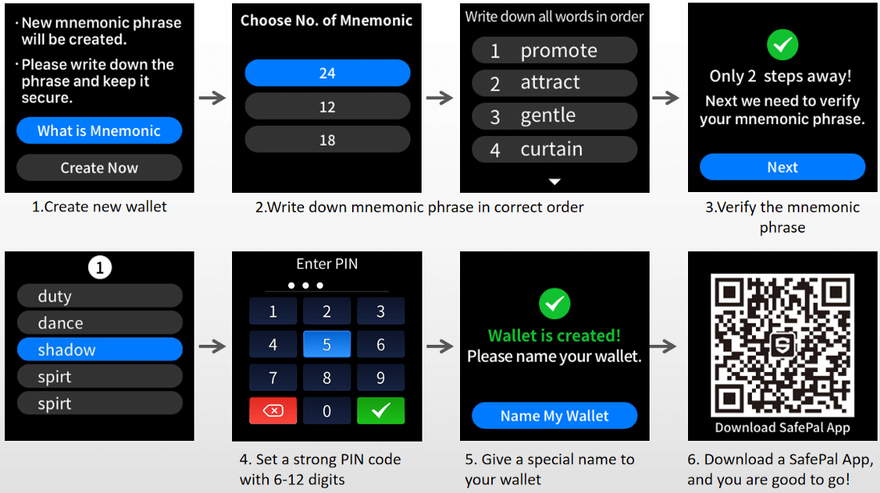
Create New Wallet
The following pictures show the step-by-step process of creating a new wallet on the S1 hardware device:
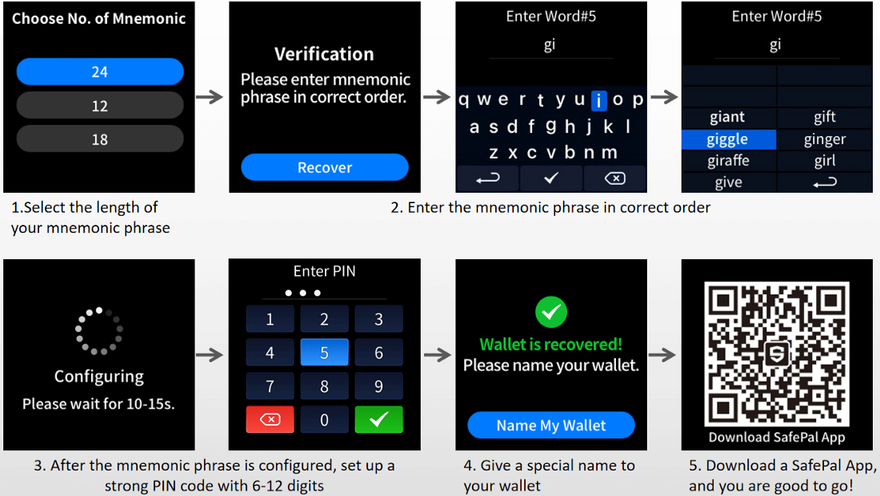
Recover My Wallet
The following pictures show the step-by-step process of recovering an existing wallet on the S1 hardware device:
Pair the S1 device with the SafePal App
Since the S1 hardware wallet is an offline device, it is not able to communicate with the internet or blockchain to send or receive XDC. For it to sign a XDC transfer or authorize a DApp login, an S1 hardware wallet needs to be paired with the SafePal App so that the SafePal App can broadcast the crypto transfer or pull data from the blockchains or DApps. Thus your private key never leaves the offline S1 device and is safely protected.
Therefore, after setting up the S1 hardware wallet, the last step is to pair the S1 device with the SafePal App
Step 1 Download the SafePal App link to the android and IOS wallet.
Step 2 Configure the security settings of the SafePal App
If this is the first time you use the SafePal App, it will take you a few minutes to complete the security settings on the SafePal App, including setting a Security Password, fingerprint, and Pattern.
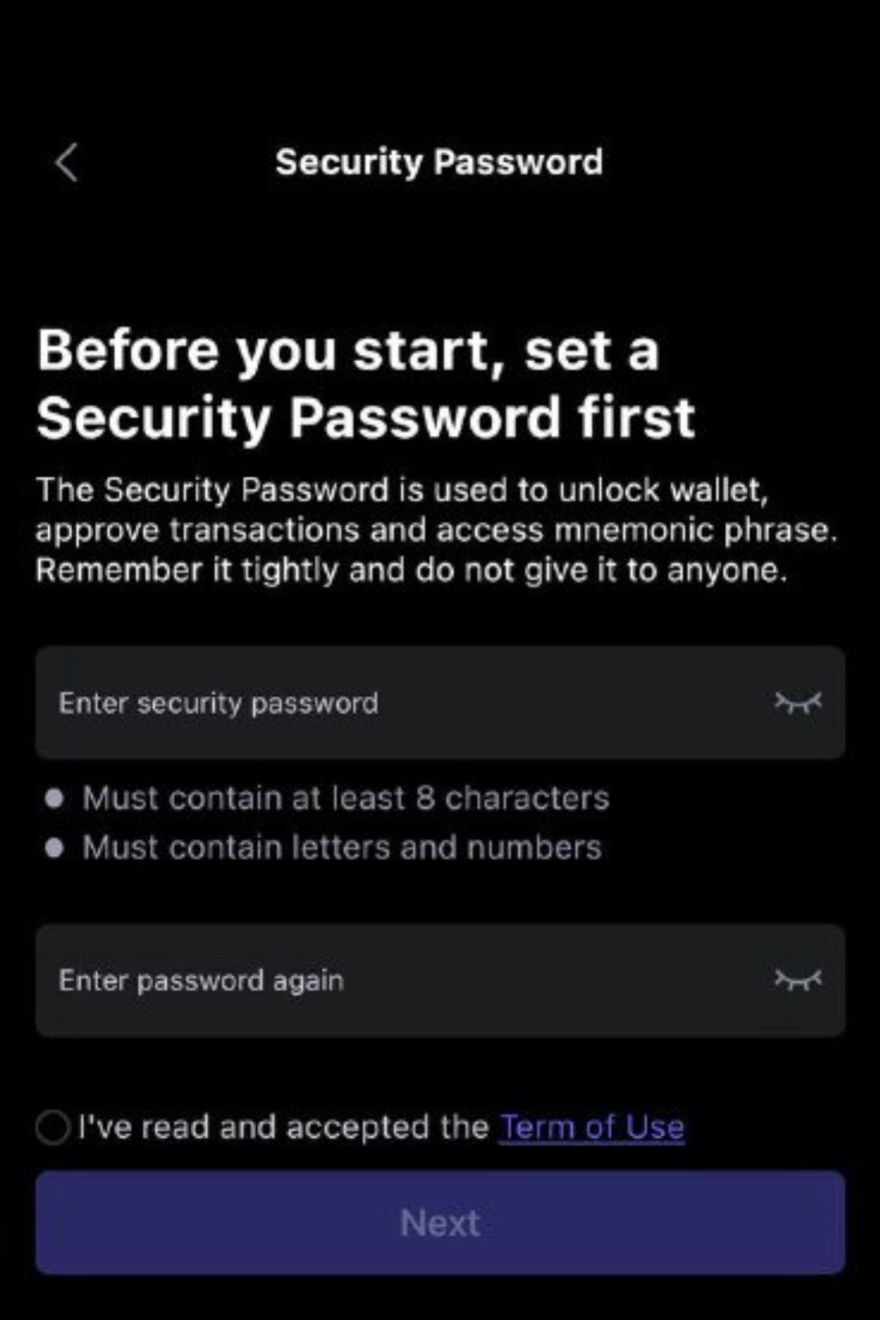
Follow the instructions on the application and it should be a fairly easy process.
Step 3 Enter the hardware wallet pairing process
After setting up the SafePal App, you can then choose to add a Software Wallet or a Hardware Wallet. In this case, choose ‘Hardware Wallet’.
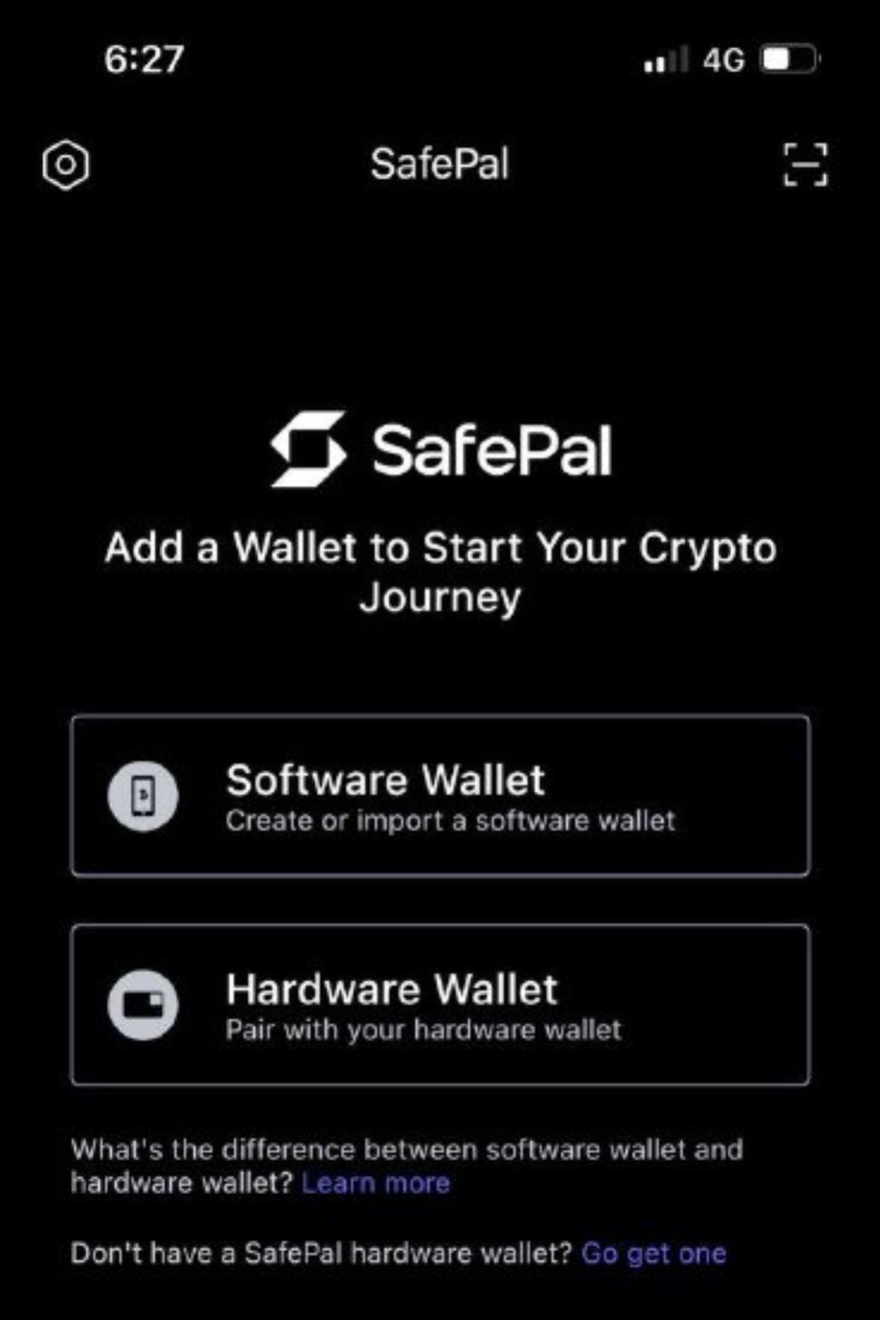
Read the instructions on the SafePal App, and click ‘Next’.
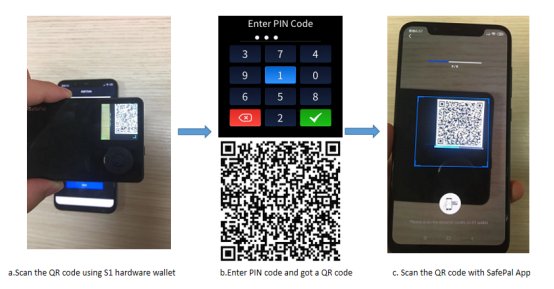
Step 4 Use the S1 device to scan the QRcode on the SafePal App
By entering the pairing process, you will see a QRcode on the SafePal App. Open the S1 hardware wallet, and click ‘Scan’ on the device. Then use the S1 device to scan the QRcode shown on the SafePal App. By doing this, the App can successfully build a connection with the S1 device. Then enter the PINcode on the S1 device to authorize the connection.
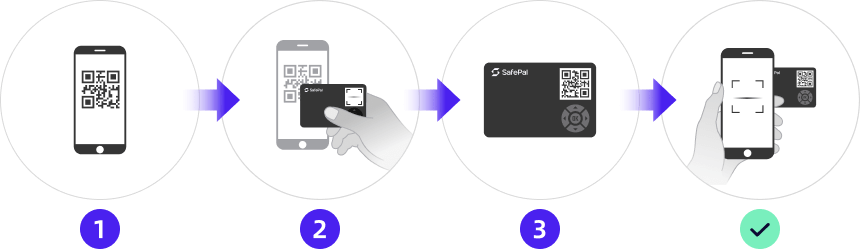
Step 5 Use the SafePal App to scan the QR codes on the S1 device and pair them together
After entering the PINcode on the S1 device, the device will display a set of dynamic QR codes on its screen. On the SafePal App, click ‘Next’ and it will open the cellphone camera. Use the SafePal App to scan the dynamic QR codes on the S1 device. Once the scan completes, the S1 device and the SafePal App are paired!
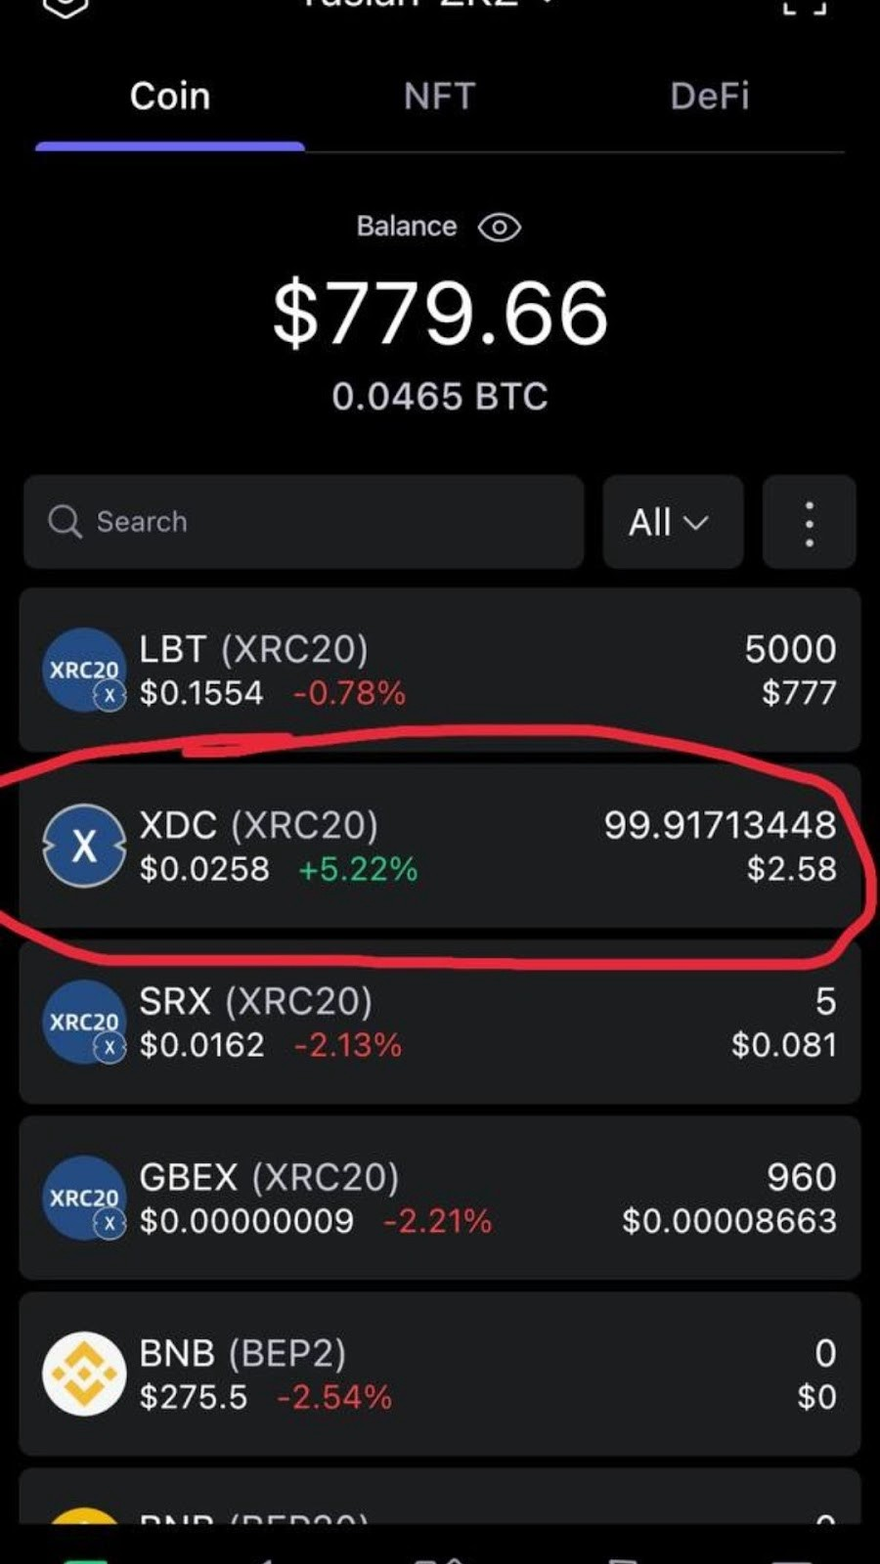
Adding XDC Network on your safepal S1 wallet
If you have recovered an existing wallet into the S1 hardware device, by pairing the SafePal App and the S1 device together, you can already view the XDC or XRC-20 tokens on the SafePal App. In this case, there is no need to manually add the XDC Network again because the App will automatically pull the balances of the XDC or XRC-20 assets from the XDC blockchain.
If you have created a new wallet on the S1 device and paired the S1 device with the App instead, then you might want to manually add some coins or tokens into the wallet so that you can start receiving XDC using the wallet.
Example A: If you have added XDC in the S1 hardware wallet, it means that the S1 device has already activated the signing algorithm for all the XRC20 tokens as well, and you don’t need to manually add any XRC20 token issued on XDC Network to the wallet anymore.
Example B: If you want to add CGO (XRC20) into the asset list, simply add XDC coin to the S1 hardware wallet, then you are able to sign any transfer of a XRC20 token with the S1 hardware wallet.
The following shows how to add a native coin to the S1 hardware wallet, using XDC as an example:
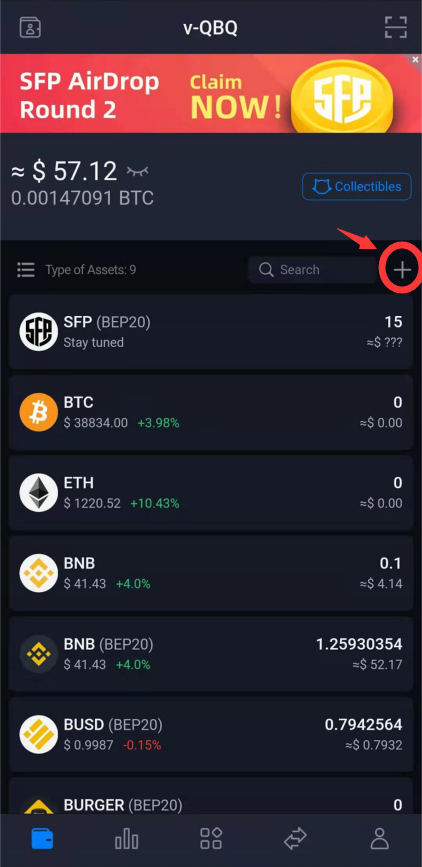
Step 1 Open the SafePal App and click the edit button as shown in the picture below
Step 2 Select all the coins you want to add, and click ‘Add Coin’ at the bottom
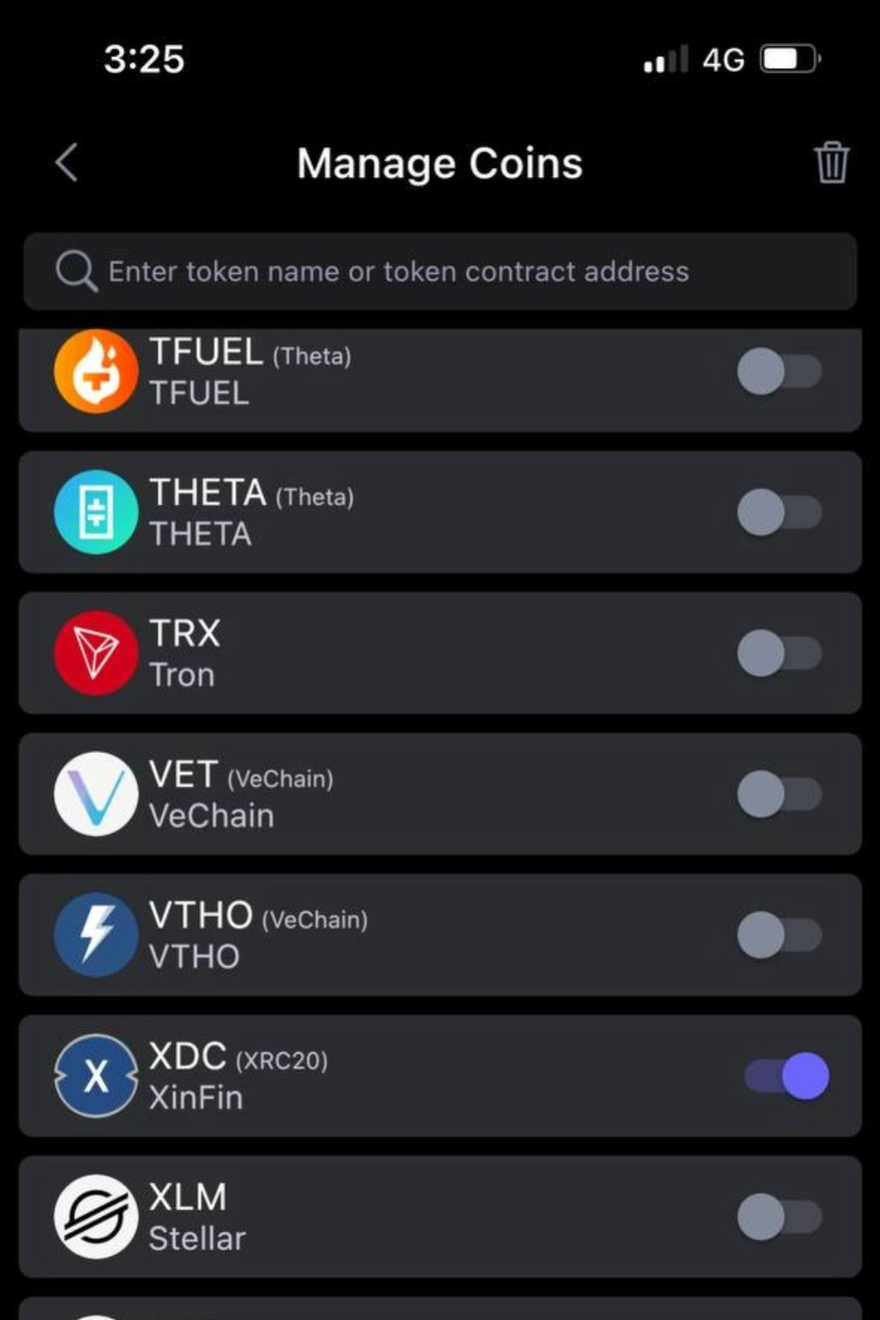
Step 3 Scan back and forth between the App and the S1 hardware wallet (just like how you pair the device and the App together in the last step) so that the data is correctly synchronized between the App and the device.
Step4: Then the XDC has been successfully added and you can view them in the ‘Asset Management’ tab on the S1 device.
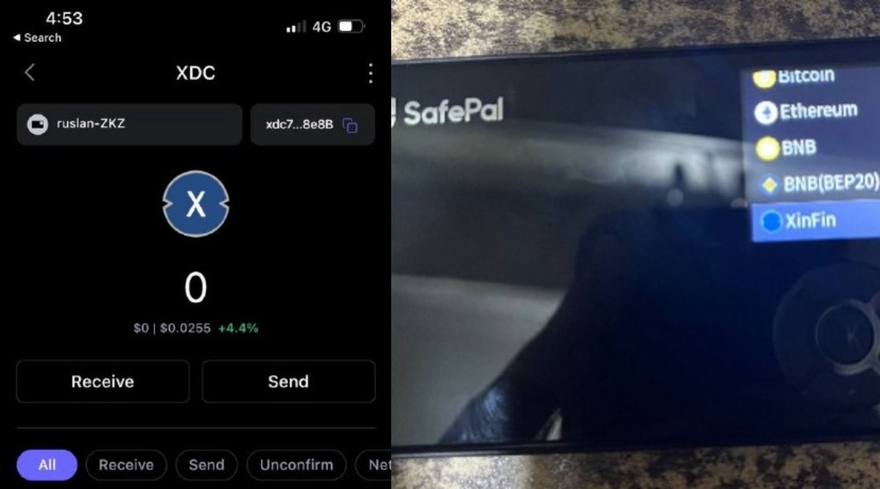
Step 5 Launch your S1 and navigate to Asset Management, select XDC as you would like to receive from others.
Step 6 Select ‘Receive’
Step 7 Enter your PIN code of the S1.
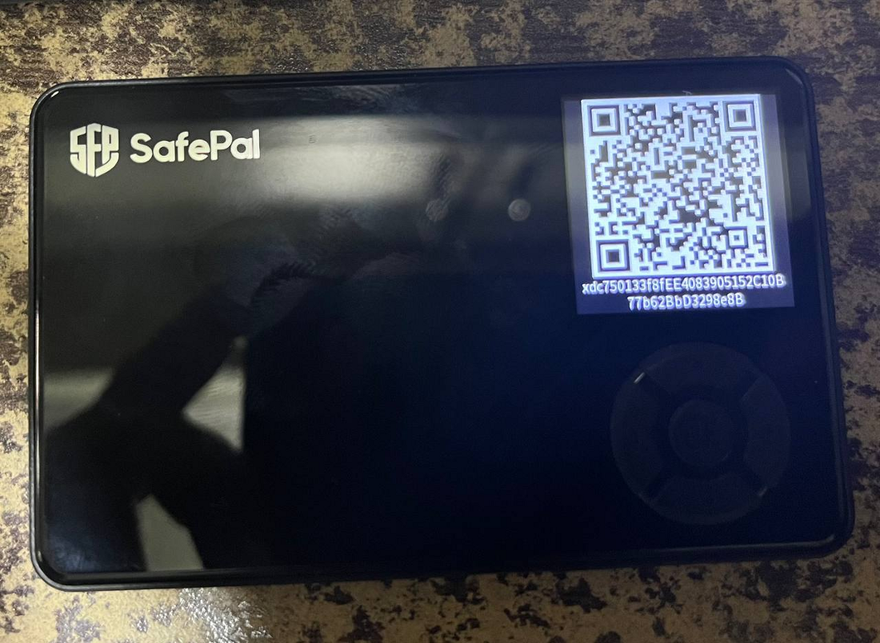
Step 8 Then you can see the QR code of your coin address, and show it to others so that they can scan and send the coin to you.
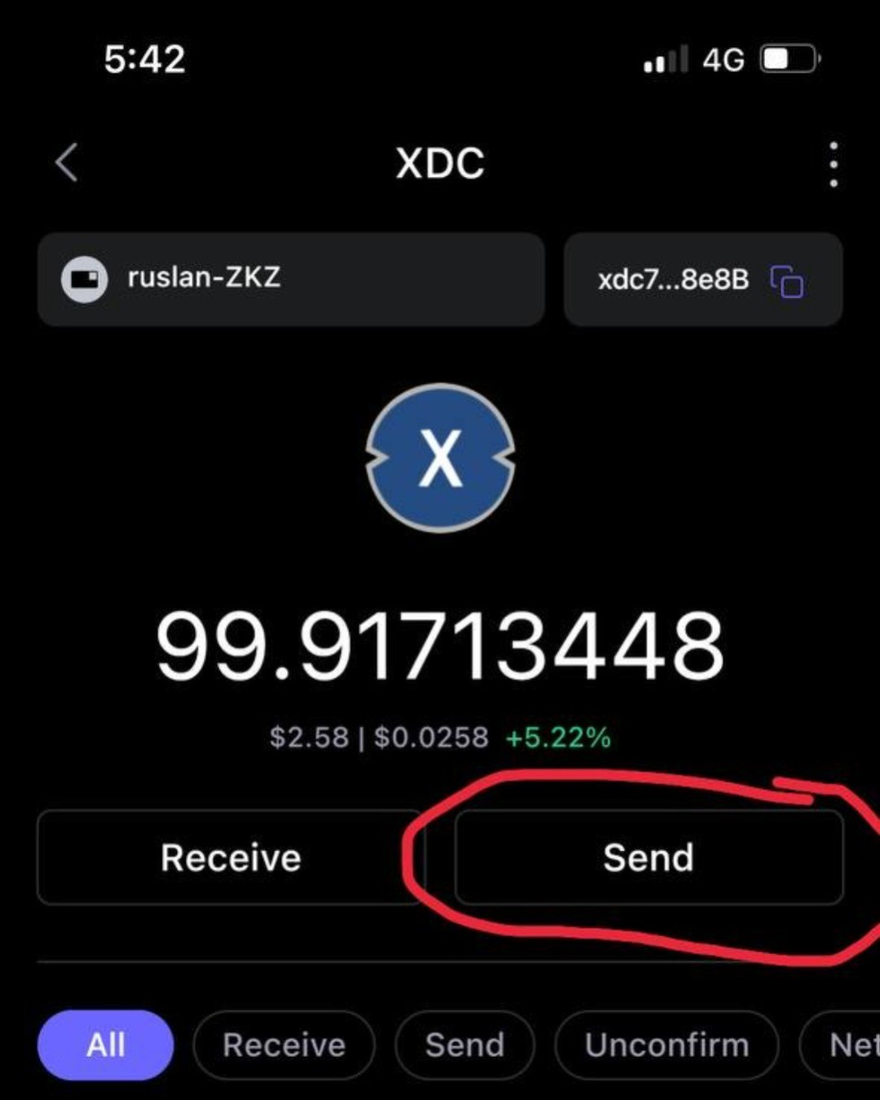
How to Send XDC with a S1 Hardware Wallet
Step 1 On the SafePal App, choose the XDC as you want to send, and click ‘Send’.
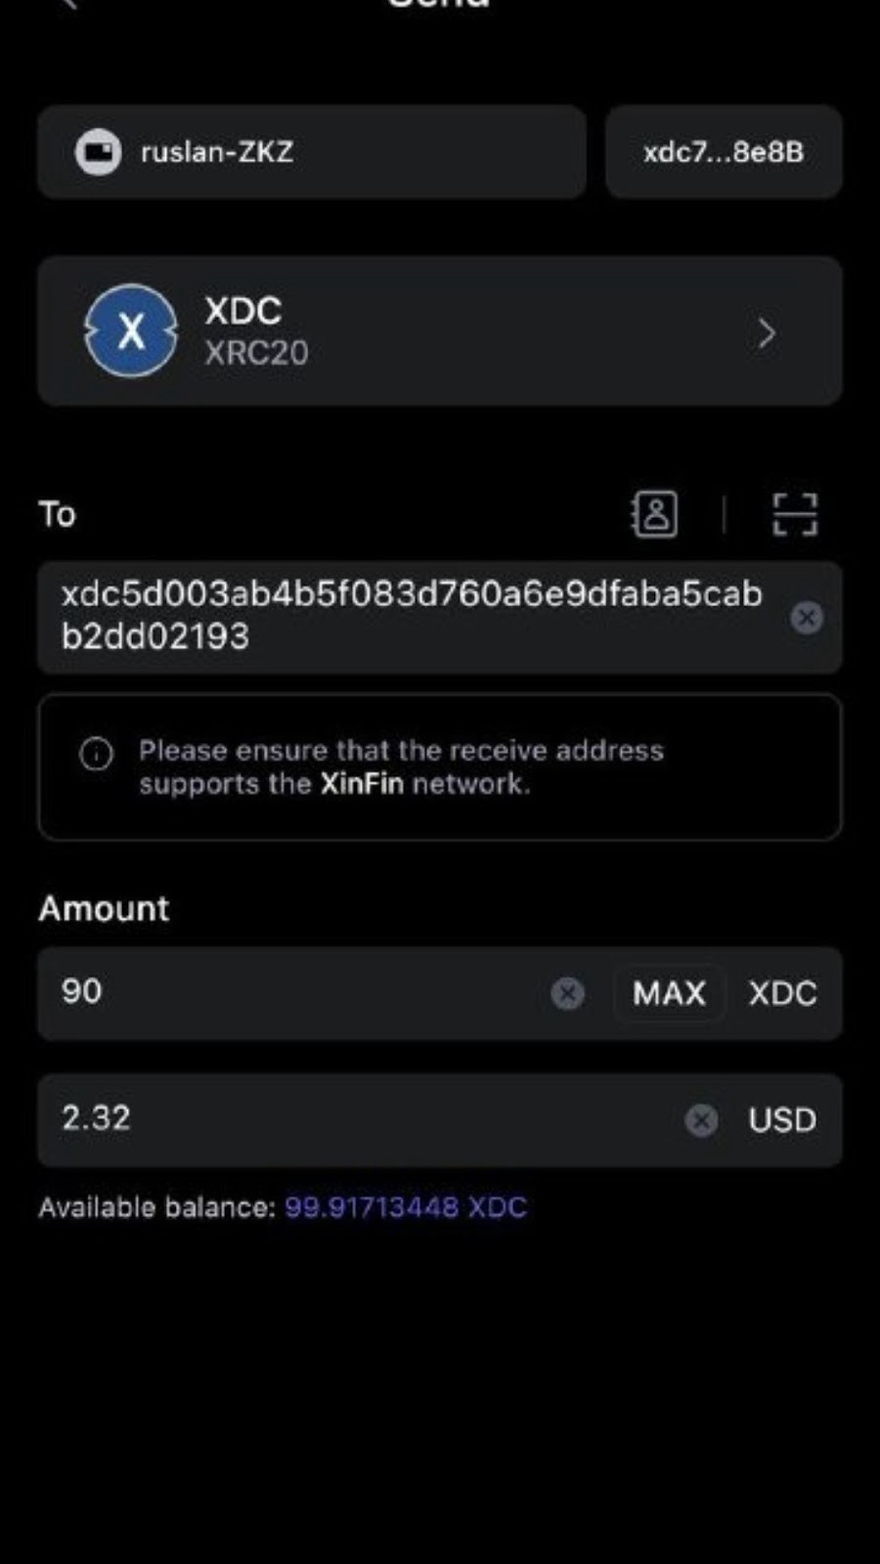
Step 2 Enter the destination address and amount and click ‘Next’ to confirm the details again.
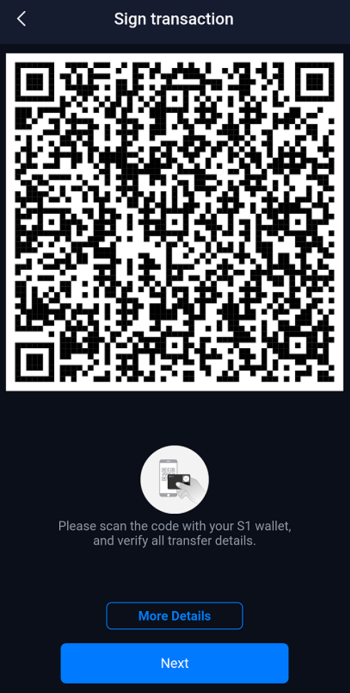
Step 3 Initiate the signing process of the S1 device
Once you have confirmed the transfer details, click ‘Send’ on the App.
There will be a QRcode containing the transfer details displayed on the SafePal App. Start your S1 hardware wallet, and enter the ‘Scan’ tab. Then use the S1 hardware wallet to scan the QR code on the SafePal App.
By doing this, the S1 device can receive the transfer details in an offline and air-gapped environment.
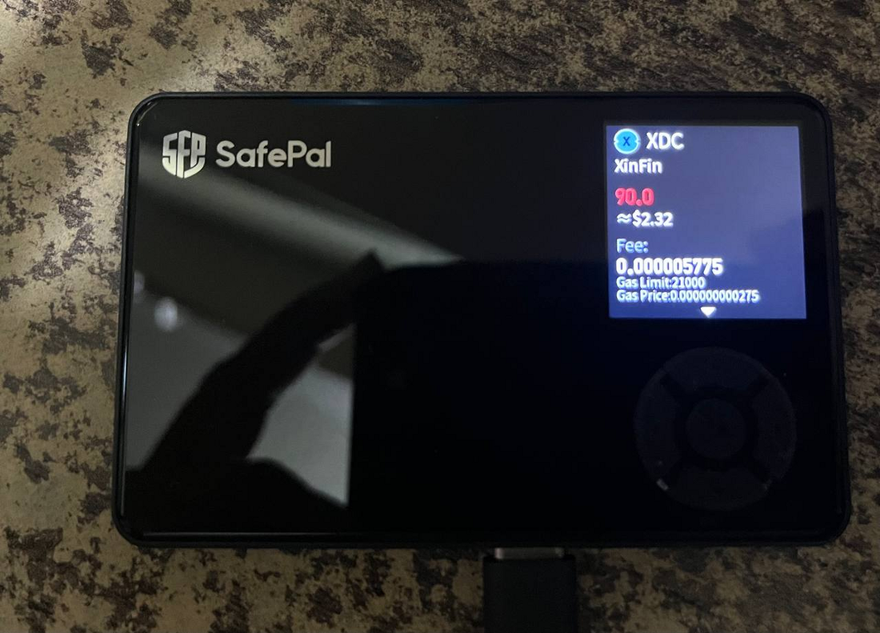
Step 4 Sign the transfer on S1
Now you can see the transfer details on the S1 device. Check the details again, and enter the PIN code.
Step 5 Synchronize the signature back to the SafePal App
By singing the transfer on the S1 device, you will see a set of dynamic QR codes shown on the S1 device. On the SafePal App, click ‘Next’ to open the cellphone camera.
Use the SafePal App to scan the dynamic QR codes shown on the S1 device.
By doing this, the App will receive the signature contained in the QR codes and be ready to broadcast the transfer to the XDC blockchain.
Step 6 Click ‘Broadcast’ on the App and wait for the transfer to go through
Once the App receives the signature from the S1 device, there will be a pop-up message asking if you would like to broadcast the transfer. Click ‘Broadcast’, and the transfer is now broadcast on the blockchain!
Don’t forget to check in your App and see if the transfer goes through successfully.
If you have any questions regarding the XDC Network please feel free to post it ion https://xdc.dev


Discussion (1)
Good morning everyone,
I own a hardwallet SafePal A1S,
I can't see my wallet on this device, I only display it on the application installed on the smartphone .
Can you help me?
Thank you