In the world of blockchain, the creation of tokens is essential for launching decentralized projects, powering DApps, and facilitating transactions. While creating tokens can often be a technical challenge, the Token Deployer simplifies the process, making it accessible to both experienced developers and newcomers to the blockchain space. Whether you're looking to create XRC20 tokens or deploy an XRC721 NFT collection, the Token Deployer provides an easy-to-use platform that handles the complexity behind the scenes.
In this guide, we’ll walk you through the process of deploying both XRC20 tokens and XRC721 NFT collections on blockchain networks like XDC, helping you bring your digital assets to life.
XRC20 Token Deployer:
The XRC20 Token Deployer is an intuitive tool that allows anyone to create and launch their own XRC20 tokens on blockchain networks, such as XDC. The deployer streamlines the process, removing the need for technical expertise. Here’s how you can use it to deploy your XRC20 token.
Step 1: Connect Your Wallet
To begin, you’ll need to connect your cryptocurrency wallet. The deployer supports MetaMask, a popular browser-based wallet that offers secure and seamless access to blockchain networks. By connecting your wallet, you ensure that the token is deployed from your personal address, giving you full control over your newly created tokens.
Step 2: Fill Out the Token Details
Next, enter the following basic details about your token:
Name: The full name of your token (e.g., "Deployer Token").
Symbol: A short abbreviation that represents your token (e.g., "DPTKN").
Supply: The total number of tokens you wish to create (e.g., 1,000,00 tokens).
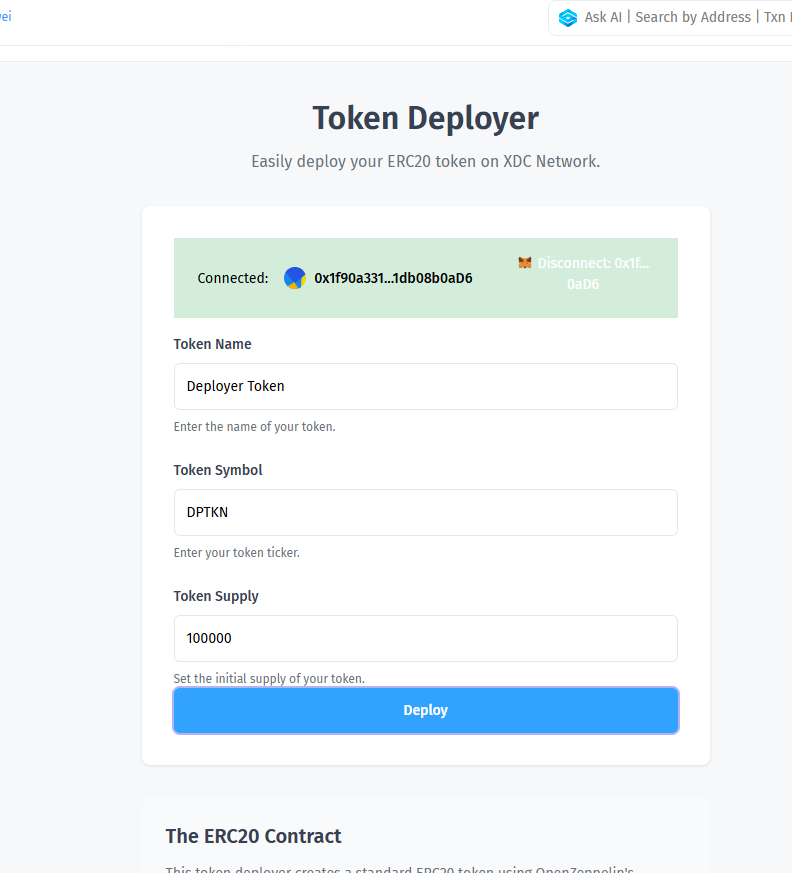
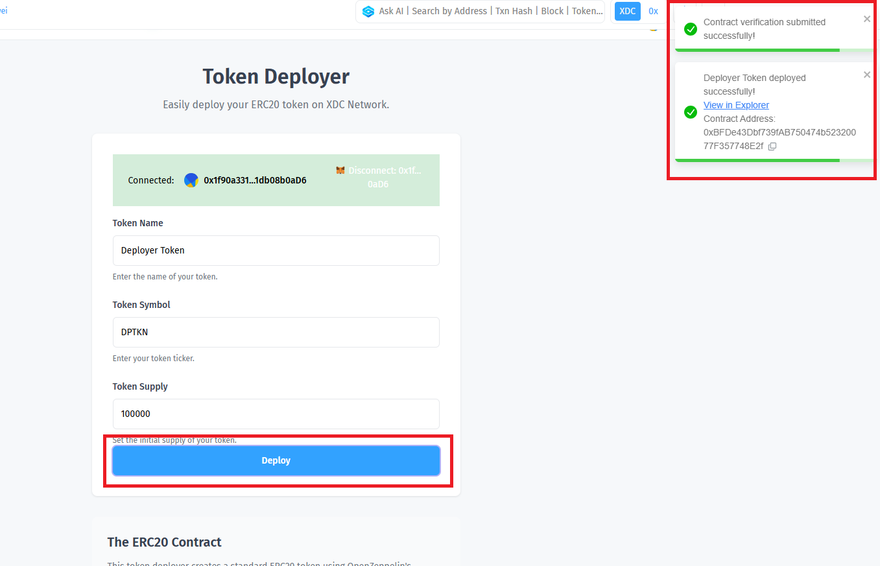
Step 3: Deploy the Token on the XDC Network
Once you've filled in the details, click the "Deploy" button. The backend process works as follows:
How things work in backend
The deployer automatically generates a smart contract tailored to your token specifications.
It sends a transaction to the blockchain, deploying your token’s smart contract.
After the transaction is confirmed on the blockchain, your XRC20 token built on XDC Network is officially live and ready to use.
Benefits of Using the XRC20 Token Deployer
Here’s why the XRC20 Token Deployer is a game-changer:
Ease of Use: The user-friendly interface eliminates the need for technical skills, making token creation accessible to everyone.
Security: By using a secure wallet like MetaMask, you maintain full control over your tokens and their deployment.
Speed: In just a few clicks, your token is live on the blockchain, saving time compared to manually developing smart contracts.
Customization: You can define key token details such as name, symbol, and supply, tailoring your token to your specific needs.
XRC721 NFT Collection Deployer:
The XRC721 NFT Collection Deployer is a tool designed to make it easy for you to create and deploy your own NFT (Non-Fungible Token) collection. Using this deployer, you can launch a unique NFT collection on XDC Network Blockchain, without needing to know how to write smart contracts.
Steps to Deploy Your NFT Collection
Step 1: Connect Your Wallet
Similar to the XRC20 Token Deployer, the first step is to connect your cryptocurrency wallet. The deployer integrates with MetaMask, which provides the ability to interact with the blockchain and manage your NFTs. Connecting your wallet ensures that the NFT collection is deployed from your address, giving you full control over it.
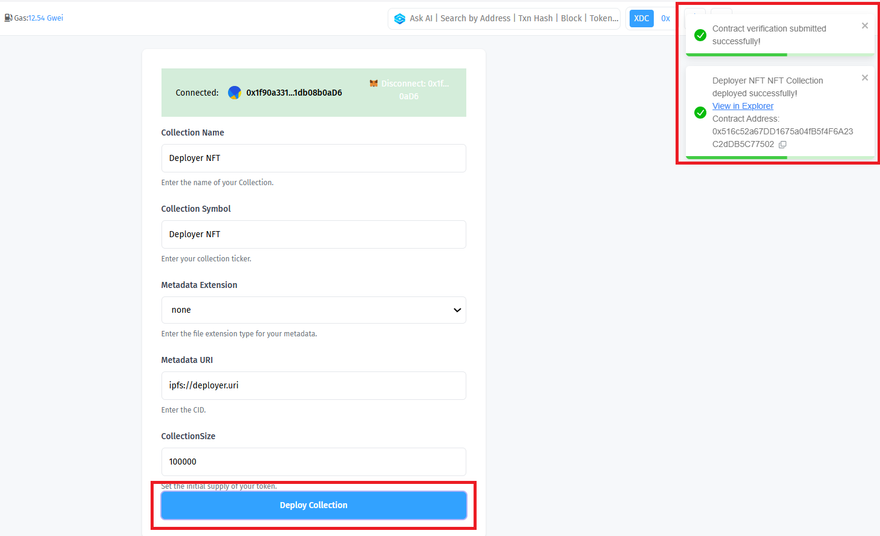
Step 2: Provide Collection Details
Fill in the following details for your NFT collection:
Name: The full name of your NFT collection (e.g., "Deployer NFT").
Symbol: A short abbreviation (e.g., "Deployer NFT").
Metadata Extension: The file extension for your metadata files (e.g., ".json").
Base URI: The location where the metadata for your NFTs is stored (e.g., an IPFS link).
Collection Size: The total number of NFTs you want in your collection.
These details define the core characteristics of your NFT collection, ensuring proper functionality.

Step 3: Deploy Your Collection on the XDC Network
After entering the collection details, click the "Deploy Collection" button. Here's how the backend works:
How things work in backend
The deployer automatically generates a smart contract for your NFT collection based on the information you provided.
It sends a transaction to the blockchain network to deploy the contract.
Once the transaction is confirmed, your NFT collection is live and ready for minting or distribution.
Why Use the XRC721 NFT Collection Deployer?
The XRC721 NFT Collection Deployer offers several key benefits:
Ease of Use: The interface is simple and intuitive, making it accessible to anyone, even those without coding expertise.
Control: By deploying from your wallet, you retain full ownership and control over your NFT collection.
Speed: You can deploy your NFT collection in just a few clicks with minimal setup.
Blockchain Standards: Your NFT collection adheres to the XRC721 standard, ensuring compatibility and reliability with other systems and marketplaces.
Contract Interactor
Simplifying Blockchain Smart Contract Testing. The Contract Interactor is a versatile tool designed to simplify the process of interacting with Solidity-based smart contracts, such as XRC20 tokens and XRC721 NFTs. This tool makes exploring and testing smart contract functionalities easy and accessible for developers, testers, and blockchain enthusiasts alike.
Follow these steps to access and interact with a deployed smart contract using XDCScan:
Step 1: Visit the Contract Interaction Page
Go to the Contract Interaction page on XDCScan:
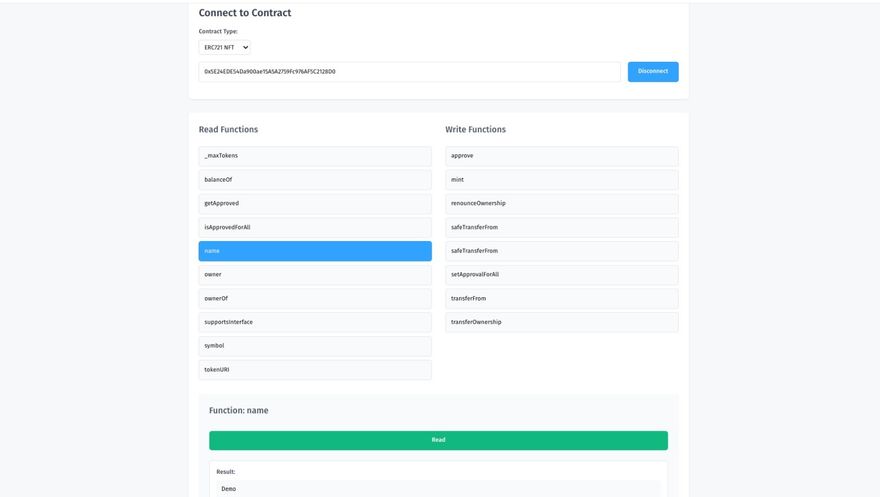
Step 2: Enter Your Contract Address
In the provided input field, paste the contract address of the deployed smart contract you want to interact with.
Ensure that the contract is verified to enable interaction.
Step 3: Access Contract Functions
After entering the contract address, you’ll see available functions like:
- owner() – View contract owner
- name() – Get contract name
- balanceOf(address) – Check token balance
- totalSupply() – View total token supply
Key Features
Seamless Contract Connection: Simply input the contract’s address to connect. The Contract Interactor fetches the ABI dynamically, enabling easy access to all contract functions.
Dynamic Function Selection: Browse and select from available read and write functions, automatically listed based on the contract ABI. Inputs are dynamically generated for ease of use.
Real-Time Feedback and Results: View instant feedback on your interactions, including success responses and detailed error messages for efficient testing.
Error Handling Made Simple: The tool provides robust error detection, guiding users through successful interactions while helping identify potential issues clearly.
For more insightful articles and guides, stay connected and follow us on various platforms. Happy coding! 🚀
Please Follow👇


Discussion (0)