Verifying your smart contract on a blockchain explorer is an important step to ensure transparency and trust. By verifying the source code of your smart contract, users can view the contract logic, fostering a more open and secure ecosystem. This guide will walk you through the process of verifying a smart contract deployed on the XDC Network using standard input JSON on XDCScan.
Why Verify Your Smart Contract?
Verifying your smart contract on XDCScan allows anyone to view the exact code you deployed on the XDC blockchain. This brings several benefits:
- Transparency: Users and developers can inspect your contract's logic, improving trust.
- Security: Verifying code enables users to ensure that there are no malicious or hidden features in the contract.
- Ecosystem Participation: Verified contracts become part of the public ecosystem, enabling tools such as decentralized finance (DeFi) applications and wallets to interact with your contract more easily.
Prerequisites
Before you proceed with verifying your smart contract, make sure you have the following:
- Contract Source Code: The original source code of your smart contract, usually written in Solidity.
- ABI (Application Binary Interface): Automatically generated when you compile your smart contract.
- Compiled Contract Code: The compiled bytecode of your smart contract.
- Standard JSON Input File: Generated by Solidity during compilation.
Step-by-Step Guide to Verify Your Smart Contract on XDCScan
Step 1: Navigate to XDCScan’s Contract Verification Page
- Open XDCScan, the XDC Network’s blockchain explorer.
- Enter your deployed contract address on XDCScan explorer, select the “Contract” tab and click on the "Verify And Publish" option. This will redirect you to the contract verification page.
Step 2: Enter the Contract Details
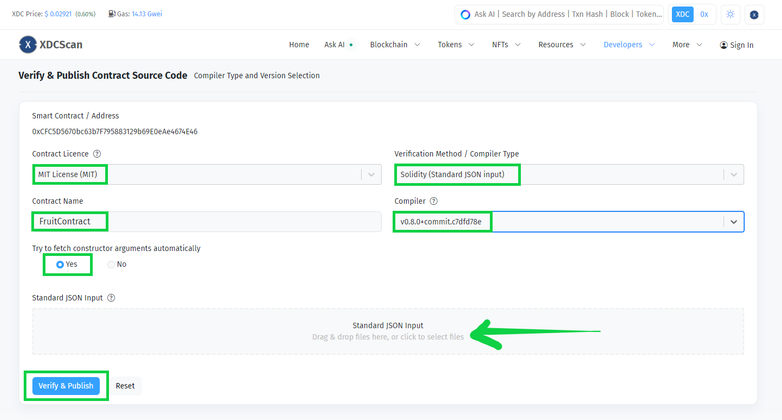
On the contract verification page, you’ll be prompted to fill in the following details:
- Contract Licence: Select the correct “Contract Licence” from the dropdwon.
- Compiler Type: Select "Solidity (Standard JSON Input)" from the available options.
- Contract Name: Specify the name of the contract as used during deployment.
- Compiler: Select the Compiler version, used during deployment.
- Try to fetch constructor arguments automatically: Select “Yes” or “No”.
Step 3: Create a standard input JSON file
Here first you need to create an empty JSON file, and then from there you need to go to the following file(in hardhat project) artifacts->build-info-> JSON file corresponding to your smart contract.
In Remix, We will use a COMPILERINPUT file generated by the compiler. You can find it in the “Compilation Details” tab (ensure that the correct contract is chosen).
Once you found the JSON file, copy the input value and paste into the empty JSON file you created.
Step 4: Upload the Standard JSON Input
- Choose the option to upload your standard input JSON file.
- Upload the JSON file generated during the contract compilation.
The JSON file contains all the necessary metadata, including the source code, ABI, and other details required for verification.
Step 4: Confirm and Verify
Once you’ve uploaded the file, review the information displayed on the page. Make sure the contract address, name, and compiler settings match the deployed contract.
Click the “Verify and Publish” button to complete the verification process.
Step 5: Verification Successful
If everything is correct, XDCScan will display a success message, and your contract will be verified on the platform.
Users can now view the source code, ABI, and other relevant details directly on XDCScan.
Troubleshooting Common Issues
If your contract fails to verify, here are a few common issues and their solutions:
- Compiler Mismatch: Ensure that the compiler version and optimization settings used during verification are the same as those used during deployment.
- Contract Name Mismatch: Double-check that the contract name entered during verification matches the one used in the source code.
- Incorrect JSON File: Verify that you are using the correct standard input JSON file generated during the contract’s compilation.
Follow us to know more updates:


Discussion (0)